How to change DNS to access Facebook is not blocked
How to change DNS to access Facebook is not blocked. Sometimes at work you use Facebook encounter lag or can not connect to Facebook, the reason may be because Facebook blocked your DNS. Do not worry, in this article I will guide
Table of Contents

It's undeniable that the influence on Facebook is very great, is the best social network to meet entertainment and work needs. Sometimes at work you use Facebook encounter lag or can not connect to Facebook, the reason may be because Facebook blocked your DNS. Do not worry, in this article I will guide you the simplest way to change DNS on your computer to access Facebook faster, without being blocked without any other software intervention.
Here I will guide how to change DNS for Windows 10, Windows 7 and Windows XP.
For Windows 10
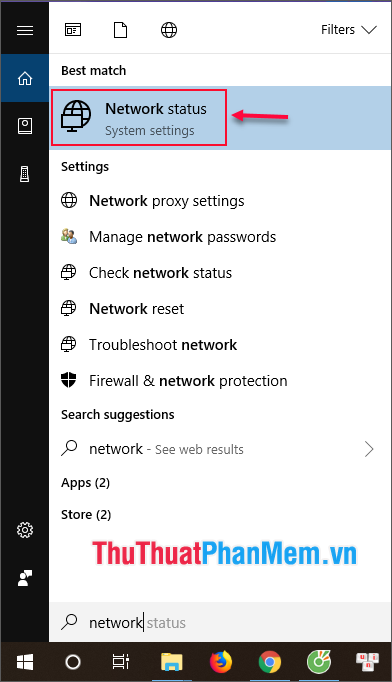
Step 1:
Go to Cortana (or press Window + S ) and search for ' Network '. After the search results, click on Network status .
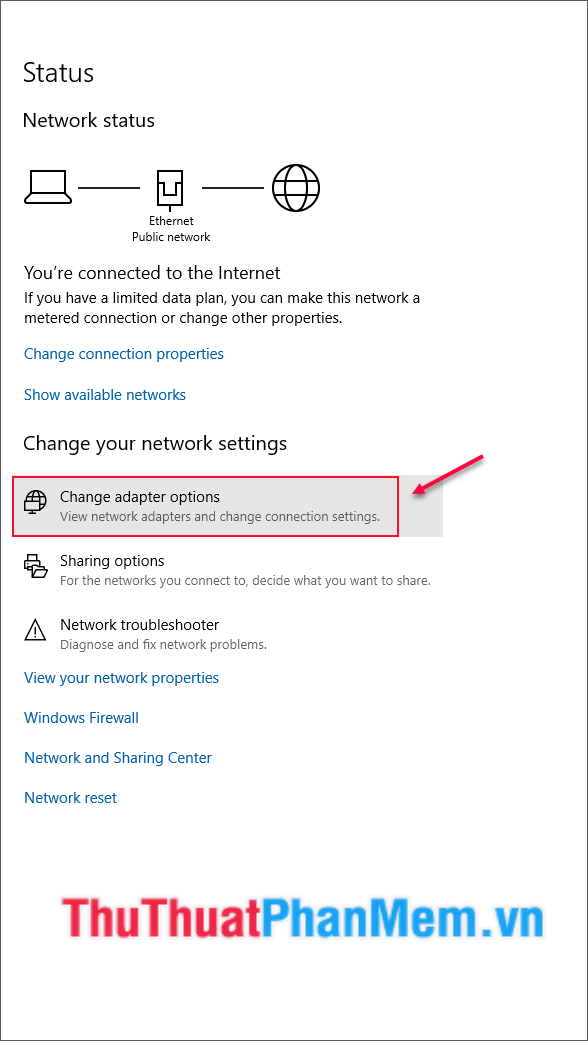
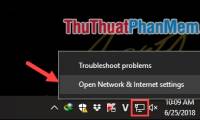
Step 2:
A table settings (Settings) appears, you click Change adapter options .
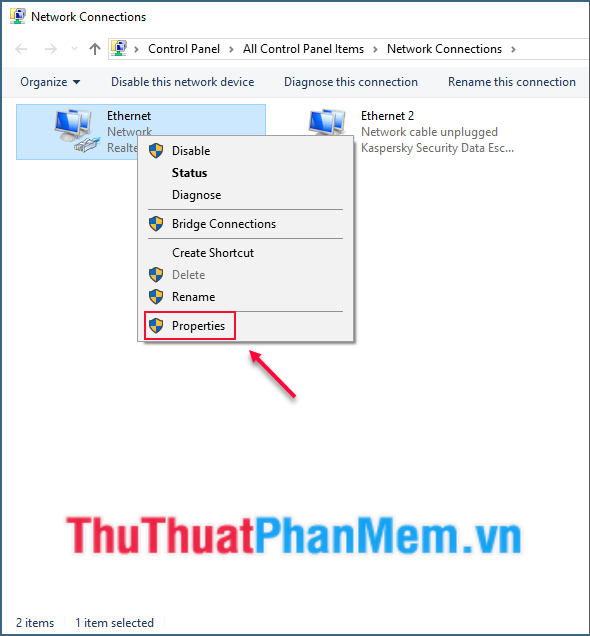
Step 3:
For computers using LANs, there will be an Ethernet icon, for computers using a Wi-Fi connection will have a Wi-fi icon (in my lesson using Ethernet), right-click and select Properties .
Step 4:
A new dialog box appears, find Internet Protocol Version 4 (TCP / IP) and then click Properties .

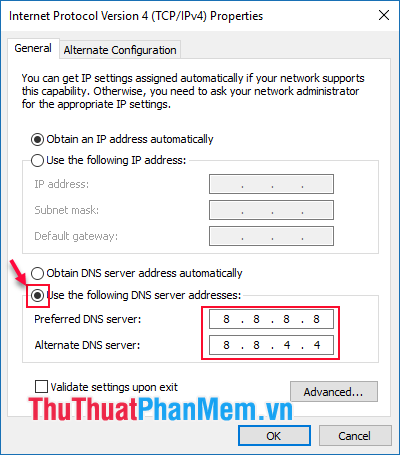
Step 5:
After the Internet Protocol Version 4 (TCP / IPv4) dialog box appears. Find the option Use the following DNS sever addresses and then add a new DNS address:
Preferred DNS server: 8.8.8.8
Alternate DNS sever: 8.8.4.4
For Windows 7
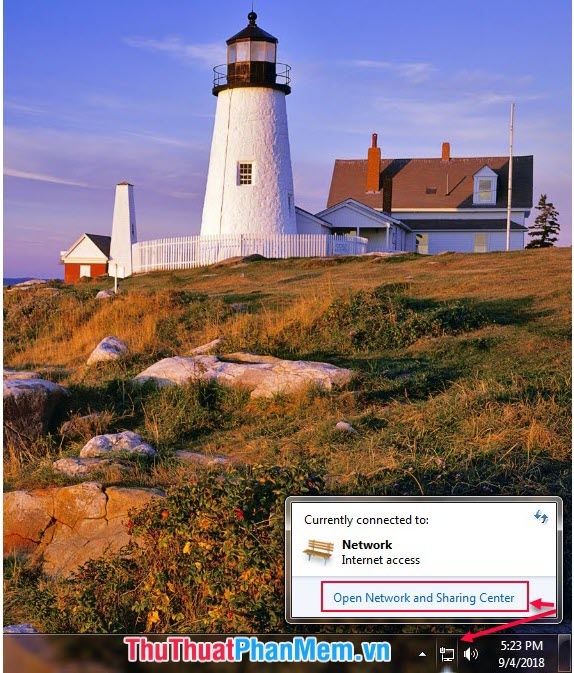
Step 1:
Click the Network icon in the lower right corner of the screen and select Open Network and Sharing Center .
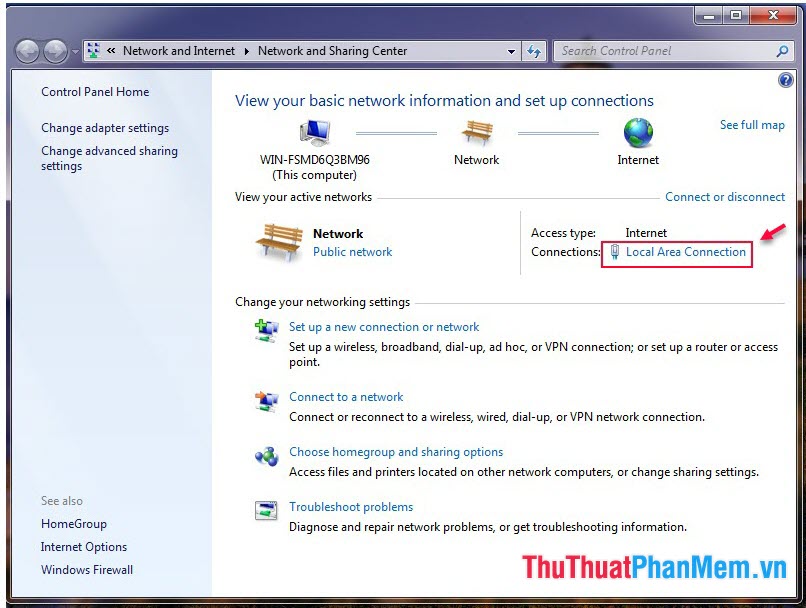
Step 2:
Click the Local Area Connection option under Connection or Wireless Network Connection for Wi-Fi connections.
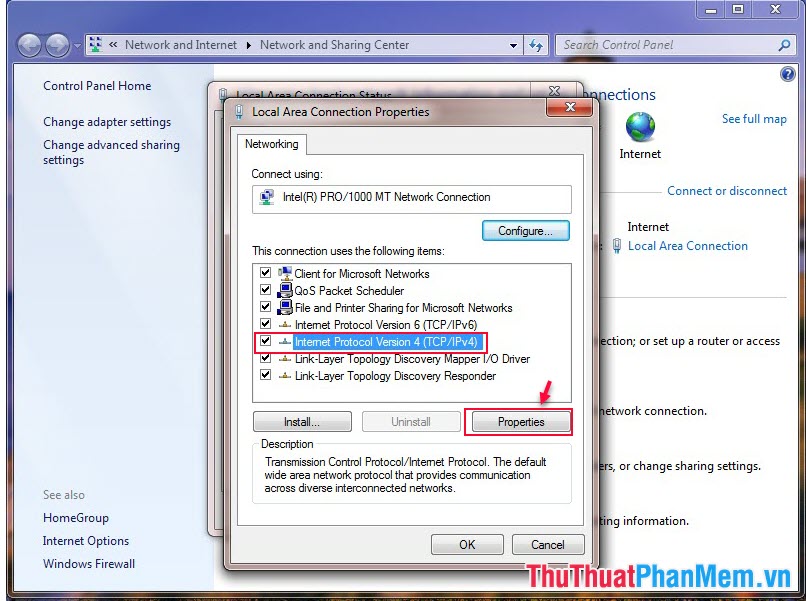
Step 3:
The Local Area Connection Status dialog box appears, click Properties .

Step 4:
Find Internet Protocol Version 4 (TCP / IPv4)
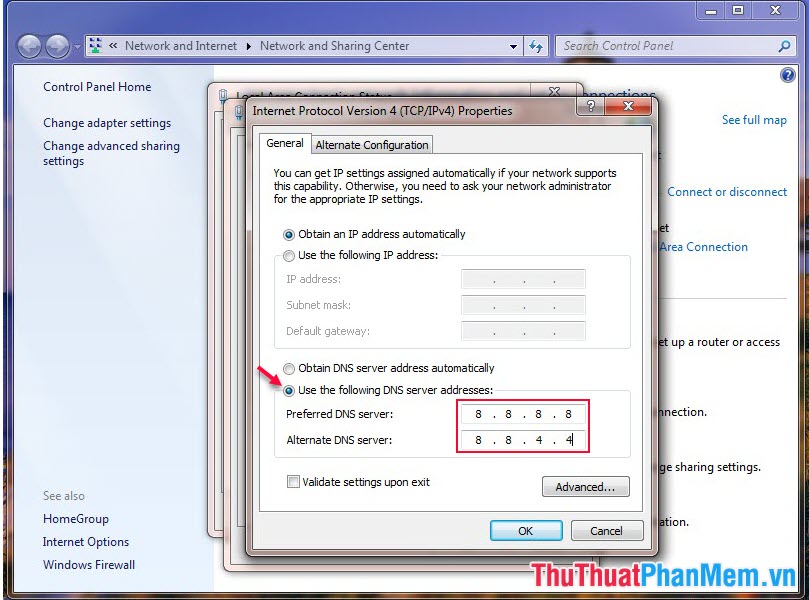
Step 5:
A new dialog box appears, tick the Use the following DNS sever addresses box
then add the following address:
Preferred DNS server: 8.8.8.8
Alternate DNS sever: 8.8.4.4
For Windows XP
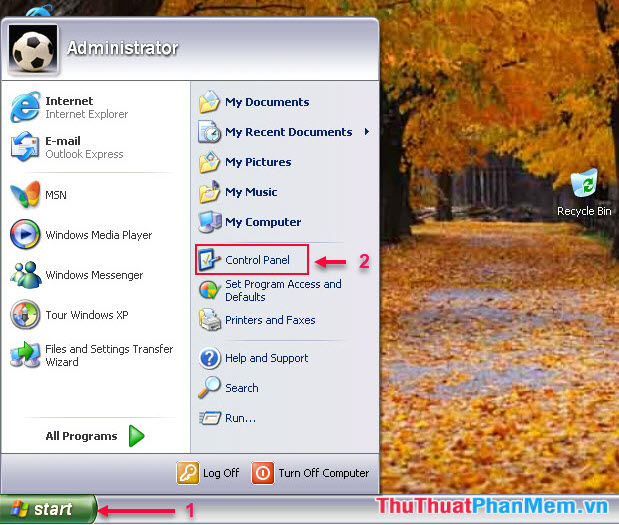
Step 1:
At Start (1) -> Control Panel (2)
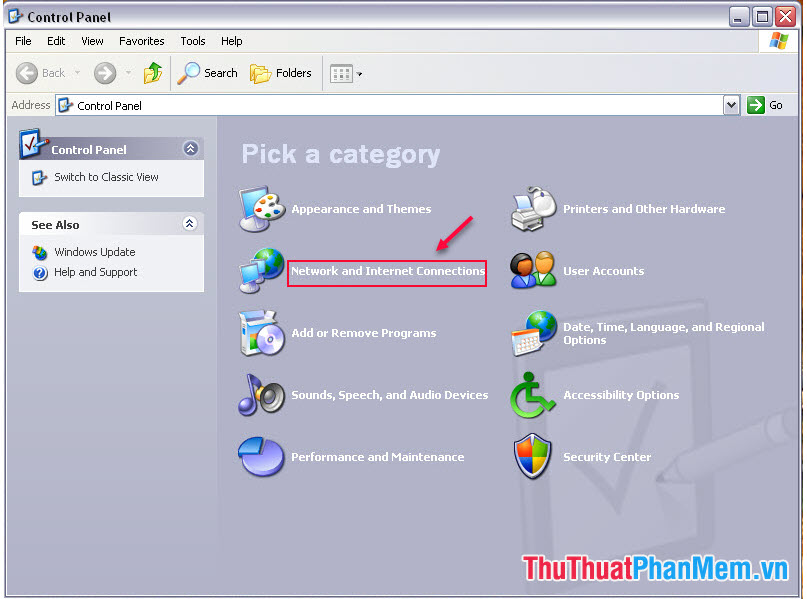
Step 2:
Click the Network and Internet Connections icon
Step 3: Select Network Connections .

Step 4: Right-click the Local Area Connection icon and then select Properties .
In my article I use a LAN - Ethernet connection, and with a Wifi connection will be an icon with the word Wireless Network Connection

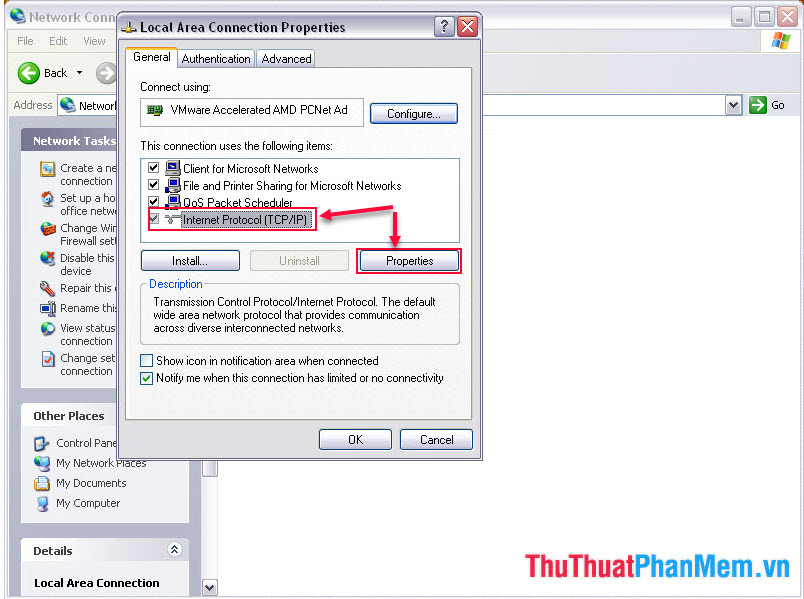
Step 5: Find down the Internet Protocol (TCP / IP) line and select Properties .
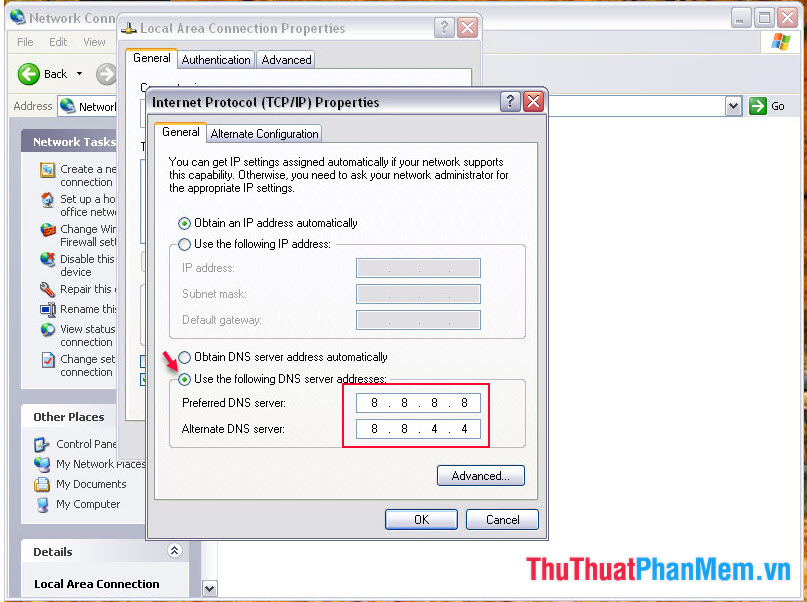
Step 6: Finally, check the option Use the following DNS sever addresses and then add the new DNS address respectively:
Preferred DNS server: 8.8.8.8
Alternate DNS sever: 8.8.4.4
In addition to the Google DNS address is 8.8.8.8 / 8.8.4.4 I will send you some other common DNS you can refer to.
OpenDNS:
- 208.67.222.222
- 208.67,220,220
ScrubIt Public DNS:
- 67.138.54.100
- 207.225.209.66
FPT DNS:
- 210.245.24.20
- 210.245.24.22
VNN:
- 203.162.4.190
- 203.162.4.191
- 203.162.0.181
- 203.210.142.132
- 203.162.0.181
- 203.162.4.1
- 203.162.0.11
- 203.162.0.181
Viettel:
- 203.162.4.191
- 203.162.4.190
MediaNet:
- 203.190.163.10
- 203.190.163.13
SCTV:
- 210.245.24.20
- 210.245.24.22
OpenDNS:
- 208.67.222.222
- 208.67,220,220
NetNam DNS:
- 203.162.7.89
- 203.162.6.71
VNNIC DNS:
- 203.162.57.105
- 203.162.57.107
- 203.162.57.108
Above are the basic steps I show you how to change DNS on Windows 10, Windows 7, Windows XP to access Facebook fast and without being blocked. Good luck!
Was this article helpful?
Your feedback helps us improve.
Related Articles
 Summary of several ways to access blocked websites7 minutes read
 How to change DNS to access Facebook fast, not blocked2 minutes read
 How to handle when unable to access facebook, facebook is blocked, cannot access facebook4 minutes read
 How to access Facebook when the latest blocked 20154 minutes read
 Ways to login to Facebook5 minutes read
 10 How to access blocked websites6 minutes read
Reader Comments 0
Sign in with email or Google to join the discussion.