How to install Kodi on a Raspberry Pi
In fact, building your own computer and giving it vitality will undoubtedly help upgrade your technology skills. This is a really interesting project. So, learn about installing Kodi on a Raspberry Pi.
Table of Contents
Raspberry Pi can form small, powerful computers capable of running all kinds of software, including Kodi. In fact, building your own computer and giving it vitality will undoubtedly help upgrade your technology skills. This is a really interesting project. So, learn about installing Kodi on a Raspberry Pi.
The following article covers everything you need to know about installing Kodi 18 Leia on a Raspberry Pi. You'll be happy to know that the latest Kodi version brings many performance improvements, making the user experience better and smoother than before.

Warning: Why can't you use Kodi without a VPN?
Here are the reasons that you should consider using Kodi with a VPN.
1. Using illegal Kodi add-ons is very dangerous without a VPN:
Most Kodi users are installing Kodi add-ons on their systems to access all of the movies, TV shows, sports, music and more for FREE, instead of using one Kodi legitimate add-on with very little content inside.
Video content on these add-ons is copyrighted. If you access them on Kodi, then your activities are controlled by the ISP, by monitoring your IP address and providing all information to the authorities if required. This will get you in trouble. To avoid this, you'll have to connect to a VPN, where your identity is hidden by alternating IP addresses while streaming Kodi content. Here's how to keep you safe from prying eyes.
2. Ignoring geographic limits:
As you may already know, some official add-ons like BBC iPlayer, NBC Sports, Hulu, IceFilms have geographical location restrictions. This also applies to other add-ons like Acestream that get data from torrents. To remove these restrictions, you will definitely have to use a VPN.
These are the two main reasons why Kodi users must use a VPN to stream more securely. Check out the article: 3 reasons why you should use VPN with Kodi to learn more about this issue and review the 11 best VPN software today to find yourself the right choice!
The following article will guide you through the process of installing Kodi 18 on a Raspberry Pi through 3 simple steps.
Step 1: Essential components

Here are all the components needed to assemble a Raspberry Pi computer.
- Raspberry Pi 3 Model B
- A case (shell) for the Raspberry Pi
- Ethernet cable
- HDMI cable
- MicroSD memory card
- Micro USB power adapter.
Raspberry Pi 3 Model B : Although you can use other models, this is the recommended option. You can use older models to install Kodi on a Raspberry Pi, but performance quality is not guaranteed. After all, this is the most important part of the process, so $ 35 (VND 815,000) seems to be a reasonable investment.
Case: You will also need a case for the computer board. There are many different design and functional choices. If you don't know how to decide, you can choose the official Raspberry Pi case.
MicroSD memory card : The Raspberry Pi needs a memory card so you can store movies, TV shows and anything else. However, make sure you have purchased the right microSD card. Raspberry Pi is not compatible with every card, which is why you will need to make sure you are using a compatible card.
Power adapter : Finally, you will also need a micro USB power adapter. Make sure you buy a quality adapter, which costs around $ 10 (VND 230,000).
Another tip : The Raspberry Pi does not have an ON / OFF switch - that means it is powered on all the time. However, you can find the ON / OFF switches built into the micro USB cable. With Raspberry Pi, you always need to be creative and find your own solution. This is why this project is highly educational and quite interesting.
Step 2: Assemble a Raspberry Pi
There are various methods for assembling a Raspberry Pi, so this article will provide a general guide.
You will need to open the case and apply glue to the heatsink (if your case comes with this feature). Carefully place the board so it is in the proper position in the case. Afterwards, make sure you have carefully arranged the board with the available ports and everything is in place. Finally, insert HDMI, Ethernet, micro USB cables and connect any peripherals in use.
This article has provided you with a general description of how to assemble a Raspberry Pi. Please note that these may not be the case. After making sure everything is in place, it's time to install Kodi on the Raspberry Pi.
Step 3: Install Kodi on the Raspberry Pi
Finally, here's how to install Kodi on a Raspberry Pi using OpenELEC.
You should format the microSD card first. You can use SD Formatter 5.0 for this purpose. Download the software to your computer (Windows or macOS), install and launch SD Formatter. Insert a microSD memory card, select Quick Format and complete the process by clicking the Format button .
Next, you need to install LibreELEC using a tool called USB-SD Creator. Download and launch this tool.
Double click USB-SD Creator . You will see a simple interface with 4 different areas marked with numbers.
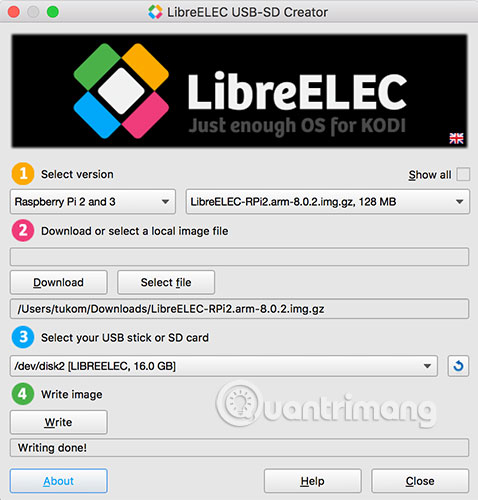
First, you will need to choose a version. Select 'Raspberry Pi 2 and 3' . On the right, you will only see an image of this operating system. Next, proceed to the second part. This is where you can download this operating system or load it if stored locally. You can click Download and choose where to install. Next, choose a microSD memory card. Finally, click the Write button . You have now installed LibreELEC on the microSD memory card.
Remove the memory card and put it into the Raspberry Pi setup. During the initial boot process, you will have to wait a few minutes for the operating system to be fully installed. When the process is complete, you will be greeted by Kodi and a LibreELEC installation wizard.
During this process, you will have to connect to WiFi, set a hostname and sharing service. In case you are not sure which option to share, you can always use the default option.
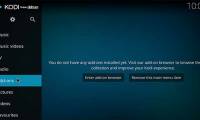
When you're done with the setup wizard, you'll be greeted by the default Kodi interface. Take a look around to check out its features.
With Kodi running on a Raspberry Pi, you might be wondering what to do next. You can import media libraries, install add-ons and even change the Kodi interface. That's all you need to know about installing Kodi on a Raspberry Pi. Hopefully you will use this guide as your main source of information.
Hope you are succesful.
Was this article helpful?
Your feedback helps us improve.
Related Articles
 Instructions for installing and using Kodi on computers4 minutes read
 Install Kodi to turn Raspberry Pi into media center at home11 minutes read
 How to install Kodi on a Chromebook6 minutes read
 How to install Kodi on Linux6 minutes read
 How to install Kodi on iPhone without jailbreak8 minutes read
 Instructions for updating Kodi on Android3 minutes read
Reader Comments 0
Sign in with email or Google to join the discussion.