Table of Contents
This guide explains how to add features to vim editor using a clear, step-by-step process. It also highlights the settings and checks that can help you avoid common errors.
By default, Vim lacks many of the features that users often find in modern text editors. Please install some Vim packages and variables into a powerful tool like Visual Studio Code, Sublime Text, etc.
How Add Features to Vim Editor Works

Another major feature in modern text editors is the ability to expand with plugins. Although Vim has added the original package management feature in version 8.0, many people find it quite 'cumbersome' compared to third-party package managers. One of the most popular package managers is Vim-Plug.
Before you can start using Vim-Plug, you need to install it. On Unix systems like Linux or macOS, run the following command in the terminal to download and install Vim-plug.
curl -fLo ~/.vim/autoload/plug.vim --create-dirs https://raw.githubusercontent.com/junegunn/vim-plug/master/plug.vimIf you use Vim in Windows, you can install Vim-Plug by pasting the following command into PowerShell.
md ~vimfilesautoload $uri = 'https://raw.githubusercontent.com/junegunn/vim-plug/master/plug.vim' (New-Object Net.WebClient).DownloadFile( $uri, $ExecutionContext.SessionState.Path.GetUnresolvedProviderPathFromPSPath( "~vimfilesautoloadplug.vim" ) )Now, you will be able to install the plugin by adding them to the ~ /. vimrc File . You need to add 2 new lines to the file:
call plug#begin('~/.vim/plugged') call plug#end()To install a plugin, add the Plug, Plus a portion of the GitHub URL followed Http://www. github. com In parentheses. For example, to install the Solarized palette, the configuration file will contain the following command:
call plug#begin('~/.vim/plugged') Plug 'altercation/vim-colors-solarized' call plug#end()For more information on how to install the package manager, see the Vim-Plug GitHub page (link: Https://github. com/junegunn/vim-plug)
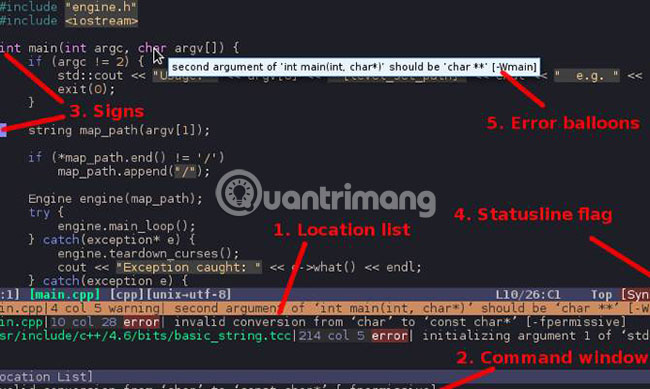
Another feature many people need to rely on is notification when you write invalid code. This feature is commonly known as 'linting'. It doesn't help you not write code that can't run, but will show you basic syntax errors that you might not notice.
As its name suggests, Syntastic is a syntax checker plugin for Vim. Syntastic does not support all programming languages. Instead, you will need to install the syntax checker for the selected language (s). Syntastic will then integrate the checker into Vim, check the code every time you save the file.
Syntastic supports many popular languages, so it is possible that the language you use is also supported. For instructions on how to configure this plugin, see the GitHub Syntastic page (reference link: Https://github. com/vim-syntastic/syntastic).
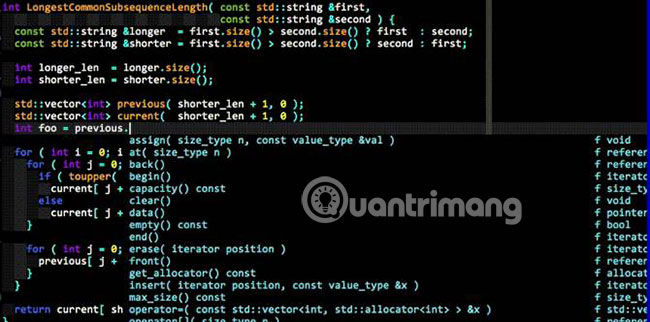
Syntax checking is a very useful feature, but if you have used Visual Studio Code or an editor with similar features, you may find something missing. That is the code completion feature, also called Intellisense in Visual Studio. If you use Vim for more than editing configuration files, the code completion feature will make your life a lot easier.
The code completion feature makes writing code easier, by making suggestions as you type. This is great if you use a method that includes many nested functions. At that point, you don't need to remember the whole string anymore.
YouCompleteMe is a code completion tool for Vim and one of the powerful plugins you can install. YouCompleteMe is also somewhat harder to install than other plugins. You can install basic things with package managers like Vim-Plug, but you will need to compile it.
The easiest way to compile the plugin is to use the included install. txt script. To do this on macOS or Linux, enter the following:
cd ~/.vim/bundle/YouCompleteMe ./install.py --clang-completerNote that on Linux, you will have to install development tools, CMake and necessary headers before you can compile YouCompleteMe.
For instructions on how to install and compile YouCompleteMe on other systems, see the YouCompleteMe GitHub page (reference link: Https://github. com/Valloric/YouCompleteMe).
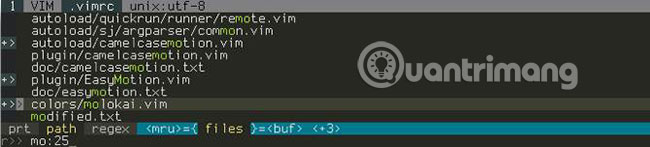
If you work on a project with many different files, Vim's file opening method can disappoint you. The command : e Has the basic auto-completion feature, but you still need to know where your file is located. You can use the command line to find the file, but it's better if you can do this right in Vim.
Fortunately, the CtrlP plugin can help search files and more. CtrlP page GitHub description CtrlP is a tool to find file buffer, mru, tag, etc. for Vim. This plug-in is similar to Sublime Text's 'Goto Anything' Command, with a shortcut of Ctrl + P or Cmd + P.
This feature or an equivalent feature can be found in most modern text editors and if you find yourself missing, it's great to have it in Vim.

You may prefer a more traditional file browser. If you remember the screen showing the left panel of the files found in many editors, you'll be happy to know it's available in Vim, thanks to the NERDTree plugin.
Unlike the left menu in Sublime Text, Visual Studio Code and other editors, NERDTree is a comprehensive system explorer file. Instead of just displaying the project folder, you can navigate to any location on the computer. If you work with files on multiple projects, this can be a very handy feature.
To open NERDTree inside Vim, simply use the command : NERDTree. If you don't like using the command, you can do this with the ~ /. vimrc option As follows:
map :NERDTreeToggleThis will allow you to simply press Ctrl + N To open and close the NERDTree table.
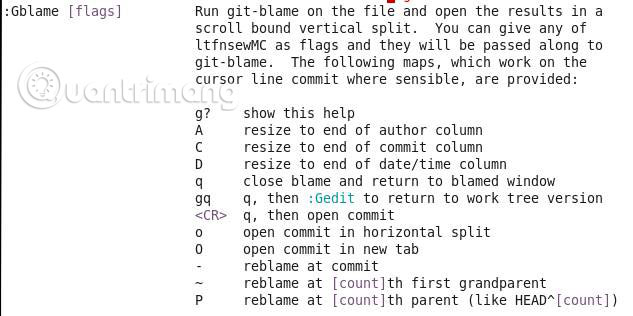
Git integration has become a must-have feature in modern text editors, so it's good to know that it's also available in Vim.
Run : GStatus Will display the same result as when using the git status command. If you have completed your work on a file, run : GCommit %. This will allow you to edit the confirmation message inside the currently running Vim window.
There are too many commands to list here, but you can run any standard Git command by running: Git. For more information, see the fititive. vim page GitHub (reference link: Https://github. com/tpope/vim-fugitive).
The tips above will help 'modernize' Vim, but they are not the only things you can do to customize the editor to your liking.
Hope you are succesful.
FAQ
What should I prepare before I add features to vim editor?
Review the requirements in the guide, confirm that your device or software is compatible, and save important work before changing settings related to add features to vim editor.
Why might add features to vim editor not work as expected?
The most common causes are incompatible versions, missing permissions, incorrect settings, or an interrupted internet connection. Recheck each step and restart the app or device when appropriate.
Can beginners follow these add features to vim editor steps?
Yes. Follow the steps in order, avoid skipping confirmation screens, and compare your interface with the screenshots because labels may differ slightly between versions.
Related Articles
 Download Photo! Editor 1.1: Multifunctional Photo Editor6 minutes read
 Link Download Free PDF Editor 1.36 minutes read
 3 Best Paid HTML Editing Tools 20237 minutes read
 Block Access to Registry Editor on Windows 10/8/79 minutes read
 6 Best Code Editor Apps for Mac6 minutes read
 7 Top AI Video Editors on Mobile: Best Options Compared9 minutes read
Reader Comments 0
Sign in with email or Google to join the discussion.