Fix WiFi not working on Ubuntu
Ubuntu is a powerful, free and open source operating system, suitable for beginners who want to explore Linux and seasoned professionals who want a reliable, secure system for projects. and so on. However, besides all the advantages of Ubuntu, you can sometimes have problems connecting to a WiFi network.
WiFi connection problem can be either hardware or software problem. Here are some useful solutions if users find themselves having problems connecting to WiFi networks.
Note: The biggest problem users will encounter is having a wireless card made by Broadcom. Although the manufacturer is part of the Linux Foundation, this doesn't mean their driver support is always good. Aside from the driver, another problem is TKIP encryption.
Install the driver from the Ubuntu ISO
If Ubuntu doesn't detect the WiFi network at all or if it fails, then you can try installing or reinstalling the WiFi driver from the Ubuntu ISO file. First, you need to download the Ubuntu ISO corresponding to your Ubuntu version (on another device or by an Ethernet connection on Ubuntu).
Place the Ubuntu ISO in your Ubuntu Home folder , then in Terminal, enter the following command string to mount the Ubuntu ISO to the virtual drive:
sudo mkdir /media/cdrom sudo mount -o loop ubuntu-*.iso /media/cdromGo to Software & Updates from the control panel, then in the new window select CDrom with Ubuntu [version] box and enter the password when prompted.
Click the 'Additional Drivers' tab , then select the Wireless Network Adapter option and click Apply Changes.
Issue 1: Device not detected
If the wireless device is not detected by Ubuntu (or any distribution), then you will need to go to Terminal and enter the following command:
sudo lsusb. if you use a USB wireless card / dongle and:
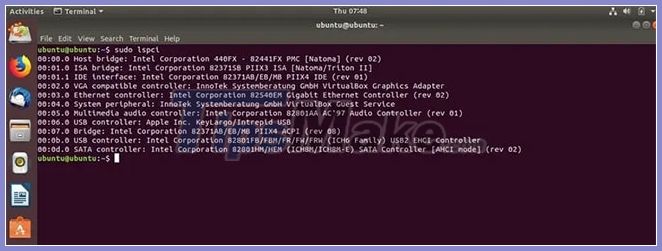
sudo lspci. if you have a wireless card inside.
If the response from these commands is similar to the screenshot below, then you're in luck: Ubuntu can find the card. It is usually identified by a Network Controller or Ethernet Controller.

In the past, many Linux distributions had difficulty finding wireless cards. Thankfully, the support has gotten a lot better, so this is a rare case.
Additional Commands
You can also use the following command to check if the wireless device is visible; users may need to install lshw first.
lshw -C networkThe output looks like this:
*-network description: Wireless interface product: PRO/Wireless 3945ABG [Golan] Network Connection vendor: Intel CorporationIf this is the case and the system finds the wireless card, you can proceed to install the driver / module as described below.
Problem 2: Missing driver module
Following from the successful lsusb and lspci commands, giving Ubuntu the ability to see the wireless card, you can assume that the firmware is working, just that the system doesn't know what to do with the card. This is when a driver or module is needed.
Go back to Terminal and enter the following command:
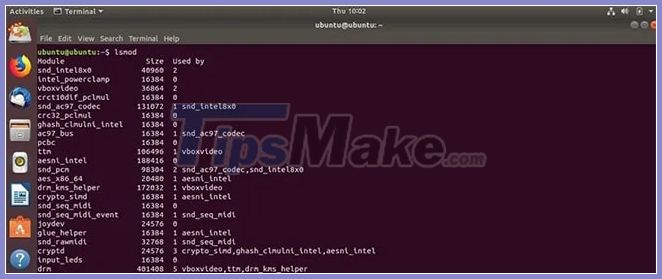
sudo lsmod 
You will see a list of used modules. To activate your module enter the following command where modulename is the name of your chipset.
sudo modprobe modulenameFor example, if your wireless chipset is 'RT2870', the command would look like this:
sudo modprobe rt2800usbThen, run the lsmod command again to see if it loaded correctly.
Load the module automatically when booting
It is a rare case, but sometimes the module will not try to boot. In this case, you can force it to load permanently. Enter the following command into Terminal:
sudo nano /etc/modulesThe Nano editor will open. Add your module name at the bottom and save the file. You will need to reboot and check to see if the wireless card can now see the networks to allow you to connect as usual.
If you have difficulty, repeat the process. Thankfully, Ubuntu has several helpful help pages in the online documentation that you can also read through at here:
Alternatively, you can use the built-in helper feature in Terminal by typing:
man lsusb man lspciIssue 3: DNS
Rarely does DNS become an issue. However, you should consider it if you're still having connectivity problems. From the Terminal, enter the following command to evaluate where DNS is coming from:
nmcli device show wlan1 | grep IP4.DNSThis will show you the router's LAN address. If it doesn't work, you may have to change 'wlan1' to whatever your wireless network uses. The following command can also be used:
ip addressAfter you have this information, the next method is to ping the router's LAN address. If this works, try pinging Google's DNS servers:
ping 8.8.8.8With these results, you can determine where the DNS problem is. If all devices in the home or office have page load errors, change the router's DNS to Google or Open DNS server. You will have to consult with the router manufacturer for how to do this, but it is usually done in admin pages, the most common is to log into 192.168.0.1 or similar.
If the DNS problem is only happening with Ubuntu, then follow these steps using the Network Manager GUI:
- Right click on Network Manager.
- Select Edit Connections.
- Select the WiFi connection in question.
- Select IPv4 Settings.
- Change the Method to DHCP Addresses Only .
- Add 8.8.8.8, 8.8.4.4 to the box of DNS server. Remember to use commas to separate IPs and not to spaces.
- Click Save , then select Close.
As a final step, reboot the machine or Network Manager from Terminal:
sudo service network-manager restartIssue 4: There is no Network Manager
Let's say you have removed Network Manager or accidentally uninstalled it. Here's a really tricky situation: You don't have the Internet and no Network Manager.
Assuming the apt package is still in cache, then you can go to Terminal and type:
sudo apt-get install network-managerIf you've cleared this cache, you can use an Ethernet cable to connect by plugging it into the Ethernet port and running the command again.
As a final step, if none of the above works, you will need to edit your configuration file. We have chosen gedit as a text editor, but you can use your preferred option and modify the command.
sudo gedit /etc/network/interfacesModify it to read as follows:
auto lo iface lo inet loopback auto wlan0 iface wlan0 inet dhcp wpa-essid myssid wpa-psk mypasscodeThen you can restart the interface by entering the code below:
sudo ifdown wlan0 && sudo ifup -v wlan0