Fix simple errors on the printer
During printing, you often encounter some simple errors such as ink spot documents, reverse page order, print margins incorrectly on the computer version . The following tips will help you operate the printer. normal.
1. The print page order is inverted
- Symptoms: While waiting for the first print 'to go out' , you suddenly notice that the last page comes first and the first page is ' fluttering' at the end. In fact, this does not affect the print quality, but it will cost you to rearrange the page order.
- Diagnosis: Setting up the printer is wrong due to 'wrong click ' or driver error, the operating system gives rise to this error. Technicians call this phenomenon Front to Back error.
- Overcome:
+ For Windows XP, go to Start menu > Settings> Printers and Faxes , right-click the printer icon that is in error and select Properties . In the General tab, click the Printing Preferences button. Continue, in the Page Order section of the Layout tab, choose again to Front to Back> Apply> OK.

+ For Windows Vista / 7, go to Start> Control Panel> Hardware and Sound> Devices and Printer> select the wrong printer name. Then, click Display Printer Properties and the same settings as on Windows XP.

2. Align and disconnect the print line from the original text on the machine
- Symptoms: The margins of the page after printing are narrow, sometimes losing words or excessive redundancy. This loses the aesthetics of the printed page.
- Diagnosis: You have not reset the correct paper size for text. For example, Letter format (21.59 x 27.94 cm) but you print on A4 or vice versa.
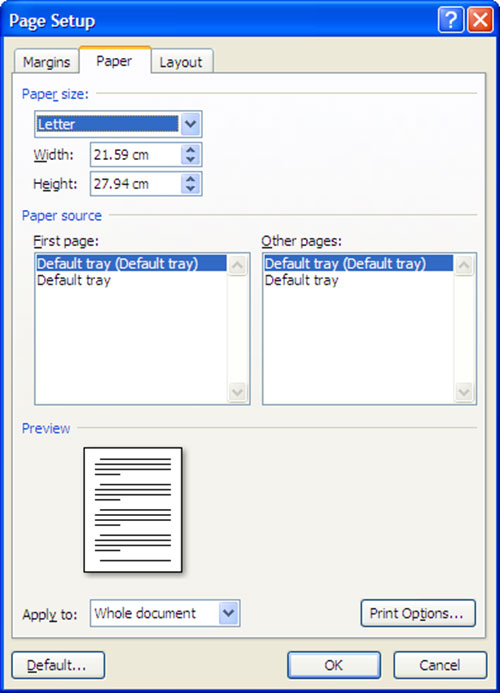
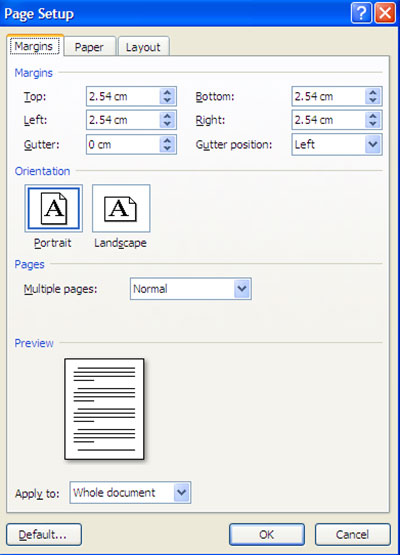
- Fix: In this case, from the Office 2003 program, go to File> Page Setup (or go to the Page Layout tab> press the arrow button in the right corner to enter the Page Setup - for the 2007/2010 Office suite) . Next, click the Paper tab in the Page Setup dialog box and then look in Paper Size for the type of paper the program will use to print the document. If you see Paper Size section of A4 - 21x29.7 cm, this is a standard paper size. Click Cancel in the Page Setup dialog box and perform the following steps to resolve this issue:
+ For Office 2003, go to Tools> Options to open the Options dialog box > into the Print> tab, check the Allow option A4 / Letter Paper Resizing> click OK.
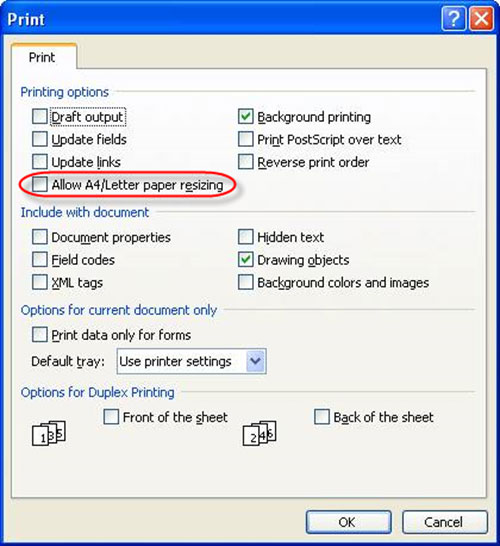
+ For Office 2007/2010, click on Office Button> Word Options> select the Advanced tab > pull down the Print> section before marking the Scale content for A4 or 8.5 option x11 'paper sizes> OK.

+ Conduct normal printing of documents.
Note: You must set the print paper size in the editor to match the printer paper size used for the best print.
3. Unable to print and repeatedly report an error
- Symptoms: When printing, an error message 'in failure' This document failed to print - see picture.

- Diagnosis: It is possible that you have not turned on the printer or plugged in the power, or have not been able to print in the local network.
- Fix: With the local printer, you must check to see if the printer's power cord is plugged into the power outlet, whether the printer is turned on and connected to the computer successfully. For network printers, you need to check the additional cable connection between the computer and the printer, and especially need to review the right to use the network printer set up for you or not. You use the exclusion of the above cases to get the right remedy.
4. Appearing ink spots on printed documents
This is a fairly common case because printer users store paper incorrectly. This has resulted in paper being damp when printing, or using poor quality printing paper. Besides, the quality factor of ink being used also needs to be reviewed. The solution for this case is quite simple, you need to bring the machine to service so that they can clean the print head device and replace the more quality printing paper.
5. You cannot print page borders
Most printers cannot print text or images that are too close to the edge of the page. By default, borders are near the edge of the page, which is why your printer cannot handle them. How to resolve this problem is as follows:
+ Choose Format> Borders and Shading> Switch to Page Boder tab > click the Options button to open the Borders and Shading Options dialog box .
+ Under Margin, you enter larger sizes (in pixels) into the Top, Bottom, Left and Right boxes to move the borders slightly away from the edge of the page. If you want the page border to wrap the text, in the Measure from section, select Text> OK> OK.

+ For Office 2007, go to Page Layout> Page Boder> Options> settings tab as on Office 2003 version.

6. Printed text lacks images
- Symptom: The printed text even though the text is full but the image disappears, instead are blank white areas.
- Diagnosis: Maybe your computer is missing memory (Low Memory).
- Fix: Perform the following steps:
+ Try to turn off the computer, restart the computer and print again. If it still doesn't fix it, check the possibilities below:
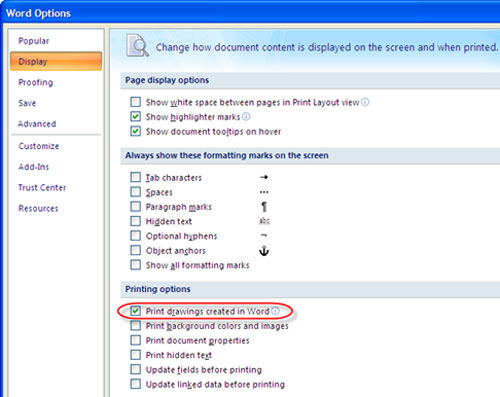
+ In Word 2003, select File> Print> click the Options button in the Print dialog box. From the second Print window, click Drawing Object> OK . Also here, check the Draft Output checkbox to ask Word to print documents with fewer formats. This option is used to work with documents during the print editing phase.
+ For Word 2007, go to Office Button> Word Options> select Display> tab, before the Print drawings created in Word option.
7. Header and Footer appear incorrect or missing
If your header and footer are not fit on the page, there is not enough space in the margin for the header or footer or they are in the non-printing section of the page.
To make more room for headers and footers, choose File> Page Setup> select the Margin tab in the Page Setup dialog box and enlarge the upper and lower margins. Next, you go through the Layout tab and increase the From Edge distance to the header and the footer is not pushed into the non-printing part of the page.
Note: In order to use the printer effectively, you should choose to buy the type of printing paper as required by the accompanying manual, not to buy low quality printing paper that is too thin, which may lead to a case of being stuck paper, and do not leave printed paper in a humid environment because it can lead to sticky spots on paper.

In addition, regularly updating the driver for the printer from the manufacturer's website to improve printer operation such as fixing printing problems in the machine and adding new features. Finally, you should take the time to clean the printer weekly, not to allow dirt to cling to the printer or scrap paper in the machine because it will cause paper jams, and especially you have to keep the printhead (printhead ) always clean.