Admin cannot remotely administer Windows XP-based computers with Service Pack 2 installed
A common "Access denied" error caused the Admin to be unable to manage Windows XP Sp2 remotely
You will receive specific error messages such as "Access denied" or "The network path was not found" when remote management (such as Remote Desktop .) to a computer running Windows XP with Service Pack installed 2
Method 1 : Use the Netsh command
Method 2 : Use the tutorial interface
Method 3 : Use the GPO group management policy to set the 'Allow Remote Administration Exception' policy
Below is a specific example of the above error, when we connect remotely to manage a computer running Microsoft Windows XP Service Pack 2 (SP2), you may receive an error similar to the following:
Computer COMPUTERNAME.EXAMPLE.COM cannot be managed. Đường dẫn mạng không tìm thấy.
If we use the program to remotely manage the Computer Computer Management (at Run , type Compmgmt.msc command)

At Action , select Connect to another computer , enter Computer name of the computer that needs remote management, then the message is still "It is impossible to access Computer named so", even though we have entered the correct computer name there.
We will see the message line describing the error as follows:
Computer COMPUTERNAME.EXAMPLE.COM cannot be managed. Đường dẫn mạng không tìm thấy.
Hãy chọn 'Connect vào máy tính khác' từ menu hành động để tạo một máy tính khác.
Lỗi là: truy cập Access được.
Không thể truy cập đến Computer Computer.
Đã gặp lỗi: Đường dẫn mạng không tìm thấy.
Lỗi khi mở đối tượng Tiêu đề của cơ sở dữ liệu trên ComputerName. Bạn có thể không có quyền.
Thông tin: Đường dẫn mạng không tìm thấy.
An object (Computer) with the following name cannot be found: "ComputerName". Hãy kiểm tra các kiểu tùy chọn đã chọn và vị trí để xác thực và xác định bạn có kiểu tên xác định đối tượng, hoặc gỡ bỏ đối tượng này từ chọn.
System error 53 has occurred. Đường dẫn mạng không tìm thấy.
What is the main cause of these errors?
This can happen when we use the tools in the Microsoft Management Console (MMC) remote management tool, such as:
• Certificates (Manage digital certificates of remote machines)
• Computer Management (Computer Administration is far away)
• Device Manager (Manage devices of remote machines)
• Disk Management (Manage disks and Logic partitions on hard disks of remote machines)
• Event Viewer (View logs of system, application, security events)
• Group Policy (Manage policies that impose systems on remote machines)
• Indexing Service (Manage file storage services, quick file search service)
• Internet Protocol Security (Ipsec) Monitor (Remote monitoring of IPSEC activity)
• IP Security Policy (IPSEC transmission line security feature management)
• Local Users and Groups (Remote Management of Users and Groups)
• Removable Storage Management (Manage removable storage devices such as USB .)
• Resultant Set of Policy (This feature helps Admin quickly check the impact of Policy on a specific User)
• Services (Managing Services of remote machines)
• Shared Folders (Manage shared Folders of remote machines)
• WMI Control (WMI - Windows Management Instrumentation, this is a tool that helps to monitor and control system components more effectively)
To open the MMC and insert the entire snap-in contained in it, at Run you type mmc command, select File , select Add / Remove Snap-in ., select Add . and choose one of the snap- The print that you want to use to administer your Computer or Computer is remote.
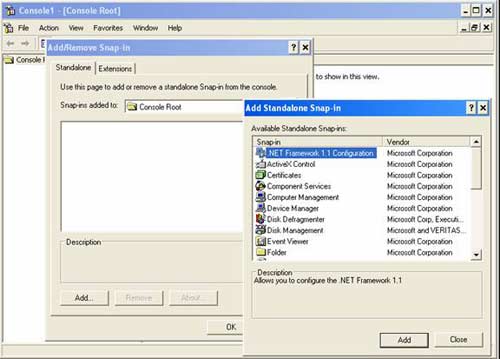
In addition, this error often occurs when we manage remote computers using the Net.exe tool or accessing remote computers using the dialog boxes (dialog boxes) such as:
• Select Users, Computers, or Groups
• Find Users, Contacts, and Groups
• Net.exe
Example of using Net.exe

You can refer to the Net commands used here.
The reason for the above error messages is because the default configuration of the firewall ( Windows Personal Firewall ) on Windows XP SP2 blocks incoming traffic when they connect to the port. 445 TCP ( Transmission Control Protocol - TCP , port 445) of Computer that we want to administer remotely. Administrative tools that often access this port to manage remote machines and remote machines must allow incoming network traffic at TCP port 445.
Solution
To solve this problem, one of the following methods can be used.
Methods 1 and 2 will describe ' How to solve this problem on each Computer ', ie manually resolve each remote machine that we want to administer.
The third way will be ' How to use that Active Directory Domain policy is Group Policy to be able to solve a series of Computer activities in our Domain '
Method 1: Use the Netsh command
At the remote machine (running Windows XP SP2), execute the netsh command to allow saving through Windows Firewall on TCP port 445.
At Run , enter cmd and then click OK . Type the following command and ENTER :
netsh firewall set portopening tcp 445 smb enable
You will receive the following message: Ok .
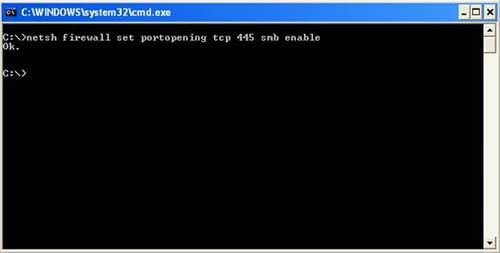
Then use the Exit command to exit the command prompt .
And if you have to run this command on each machine on the network, you may lose time. You can run this netsh command from a batch file or from a script to improve speed.
Method 2: Use the user interface (Graphical User Interface)
At a remote Windows XP SP2 computer, edit Windows Firewall to allow the flow of 6 inputs via TCP port 445
1. Click Start , then click Control Panel .
2. Click Security Center , click Windows Firewall .
3. Click Exceptions tab, click on the File and Printer Sharing box (check box), then click Edit .
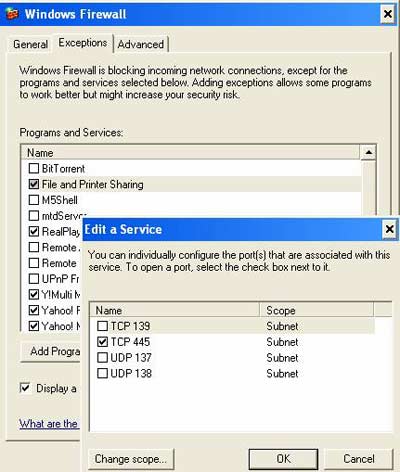
4. Click TCP 445 in the check box, click Change scope , and then do one of the following:
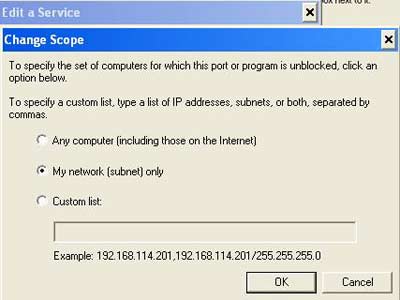
• Click My network (subnet) only . This only accepts input connections from machines in the Local Network
Or
• Click Custom list , fill in the specific IP address of the computers that are allowed to manage this computer remotely.
In this example we select My network (subnet) only
Note: Maybe we should not choose
• Any Computer (Including those on the Internet) , because this option is dangerous when Internet User can remotely manage your computer.
5. Click OK 4 times.
Method 3: Use Group Policy to establish a policy called 'Allow Remote Administration Exception'
Notice the following steps, assuming that all of the Computers that we want to manage through this policy belong to the same OU ( Organization Unit , the centralized management unit for Users, Groups, Computers, for example, this object is in the same department in our organization, for example: 'All Computers in the Human Resources Department')
To learn more about Group Policy, refer to the Microsoft Web site:
http://www.microsoft.com/windowsserver2003/technologies/management/grouppolicy/default.mspx
The steps also assume that the Windows Firewall is configured to use domain profiles (When the Domain User logs on to a Computer under the Domain, then the Domain will give this User a corresponding working environment in this Domain. Usually Firewall Profile In the Domain, it will be more open to the strict control of the Firewall Profile on a standalone Computer, because Domain Users often use multiple Network communication applications, and to be able to use them, Domain Profile applies. Set the Firewall to be 'more open' .)
And in this situation our use of domain profiles is a typical choice. Because we are in a standard environment of an organization, and Clients, Servers are joined to the Domain and are under the control of the Domain .
To learn more about Windows Firewall profiles and how Windows selects profiles to download, you can refer to 'Instructions for deploying Windows Firewall settings on Microsoft Windows XP - Service Pack 2' to access the Web site Microsoft.
To configure Group Policy for remote administration of computers in the Network, perform the following steps. All these steps are performed on the Domain Controller server (Active Directory Domain operation control server).
1. Create a Group Policy Object (GPO) for any organizational unit (OU) that currently contains the Windows XP SP2 computers that we want to enforce:
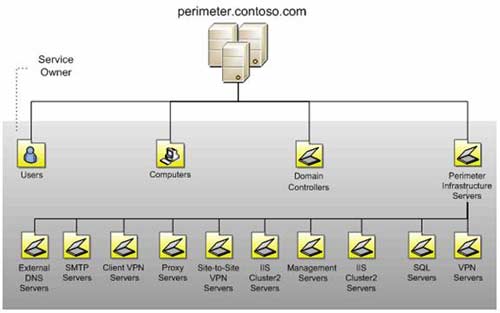
Illustrate the diagram of organizing OUs in a Domain
a. Log on to the domain controller. Of course with Administrator privileges of the Domain or Admin of this OU
b. Click Start , click Run , fill in dsa.msc , and then click OK .
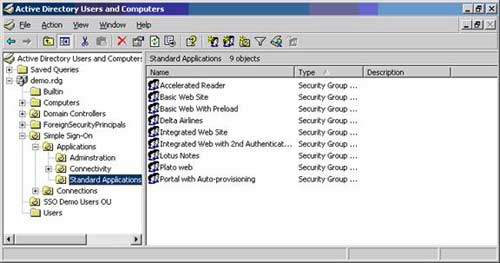
The Active Directory Domain administration interface, through here to create GPOs
c. Expand Domain and right-click on the OU that needs to create Group Policy, then click Properties .
d. Click the Group Policy tab and click New .
e. Enter the name of the Group Policy object (eg: Allow Remote Management ), then ENTER .
f. Click Close .
2. Log on to any computer that is running Windows XP SP2 (currently a member of the domain) with a User account that belongs to one of the following security groups:
• Domain Admins (Group of Administrators of the current Domain)
• Enterprise Admins (The group of top-level, full-fledged Administrators including Domain parent, child domain in Domain tree system or Domain-Domain Tree / Forest)
• Group Policy Creator Owners (Group privileged to create Group Policy Objects –GPO)
3. Click Start , click Run , fill in mmc , and then click OK .
4. At the File menu, click Add / Remove Snap-in .
5. On the Standalone tab, click Add .
6. In the Add Standalone Snap-in dialog box, click Group Policy , and then click Add .
7 In the Select Group Policy Object box, click Browse .
8. Click the GPO that we want to update with the new settings for Windows Firewall. In this example we select the GPO with the name Allow Remote Management created in step 1. Click OK , and then click the GPO above.
9. Click OK , click Finish .
10. Click Close , and click OK .
11. Under Console Root , expand the GPO named Allow Remote Management selected in step 8, expand Computer Configuration , expand Administrative Templates , expand Network , expand Network Connections , open Windows Firewall , and click Domain Profile .
12. In the right pane, double-click Windows Firewall : Allow remote administration exception .
13. Click Enabled , and then specify the allowed administrative scope in the Allow unsolicited incoming messages from box .
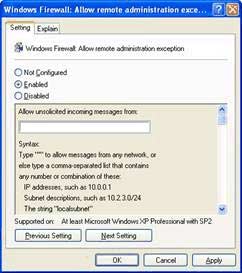
For example, to allow remote administration from a specific IP address, we'll enter this IP address into the Allow unsolicited incoming messages from box .
To be able to allow not only one IP address, but also a remote Admin Subnet, you can enter the subnet address in CIDR format ( Classless Internet Domain Routing ). For example, we will enter the address for a subnet of 192.168.1.0/24 , this address area uses 24 bit Subnet mask or is fully written 255.255.255.0 , will identify all computers with IP from 192.168 .1.1 to 192.168.1.254 (ie they belong to Network 192.168.1.0 ) managed remotely by this Computer.
14. Click OK , and then click Exit on the File menu.
Ho Viet Ha
Network Information Security Vietnam.
Email: Technicalsupport@Nis.com.vn