A comprehensive guide on how to fix black screen or black display issues when recording videos with OBS.
The black screen error when recording videos or live streaming on Facebook and YouTube using OBS is a common problem for many users today. There are many reasons for this situation. To fix black videos recorded with OBS or a black screen during live video streaming, please refer to our guide below..
Open Broadcaster Software (OBS) is software specifically designed to support recording and streaming live video to social media platforms like Facebook, YouTube , or other online video sharing channels such as TwitchTV, YouTube, etc. However, using Open Broadcaster Software (OBS) isn't always stable, and errors can occur, such as a black screen or no sound. To address black screen issues in OBS videos , TipsMake will provide the following basic troubleshooting methods.
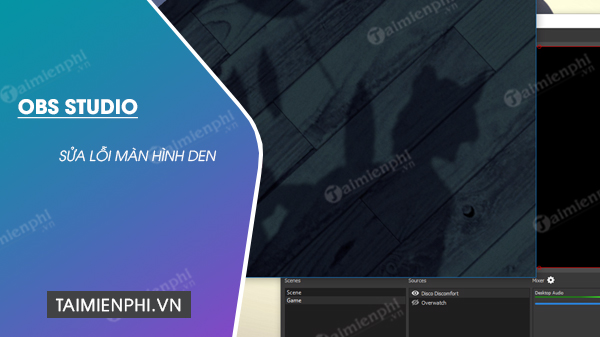
Tips to fix the black screen error when recording video or live streaming on Windows 10 and 7.
1. Run in compatibility mode
. 2. Enable OpenGL mode
. 3. Apply to the nVidia graphics card
. 4. Turn the computer off and on again.
5. Select the correct OBS version.
6. Change disk permission settings.
7. Change OBS settings
. 8. Enable multi-adapter compatibility.
9. Disable overclocking
. 10. Check for conflicting software.
11. Reinstall the program.
How to fix black screen or black display in videos recorded with OBS.
Method 1. Run in compatibility mode.
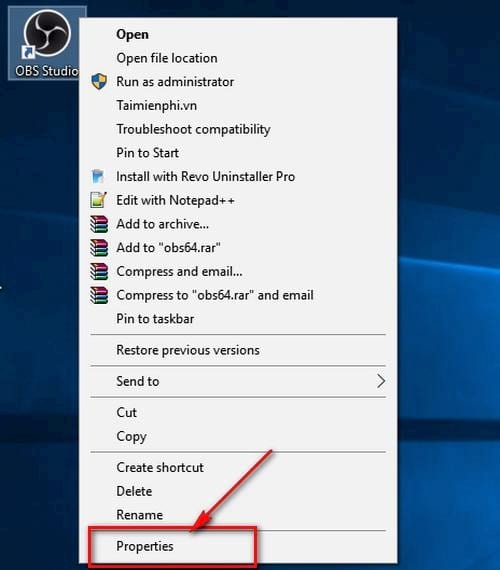
Step 1: Right-click on the OBS icon on your desktop and select Properties at the bottom.
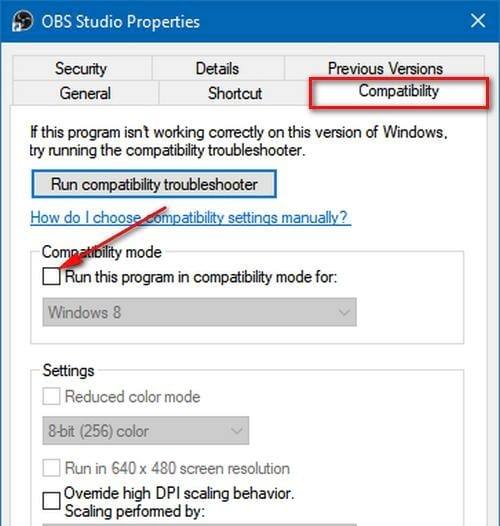
Step 2: In the Properties window, switch to the Compatibility tab .
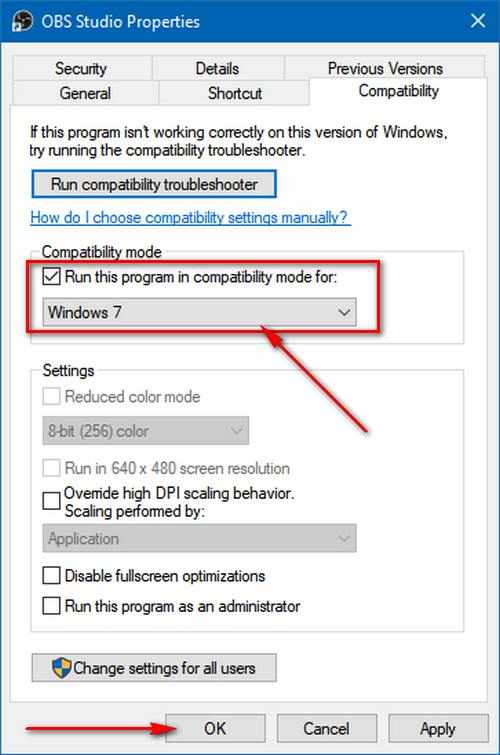
Step 3: Here, check the box next to " Run this program in compatible mode for" and select Windows 7 from the dropdown menu. Then, check " Run this program as an administrator" and click OK to save the changes.
This is a fairly common and effective method to fix the black screen error on OBS. If you've tried this and still encounter a black screen error, try the following methods for fixing black screens in OBS videos.
Method 2. Activate OpenGL mode.
Step 1: On the main OBS interface, find the Settings section .
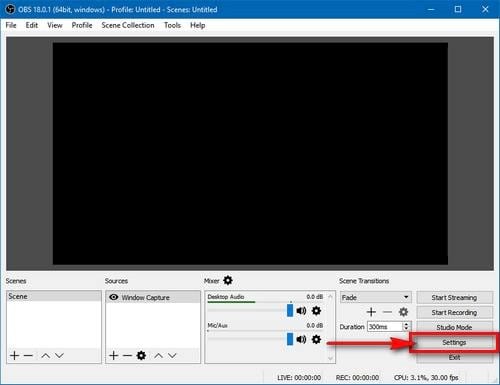
Step 2: When the Settings window appears, select the Advanced option at the bottom left of the frame.
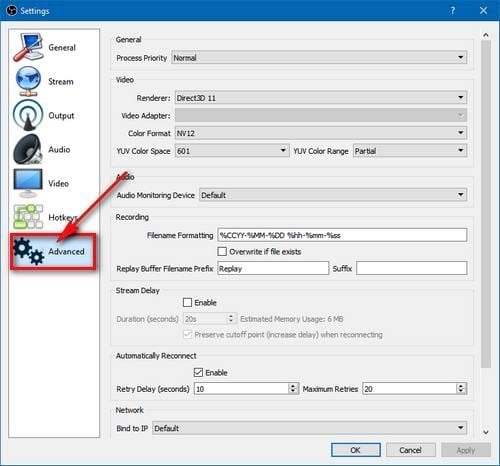
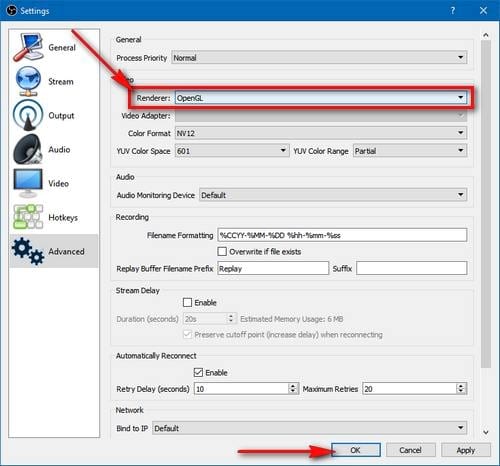
Step 3: In the right pane, the initial Renderer option will be DirectX or Direct3D 11. Change this option to OpenGL and then click OK to save the changes.
Method 3. Applicable to nVidia graphics cards.
This method only applies to computers and laptops that use a dedicated NVIDIA graphics card and have NVIDIA drivers installed.
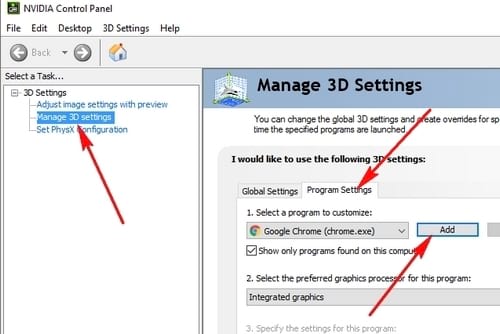
Step 1: Right-click on the Desktop and select NVIDIA Control Panel .

Step 2: In the NVIDIA Control Panel window, select Manage 3D Settings , then switch to the Program Settings tab, and then select Add as shown in the image.
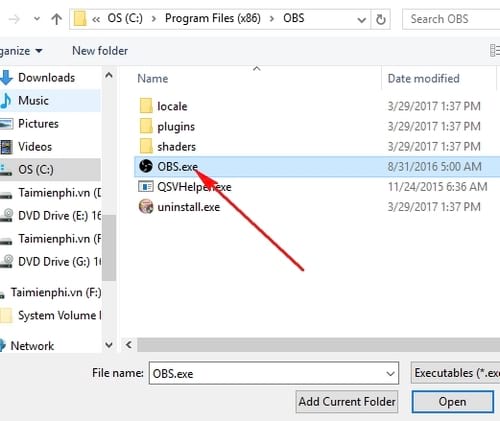
Step 3: In the dialog box that appears, click on Browse .
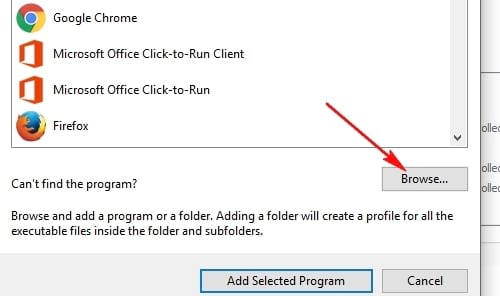
Step 4: Locate the folder containing your OBS live video streaming program. Note that OBS Studio and OBS have different file paths.
OBS Studio : C:ProgramDataMicrosoftWindowsStart MenuProgramsOBS Studio
OBS : C:Program Files (x86)OBS
OBS Studio comes in both 32-bit and 64-bit versions; choose the one that is compatible with your operating system.
Step 5: After adding OBS/OBS Studio to Manage 3D Settings, select the " Use global settings (High-performance NVIDIA processor)" option from the dropdown menu.
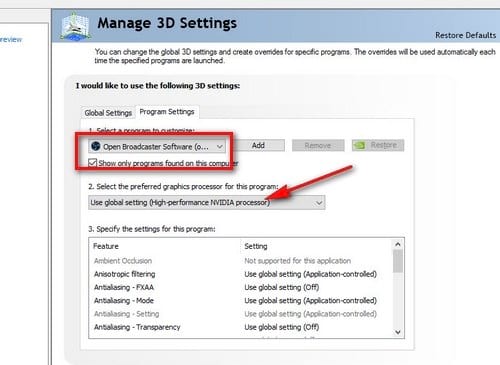
After adjusting the 3D settings in the NVIDIA Control Panel, you can check if the black screen error persists when playing live video on Open Broadcaster Software (OBS).
Method 4: Turn the computer off and on again.
Before attempting more technical troubleshooting, you should try turning your computer off and on again. In many cases, simply turning the computer off and on again immediately resolves the black OBS screen issue. Power cycling is a process that involves completely shutting down the computer and cutting off its power supply. This forces the computer to clear all temporary configurations so that whenever you restart, everything is newly initialized. Step 1
: Turn off your computer properly.
Step 2: After the computer is off, unplug the power cord if you are using a laptop and remove the battery.
Step 3: Now press and hold the power button for a few seconds. Wait 2-4 minutes, then reinsert the battery, plug in the power cord, turn on the computer, and check if the problem has been resolved.
Method 5: Choose the correct version of OBS
OBS typically comes in two versions: 32-bit and 64-bit. The software includes two versions because the Windows operating system also has two versions. A major difference between 32-bit and 64-bit processors is the number of computations per second they can perform, which affects task completion speed. In this troubleshooting solution, you open the OBS installation folder and select the correct version of the software after checking the bit version of your operating system.
First, you need to check the version of the operating system installed on your computer:
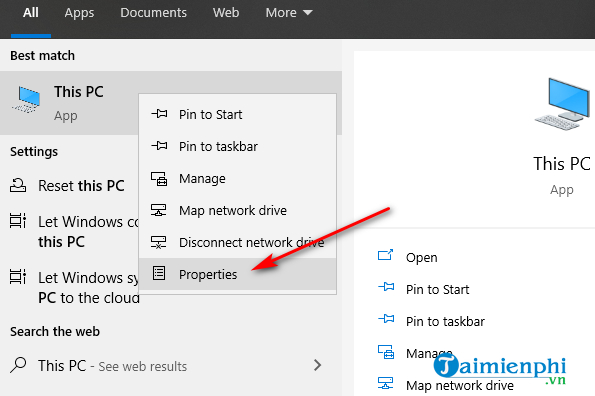
Step 1: Right-click on This PC and select Properties.
Step 2: Check the information under System and System type.

Now, open the OBS installation folder and launch the correct version of the application according to the bit version on your computer.
Step 1: Press Windows + E to open File Explorer. Search for OBS in the dialog box and open the file location as shown in the image below.
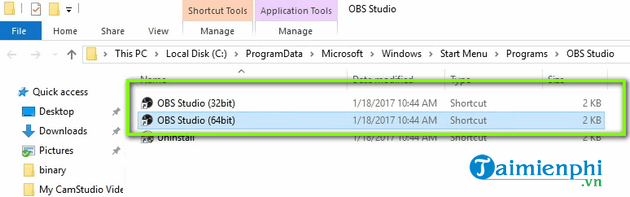
Step 2: Select and open the correct application version according to your operating system's bit version. Check if the problem has been resolved.
Method 6: Change drive permission settings
If OBS is installed on drive (C), it's possible that even your user account doesn't have full permissions to edit and modify its contents. This is a common occurrence, and the reason users are often denied access to the drive is for security reasons, as all core operating system files are present. However, according to some user reports, changing the drive's ownership settings has resolved the issue immediately. Make sure you are logged in as an administrator before attempting this solution.
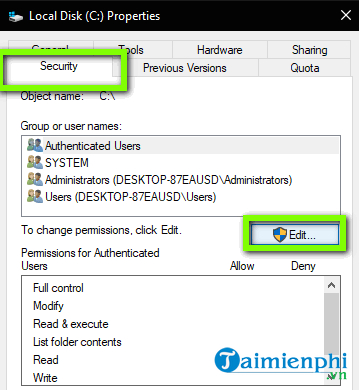
Step 1: Press the Windows + E key combination to open File Explorer. Right-click on drive C (or any drive designated as your primary operating system drive) and select Properties.
Step 2: Select the Security tab and then click the Edit button next to "To change permission, click Edit".
Step 3: Now, select Authenticated users and check the Full control option.
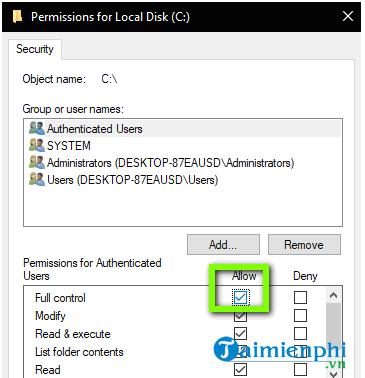
Step 4: Click Apply to save the changes. Then restart your computer.
Method 7: Change OBS settings
Another solution to consider is changing some specific OBS settings. Typically, OBS allows users to configure settings to their own preferences. However, in some cases, custom settings can conflict with the software and cause a black screen error. Here, TipsMake has listed some changes you must make to get OBS running in optimal settings.
- Mode: Choose your preferred mode
- Screen: Choose your game mode
- Priority: Default
- Sli/Crossfire: Select (You can also try unchecking this option later).
- Force scaling: Uncheck.
- Transparency: Uncheck.
- Framerate lock: Uncheck.
- Record cursor: Select.
- Anti-cheat: Uncheck.
- Overlays: Uncheck.
After making the changes to your OBS settings, restart the program and check if you can stream your screen or game correctly without encountering a black screen issue.
Note: You can also change the mode from Capture any fullscreen application to Capture specific window.
Method 8: Enable Multi-adapter compatibility
OBS has a Multi-adapter compatibility setting for computers with SLI or Crossfire technology. SLI/Crossfire is an NVIDIA/AMD technology that allows users to connect two graphics cards instead of one and use both in their games or applications. Enabling this feature seemed to resolve the black screen issue in OBS immediately.
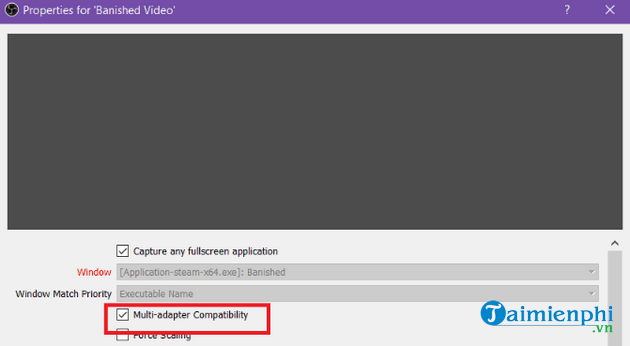
The good thing is that this method fixed the black screen error when using OBS on computers that didn't even have SLI/Crossfire installed. It's safe to say this is a bug in OBS, and you need to enable multi-adapter compatibility regardless of whether you have SLI/Crossfire installed. You can easily enable this option by selecting the stream and clicking the gear icon. A new window will appear, and you can turn this option on.
Method 9: Disable overclocking
Overclocking allows you to increase the processor's clock speed until it reaches a temperature threshold set by the manufacturer. Once that temperature is reached, the clock speed reverts to its default to allow it to cool down. After reaching the optimal temperature, the clock speed is increased again, and the cycle continues. Overclocking allows users to achieve better frame rates and performance.
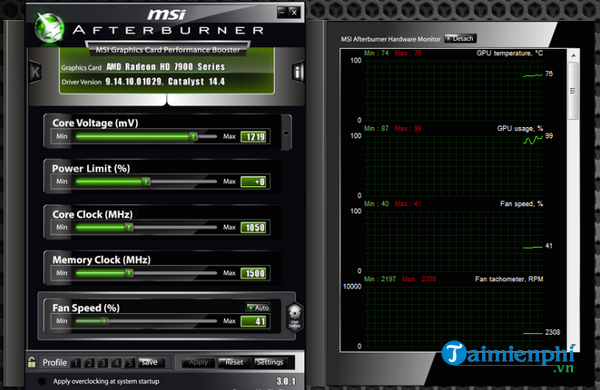
Your PC had overclocking enabled when you encountered the black screen issue in OBS. You should try disabling overclocking and possibly overclocking related software like MSI Afterburner, then try restarting OBS. If the black screen issue is resolved, consider disabling overclocking whenever you are using OBS.
Note: Also try disabling Overlay from GeForce Experience and Windows game bar features. Take into account any additional software features that may offer extra controls for games or videos.
Method 10: Check for conflicting software
Another reason you might encounter a black screen issue on OBS software is that you have additional software running in the background, also related to screen capture and video recording. This is a very common situation for users who think that other third-party software isn't running, but in reality, it's in the background. In this solution, you would browse through all the different software installed on your computer and uninstall any additional software that might be causing the problem.
Step 1: Press the Windows + R key combination, type appwiz.cpl, and press Enter.
Step 2: Once in the application manager, search for any recording software you may have installed on your computer. Right-click on it and select Uninstall.
Step 3: You should also check the taskbar to see if any additional applications are running in the background. Right-click on each item and close that application.
Step 4: Once you are absolutely sure that no programs are running in the background, run OBS again and check if the problem has been resolved.
Method 11: Reinstall the program
If the above methods don't work and you still can't stream games or record your screen using OBS, then you should try reinstalling the entire program. You might have a corrupted/outdated copy that has issues with some modules. All your preset configurations will be lost in this solution, so make sure you save everything you need.
Step 1: Press the Windows + R key combination, type appwiz.cpl and press Enter.
Step 2: In the application manager, search for OBS and right-click on it, then select Uninstall.
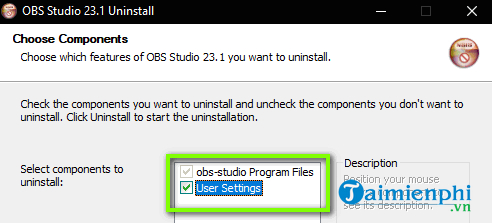
Step 3: Select both obs-studio Program Files and User Settings next to Select components to Uninstall.
Step 4: Restart your computer. Download the latest version of OBS Studio from the official website and proceed with the installation.
With the methods outlined in this article on how to fix black screens or black video recordings when using OBS, you can resolve this issue on your computer and continue streaming live videos to Facebook or games to other online video sharing and streaming platforms. This is especially useful for Facebook live streaming, which is widely used by many users and organizations worldwide to broadcast live events to their fans. Good luck!