5 Apple Calendar tips for beginners on Mac
The default MacOS Calendar app is not as advanced or complete as third-party apps like Fantastical and BusyCal, but it still accomplishes its tasks well.
If you're ready to explore this integrated calendar, the Apple Calendar tips introduced by TipsMake.com will show you how to get started with this calendar application.
5 pocket tips for beginners to use Apple Calendar
- 1. Create a new calendar
- 2. Create a new event
- 3. Convert calendar view
- 4. Sync Calendar with online account
- 5. Share the calendar
1. Create a new calendar

Thanks to the digital calendar, you can keep all your tasks, events and reminders in one place. But you will have trouble separating these items or filtering out a specific item when you need them.
You won't have that problem with Calendar. This application allows you to create multiple calendars to manage schedules in different areas of life. You can create a Home calendar to keep track of household tasks, Meetings calendars to quickly see appointments, etc.
Create a new calendar easily by clicking File> New Calendar . You can then rename the calendar from Calendar List in the sidebar. If the list is not displayed, click the Calendars toolbar button or on View> Show Calendar List to display the list.
(The application starts with a few default calendars: Work and Birthdays ).
Calendar allows you to specify a separate color for each calendar. Therefore, it is easy to distinguish events that are personal or work-related, etc. even if you are viewing all events at the same time.
To change the color assigned to the calendar, select the color you want from the right-click menu on the calendar via the sidebar. (When you move an item from one calendar to another, the item will have the color of the new calendar).
You can even combine multiple calendars into separate groups such as Tasks, Reminders and Events or Personal, Work, Family and Friends. To create a calendar group, click File> New Calendar Group .
2. Create a new event

Calendar allows you to add events to any calendar in many ways. (First, make sure you select the correct calendar in the sidebar). If you just started, you can create an event with:
- Go to File> New Event
- Use keyboard shortcuts:
Cmd+N - Use the Create Quick Event button or the plus sign button on the toolbar
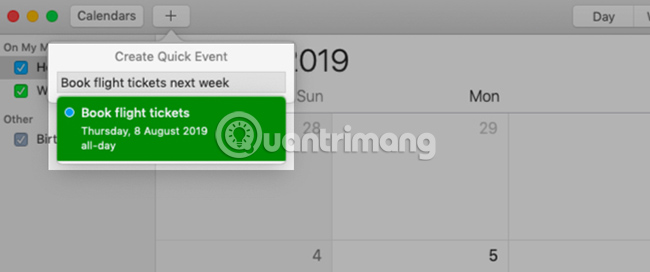
All of these actions will bring up a Create Quick Event pop-up window, where you can add events.
Here, Calendar supports you to use natural language to specify dates and times (like many other original Mac applications). For example, you can trust Calendar to interpret phrases like 'Karen's birthday dinner at 8pm' or '9am flight to Mumbai on Friday' correctly and create events from that information.
You can add locations, invitations, notes, URLs, etc . to events from the pop-up Edit Event window. To open this window, double-click the event in the calendar or select it and click Edit> Edit Event .
In the pop-up window, click on the event's date to access the hidden section, from which you can set up reminders or alerts for the event.
Unfortunately, the reminders on Calendar are not displayed in the Reminders app. But you can display them in the Notification Center with the Calendar utility .
3. Convert calendar view

Would you like to focus more on the tasks and events you have scheduled for a specific day or week? You might like to see how busy your schedule is this month or want to see what to do all year round at a glance.
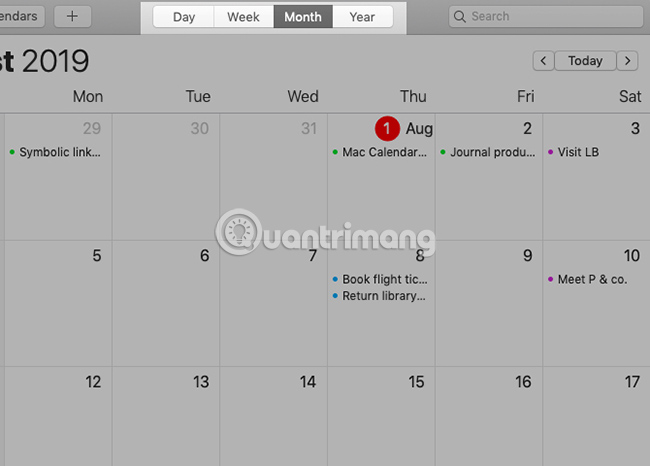
Such scenarios are the reason why Calendar has 4 viewing modes: Day, Week, Month and Year . They help you visualize your schedule in many ways.
To switch between the calendar view, click the buttons on the toolbar or the relevant View menu option. You can even create events through these views. To start, all you have to do is double click on the appropriate date in the mode see Month or on the time frame in Day and Week views. These actions lead directly to the pop-up Edit Event window instead of the Create Quick Event window.
4. Sync Calendar with online account

Any calendar you create in Calendar is stored on your Mac and appears in the sidebar On My Mac . If you want to bring the iCloud, Google Calendar or any other CalDAV calendar into the Calendar application to manage them all from one location, it's easy to do.
All you need to do is set up the appropriate calendar account in Calendar> Preferences> Accounts . (You can also temporarily delete or disable accounts from this location).
Do you use an online account that talks to Mail, Notes or other original Mac applications? In that case, you can also enable calendar sync for that account via System Preferences> Internet Accounts .
After adding an account to Calendar, you can no longer create a new calendar using the shortcut Cmd + Option + N anymore. Instead, you must use the File> New Calendar option , allowing you to select an account to create a new calendar. In addition, calendar groups are only available for local accounts.
5. Share the calendar

Sharing your schedule with people can save you a lot of time while planning for common activities.
For example, sharing your free time schedule with your friends will help you determine exactly when both of you are free. Or you can maintain a schedule for errands to see if you can shop for groceries together. And if you add items based on location to the calendar, it's easy to recognize when you're in the same neighborhood for the week.
In the Calendar application, you can only share calendars associated with Internet accounts. In other words, you cannot share the calendar listed in On My Mac .
To share the calendar, hover over it and click the Share Calendar button (wireless icon or connection) that appears. In the next pop-up window, enter the name or email address of the person you want to share the calendar with, then press Enter . This will send an invitation immediately.
By default, friends who have shared calendars can view and edit calendars. If you want to revoke editing privileges for specific people, click their name in the list and select the View Only option from the menu that appears. (Note that the Invite Again option is also in this menu. Click it if you want to resend the invitation to the shared calendar).
If you want to stop sharing your calendar with a specific person, select that person's name in the Shared With list and click the Delete button .
You don't want to share a calendar anymore? Right-click it in the sidebar and select Stop Sharing from the context menu.
The Calendar on Mac application is the perfect choice if you want a reliable desktop calendar for free. This application is very easy to use. And the application can prove its flexibility, if you add it a bit of creativity. See also: 7 tips to know how to master the Mac calendar application after grasping the basics.
Wish you success in conquering this application!
You should read it
- ★ How to add attachments to calendar events on iOS
- ★ How to use the Like Italy Calendar - Van Nien Calendar 2020
- ★ Top Vietnamese calendar application, see the best sound schedule for phones
- ★ Apple launched a solution to overcome spam in iCloud Calendar
- ★ Making Google Calendar more useful with these free calendar applications