How to set Do Not Disturb shortcuts on a Mac
Although there are many methods to activate Do Not Disturb mode, you can also use a shortcut to turn it on more easily.
Table of Contents
One of macOS's most useful features, allowing you to be uninterrupted while working, is 'Do Not Disturb'. As its name suggests, Do Not Disturb basically makes all Mac notifications 'silent', whether it's messages, phone calls, emails, app updates or anything else What else. Notifications are automatically transferred to the Notification Center for you to review later and fundamentally, making your workflow uninterrupted.
Although there are many methods to activate Do Not Disturb mode, you can also use a shortcut to turn it on more easily.
The default shortcut for Do Not Disturb mode
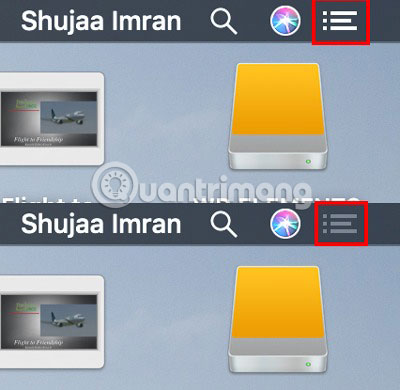
Apple has created a shortcut to enable Do not Disturb mode. All you need to do is press and hold the Option key, then click the Notification Center at the top right of the screen. This will automatically turn on / off Do Not Disturb mode on a Mac. This can be confirmed by the color change of the Notification Center icon. It will turn light gray when Do Not Disturb mode is activated and will return to white after being disabled.
This is definitely the fastest default way to enable / disable Do Not Disturb mode, but requires the use of a touchpad or mouse to activate. That's why this is not a real shortcut. Fortunately, you can create a custom shortcut for this feature.
How to create your own shortcut for Do Not Disturb mode
If you want a real shortcut to enable or disable Do Not Disturb mode, you can customize your own shortcut in System Preferences on macOS.
1. Open System Preferences on a Mac.
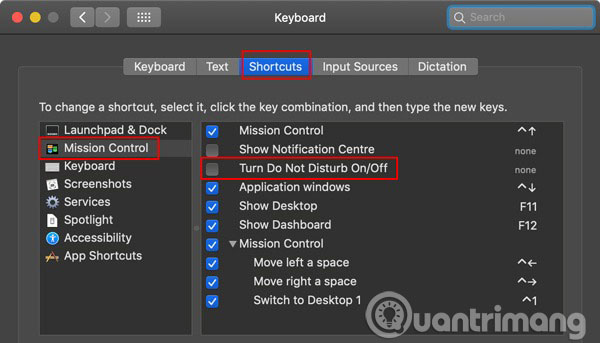
2. Click Keyboard.

3. Click the Shortcuts tab .
4. Select Shortcuts in the left pane and click 'Turn Do Not Disturb On / Off' . Make sure the options for the shortcut are selected.
5. Press the Enter button on the keyboard and you will be allowed to set the key combination of your choice. Press the keys you want to use as a shortcut and now they will appear on the screen.

For example, in the above case, the Command + Shift + 8 key combination has been designated as a shortcut. If the key combination you selected has been used for another function on macOS, you will automatically receive a warning icon, allowing you to change to avoid any conflicts.
Now you can use the set shortcut to turn on / off Do Not Disturb mode easily on your Mac.
Do you find this guide useful? Leave comments in the comment section below!
Hope you are succesful.
Was this article helpful?
Your feedback helps us improve.
Related Articles
 Trick to enable Do Not Disturb feature on Mac3 minutes read
 How to use the non-disturbing feature of going to bed on iOS 123 minutes read
 How to use the feature Do not disturb when driving on iOS 114 minutes read
 The Do Not Disturb mode is about to be significantly improved on Android.4 minutes read
 What is the best 'Do Not Disturb' setting for Windows?7 minutes read
 How to receive emergency calls while in Do not Disturb mode on iPhone3 minutes read
Reader Comments 0
Sign in with email or Google to join the discussion.