4 ways to edit smiles in portrait photos on Photoshop
Have a perfect photo of someone, but just wish they were smiling instead of frowning? It's an easy fix in Photoshop. There are a few ways to edit smiles in photos in Photoshop, including using the Liquify tool, Neural Filters, layers, and the Puppet Warp tool. Let's dive in!
1. Add a smile with another image

Overlaying images, using Photoshop Layers and the Selection tool is an old technique for replacing smiles. While this technique has a high success rate, it depends on having the right image.
It's best to use another photo of the same person rather than a similar photo of a stranger. It can happen that you're taking multiple photos of a group and most of your subjects look great, but one person isn't smiling. If you have another photo of them smiling, it's easy to 'transfer' that smile onto the better photo.
If you don't have a photo of the same person smiling, you can copy a photo of a similar looking person from the same angle. You can edit the skin tone to help match the images together more accurately.

Open both of your images in Photoshop. On the smiling image, use the Magnetic Lasso (L) to select the area around the smile and then copy the selection ( Cmd + C for Mac and Ctrl + C for Windows).

Paste the selection you just copied ( Cmd + V for Mac and Ctrl + V for Windows) onto a new layer above the non-smiling image. Use Free Transform ( Cmd + T for Mac and Ctrl + T for Windows) to select the smile.
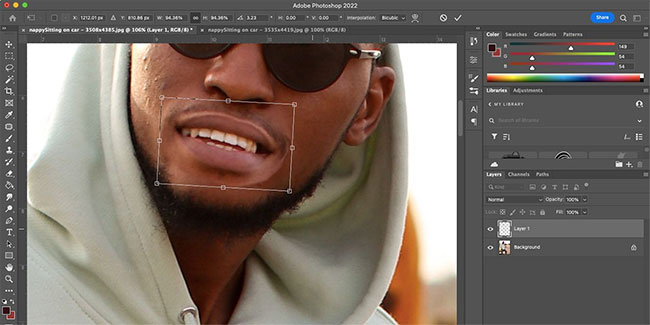
Move the smile so it fits the mouth in the non-smiling photo. You can resize it by dragging the corner handles, and rotate the smile by hovering near a corner until the cursor turns into an arrow, then clicking and dragging the corner to rotate.
You may want to flip the smile horizontally to reflect the new angles on the face. While in Free Transform mode , right-click the smile and select Flip Horizontal. Move the smile around until it fits the new image.
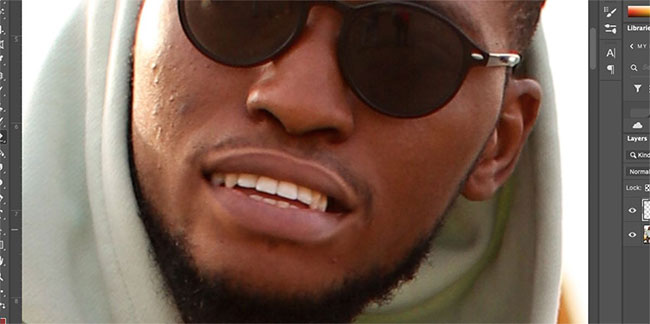
Once you're happy with the position, double-click the smile to exit the Free Transform tool. Use the Eraser Tool (E) to remove any unwanted parts of the image that overlap, such as excess skin around the mouth.
2. Add a smile using the Be Happy filter!

Photoshop's Neural Filters can create an artificial smile on any portrait. The technique uses Adobe Sensei, which provides a quick and easy way to add smiles to photos using facial recognition technology. This can work for group portraits or individual portraits.
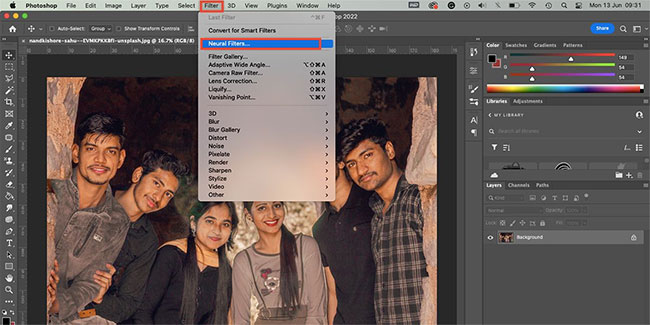
With the photo on your canvas, go to Filter > Neural Filters . If this is your first time using the Smart Portrait filter , you'll have to download it by clicking the cloud button. Enable the filter.
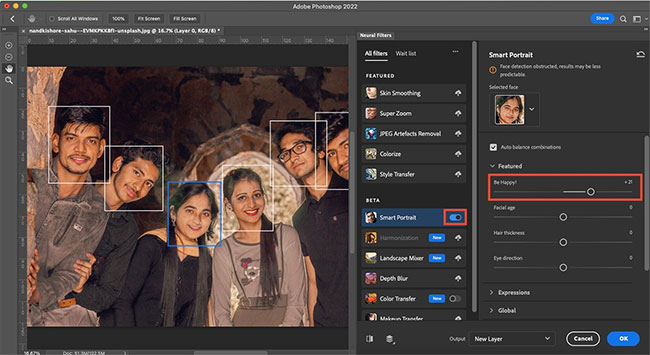
Under Featured , you'll see the Be Happy! filter . Move the slider to the right to add varying degrees of smile to your portrait. Once you're happy with the smile, click OK.
This filter only uses one smile image, which means it may not work on everyone. And if you apply this filter to multiple people in the same photo, they will all have the same smile.
However, for quick and easy smile editing, this feature works very well, as the slider gives you some control over the size of the smile.
3. Add a smile using the Liquify tool

Convert your photo to a Smart Object by right-clicking on the layer in the Layers panel and selecting Convert to Smart Object .
In the tools above, go to Filter > Liquify . This will open the filter settings. Use the Zoom Tool (Z) in the settings box to zoom in on the mouth part of the image.
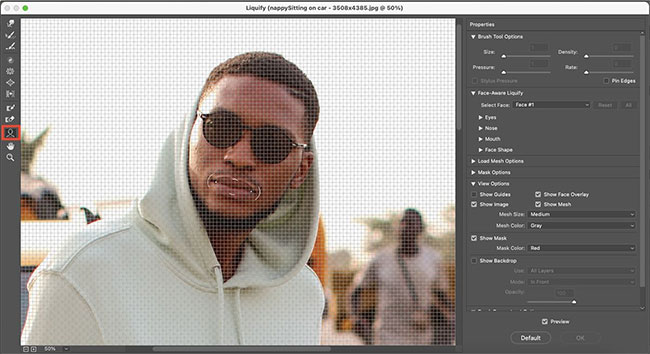
Select the Face Tool (A) in the toolbar on the left. Move your cursor around the mouth and use the guides to move the edges of the lips up. You can also use the properties on the right to change these values.
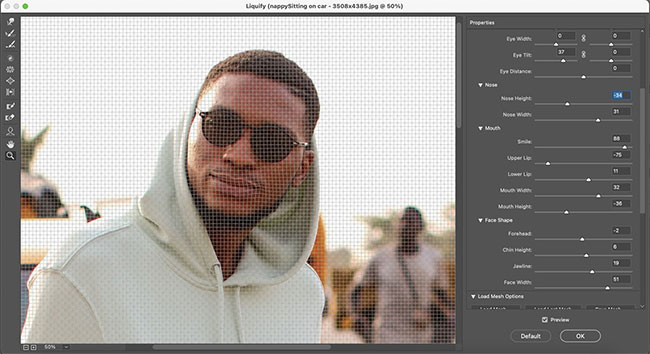
The other properties on the right give you options to move the eye position, widen the jaw, move the nose, etc. You can change these settings until your facial features look natural with a smile. Click OK when you are happy with the results.
4. Add a smile using the Puppet Warp Tool

Photoshop's Puppet Warp Tool is awesome, treating a 2D image as a movable puppet. While it works best on entire bodies, you can also use it on individual body parts, like mouths.
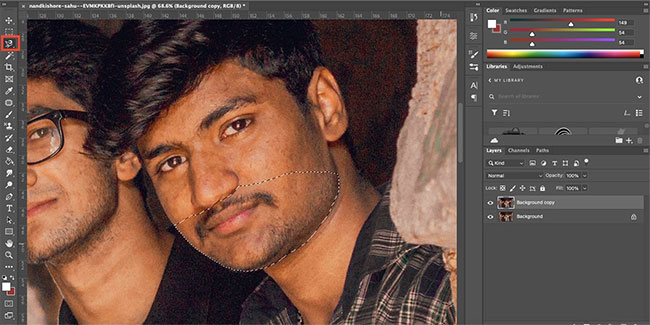
Duplicate the image in the Layers panel by right-clicking on the layer and selecting Duplicate Layer. Use the Lasso Tool (L) to select the lower half of the face.
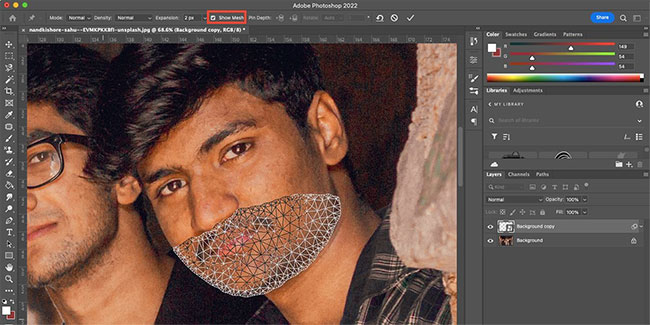
Go to Edit > Puppet Warp . This will apply a mesh to the selected area. Uncheck Show Mesh in the top toolbar to make the face more visible.
When you hover over the selected area, your cursor will turn into a pin tool. Pin areas that move naturally when smiling, such as the corners of your mouth and the center of your lips. You can also pin areas of your cheeks if they are within your selection.
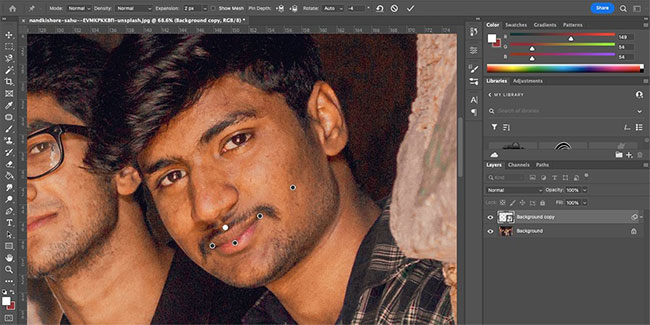
Once all the pins are in place, gently move each pin to show a natural smile. If you move too much, the distortion will be obvious, so be careful. If you are happy with the smile position, click on any other tool, then click Apply on the pop-up window that appears.
To further refine the image, check out TipsMake.com's tutorial on how to use the Clone Stamp tool in Photoshop.
If you can't get the perfect smile in your photo, that's not a bad thing. With a variety of smile editing techniques, you can choose the one that best suits your editing needs.
The Liquify and Puppet Warp methods are best for adding a subtle smile to an image. But if you want to show a smile with natural teeth, your best bet is to composite another photo or use the Be Happy! filter.
You should read it
- ★ How to use Photoshop CS5 - Part 5: Photo editing
- ★ GIMP or Photoshop is the right tool for you?
- ★ How to blur photos using Adobe Photoshop Fix Android
- ★ How to edit and enhance photos on mobile with Photoshop Touch
- ★ Do you want to learn Adobe Photoshop tips within 1 minute? Take a look at these tutorial videos