Table of Contents
Overview
This guide covers 4 ways to fix laptop's lost Wi-Fi icon in clear, practical terms. It covers the key concepts, recommended steps, common limitations, and useful checks so you can make a better-informed decision.
One fine day, you start your computer and find that your laptop has lost the Wi-Fi icon and cannot access the internet even though it was working normally before. Let's see with this guide one reason and some ways to fix that error!
Reasons why laptop lost Wi-Fi icon
Below are the 2 main and common causes when the error of the laptop losing the Wi-Fi icon occurs.
Wi-Fi icon is turned off/hidden: Normally, by default, the Wi-Fi icon is always displayed on the Windows taskbar, but there may be an operation that causes the Wi-Fi icon to be hidden.
Not installed or Wi-Fi driver error: Currently Windows updates the automatic driver update feature, so if you accidentally turn off automatic updates without knowing.
How to fix laptop icon loss error
Method 1: Wi-Fi icon is hidden
To fix the error of whether the Wi-Fi icon on the laptop is hidden or not on Windows 10 operating system, we perform the following steps:
Step 1: Click on the Windows icon on the keyboard or the bottom left corner of the screen. Then click on the settings section.
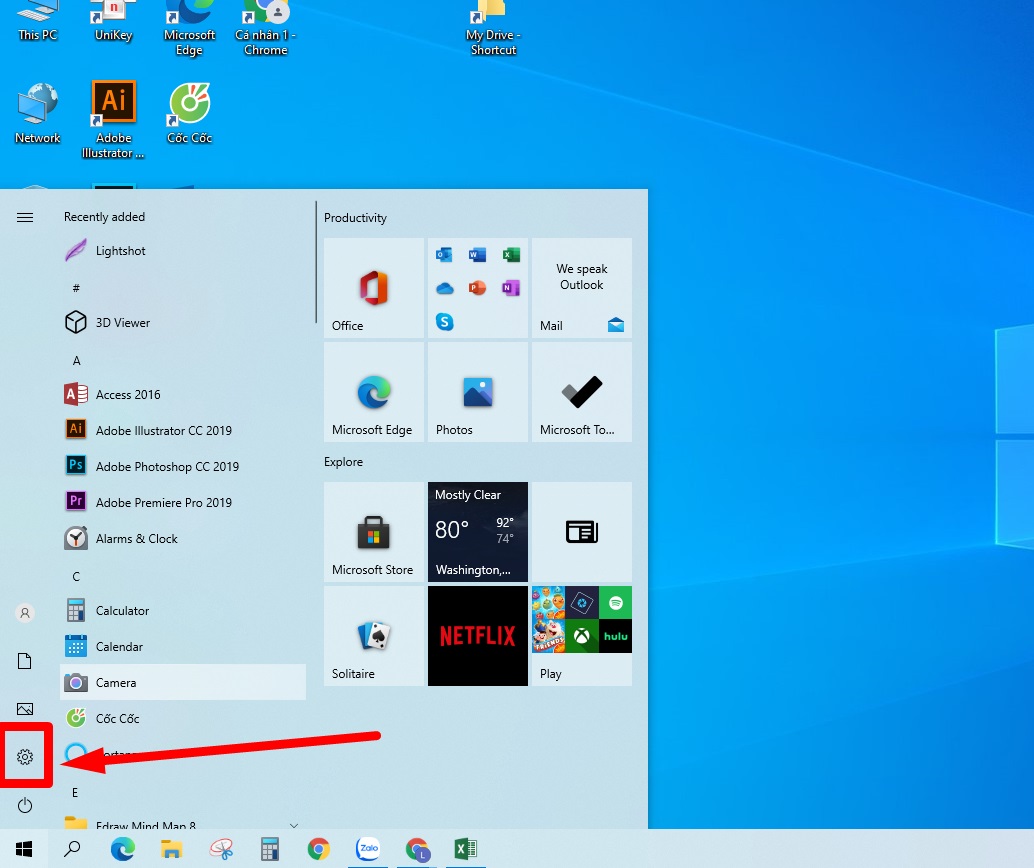
Step 2: Then click on Personalization
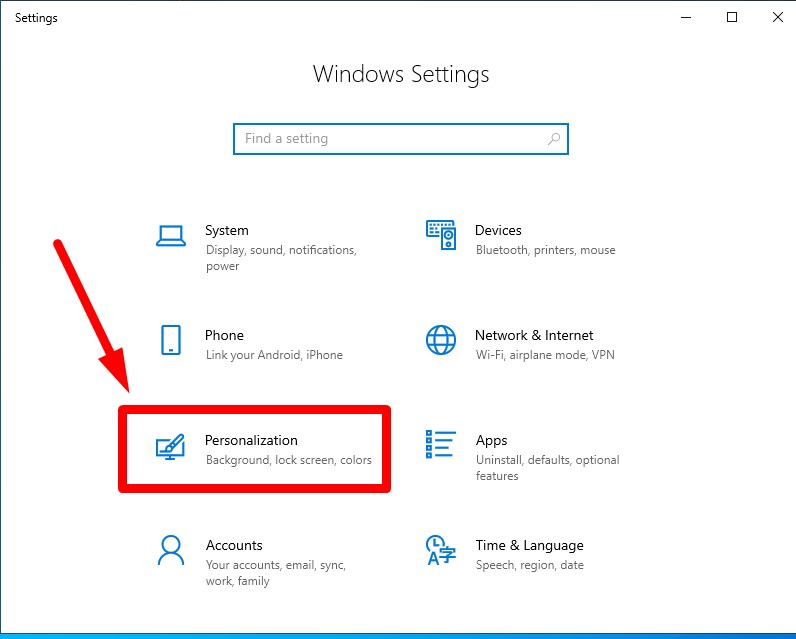
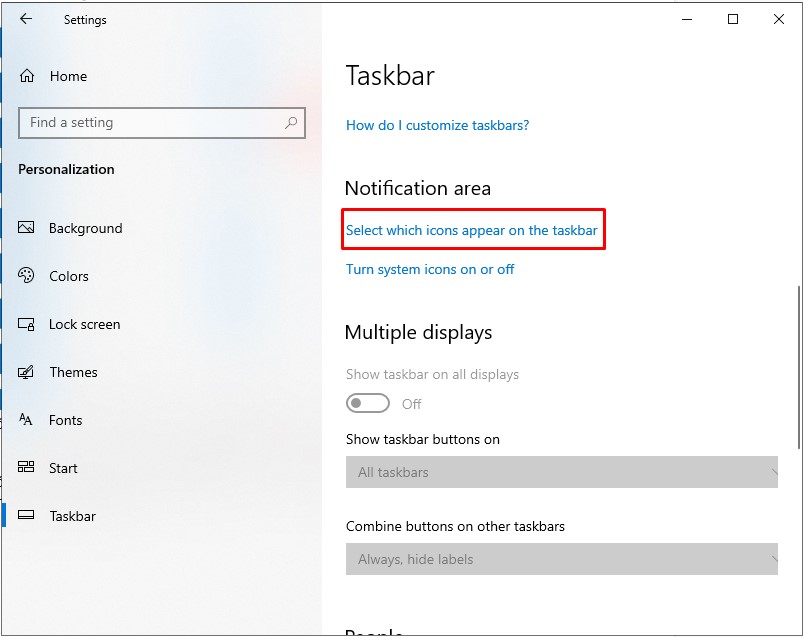
Step 3: Next, click on the Taskbar in the bottom left corner, Scroll down and click Turn system icon on off as shown below:
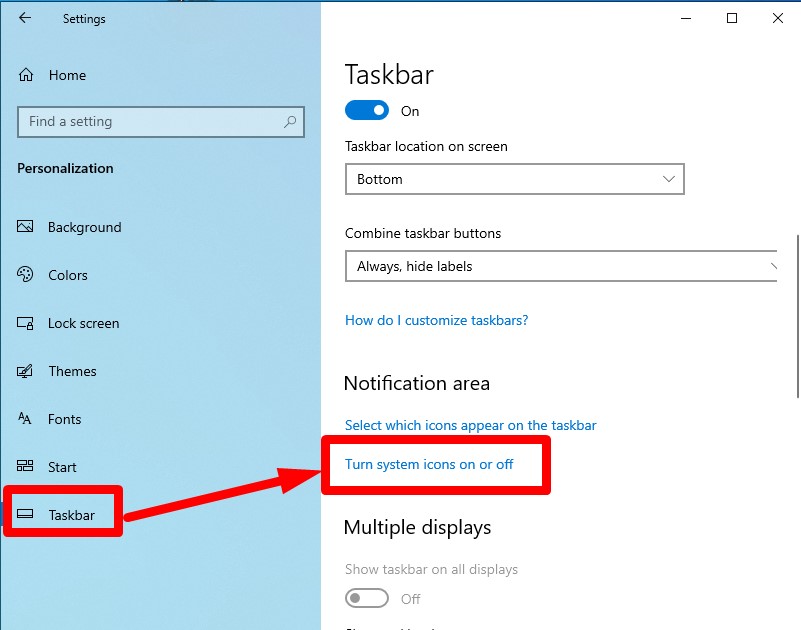
Step 4: Scroll down to the network section to see if it is in ON or OFF mode. If it is in OFF mode, just press ON and you're done.
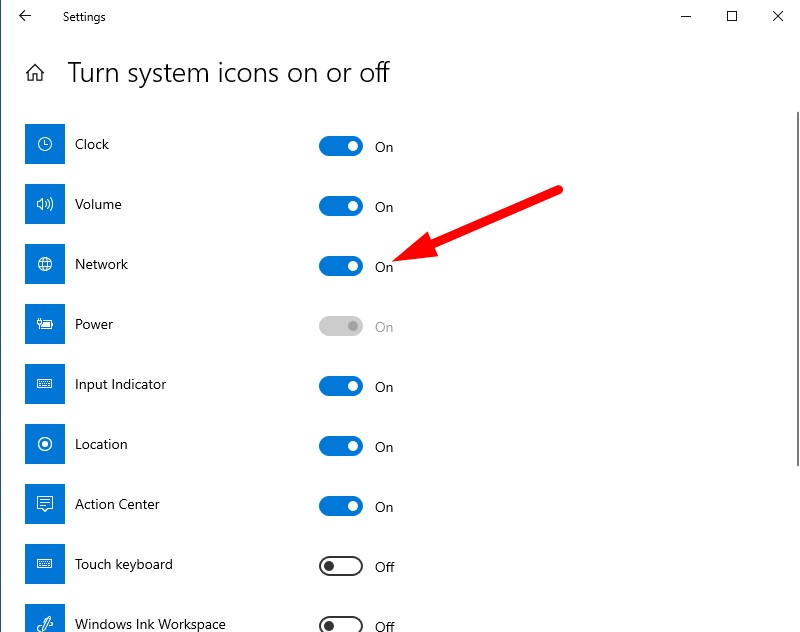
Step 5: Go back to the interface on the taskbar, select which icon appear on the taskbar ⇒ then find the Network section and select ON.
Method 2: Install or update driver for new Wi-Fi
Instructions on how to install standard Wi-Fi driver from the manufacturer
Step 1: If you are using one of the following laptop models, you can directly access the link below:
- Sony: the official Sony website
- Acer: the official Acer website
- Dell: the official Dell website
- Asus: the official ASUS website
- HP: the official HP website
- Lenovo: the official Lenovo website
- Samsung: the official Samsung website
You need to enter the laptop serial number printed on the bottom of the laptop to install the driver more accurately.
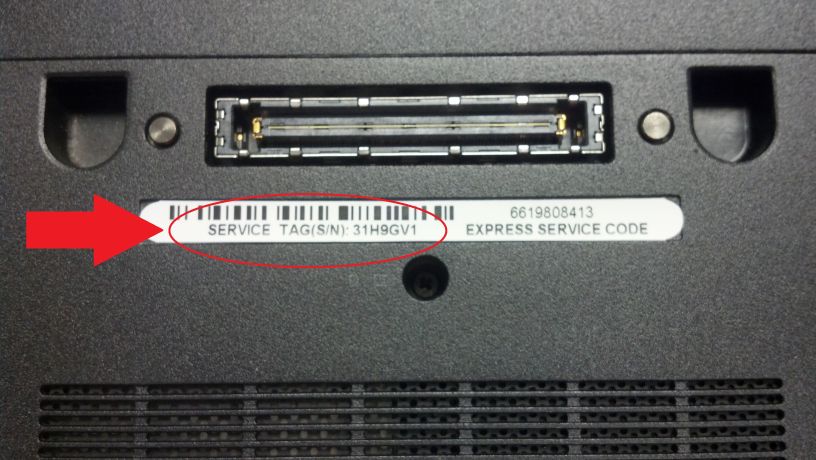
Step 2: Enter the code above to find and download the appropriate driver.
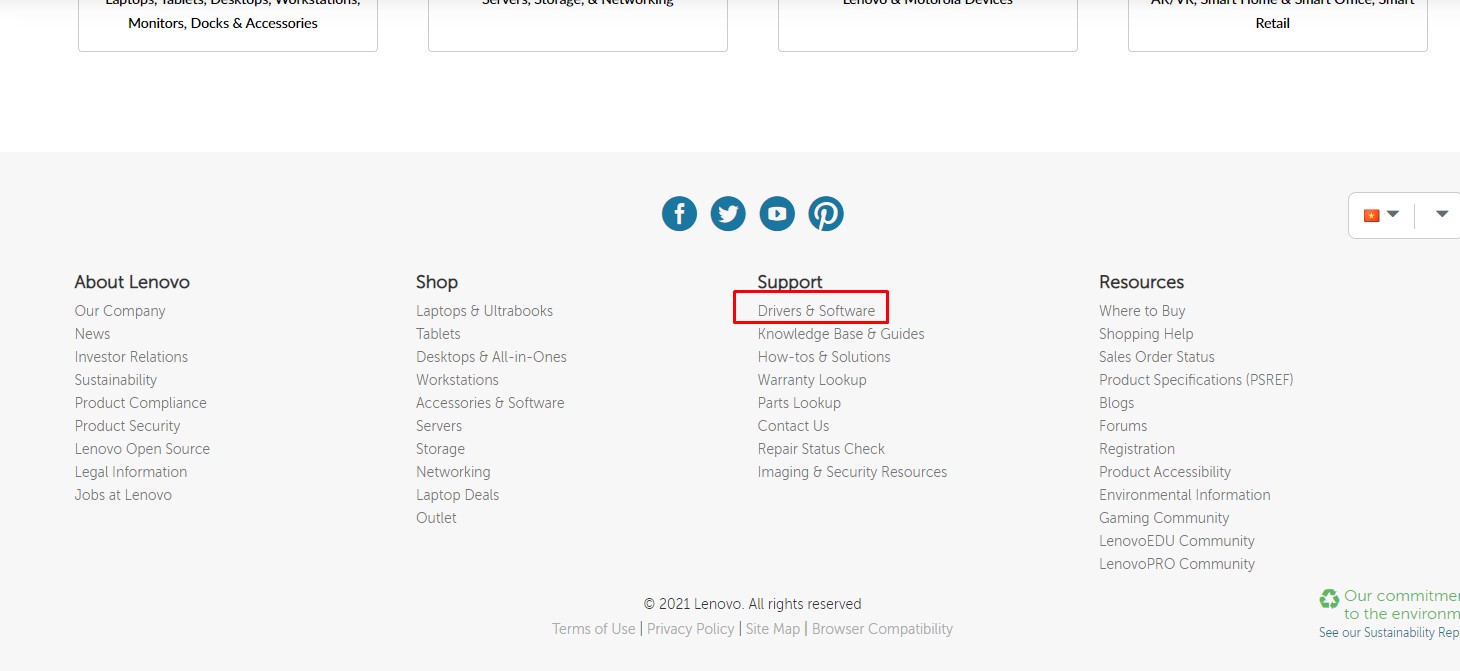
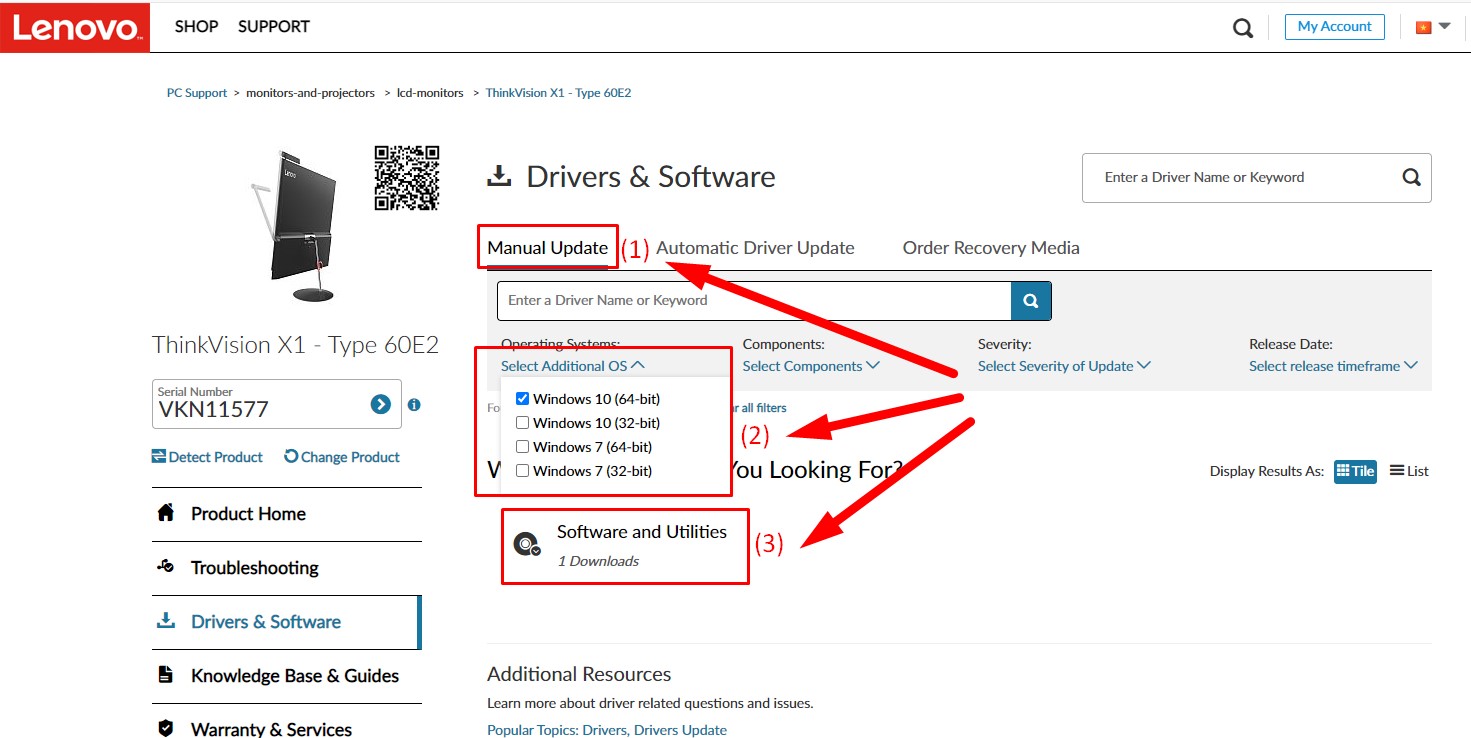
For example, with Lenovo laptops, when accessing the link above, select the line Driver & software in the support section at the bottom of the page.
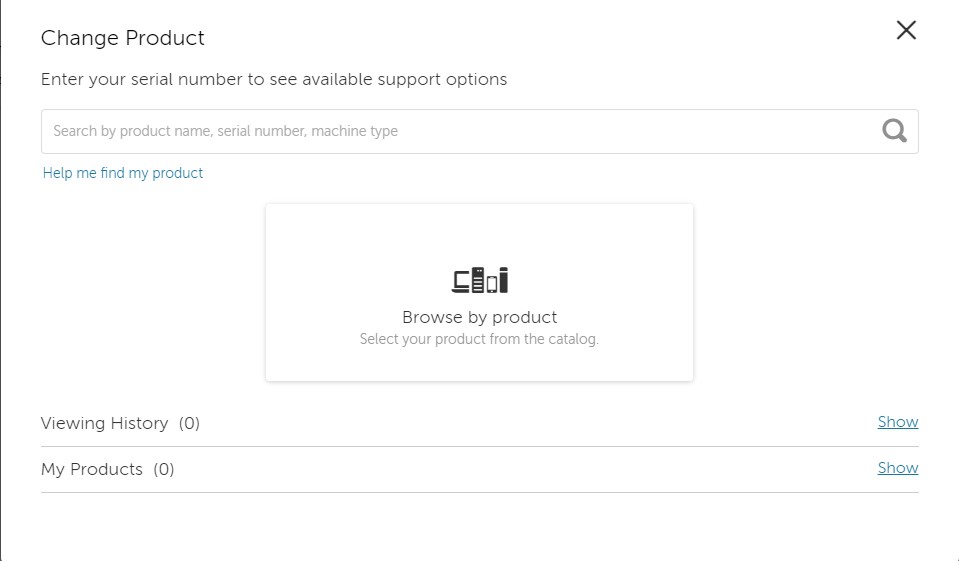
And enter the machine series
Step 3: Select Manual Update then select the Windows operating system you are using and go to download as shown below:
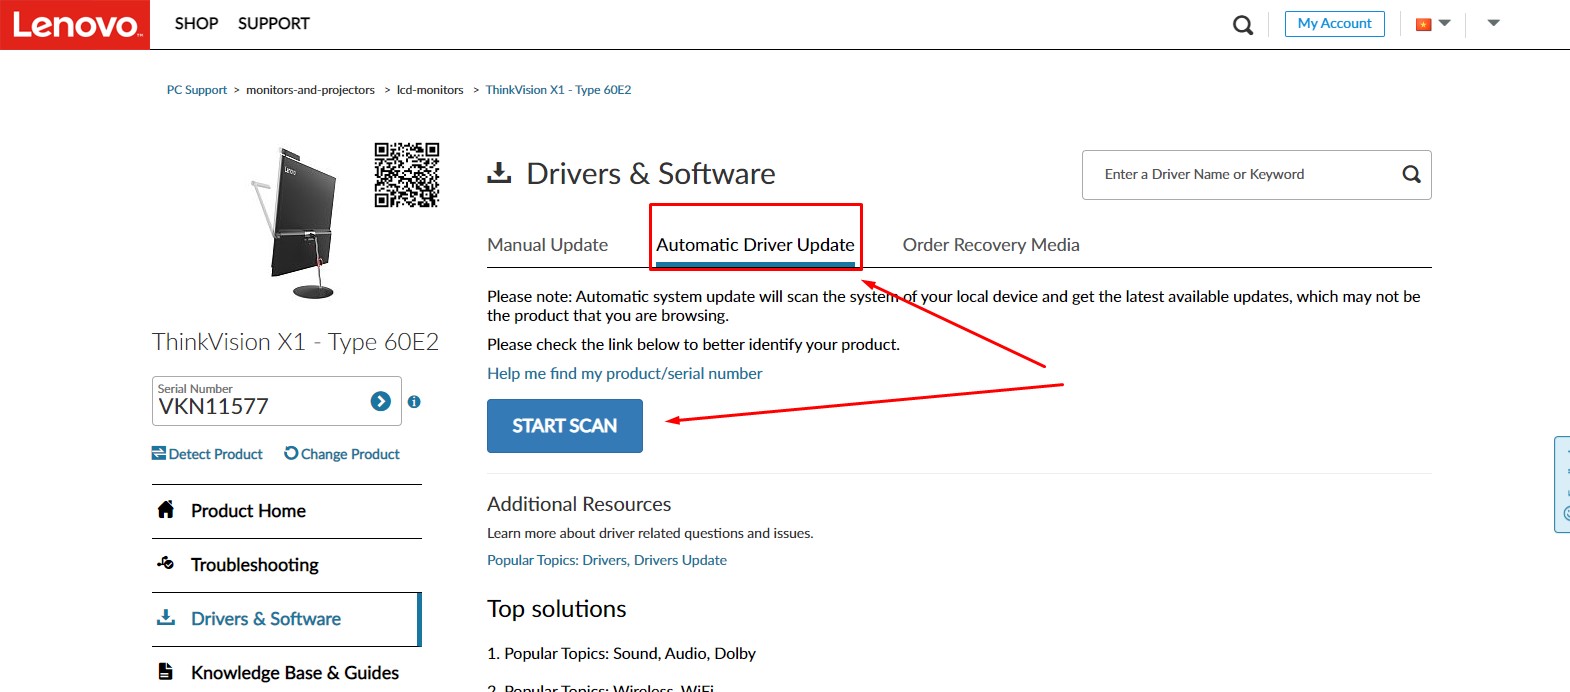
For Wi-Fi update, select Automatic Driver Update => Start Scan
Instructions for removing old drivers
In case the driver is faulty, before reinstalling we need to uninstall the old Wi-Fi driver. To uninstall the driver, follow the instructions below.
Step 1: Right-click on the This PC icon on the desktop, then select manage as shown below.

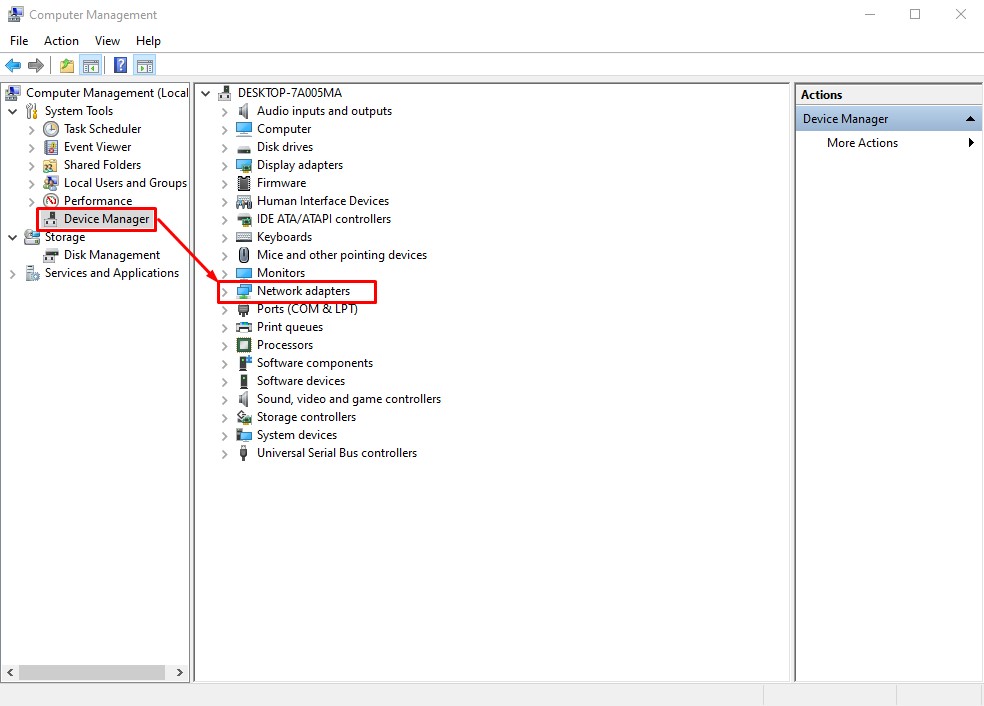
Step 2: Select Device Manager ---> Network adapters
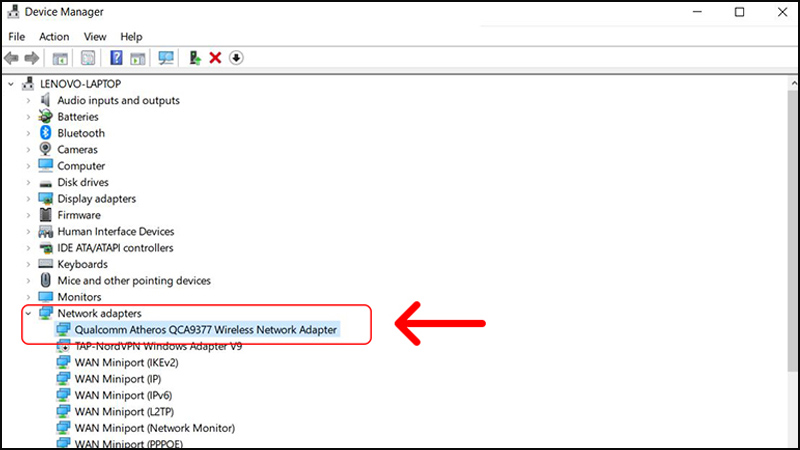
Find and click on Network adapters => and select your Wireless (Wi-Fi network) => then right click here => select Uninstall device to remove the current Wi-Fi driver. After removing, you should restart your computer.
Driver installation instructions
Step 1: Find and open the downloaded Wi-Fi driver by double-clicking on the file.
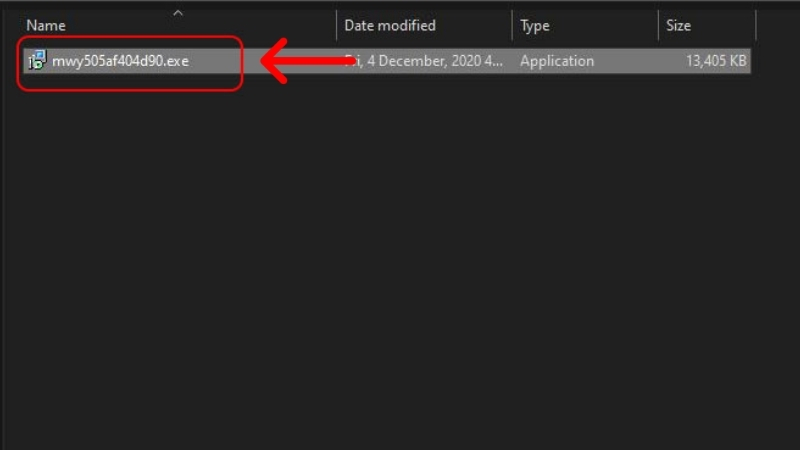
B2: Select Yes

B3: Select I accept the agreement => Click Next.
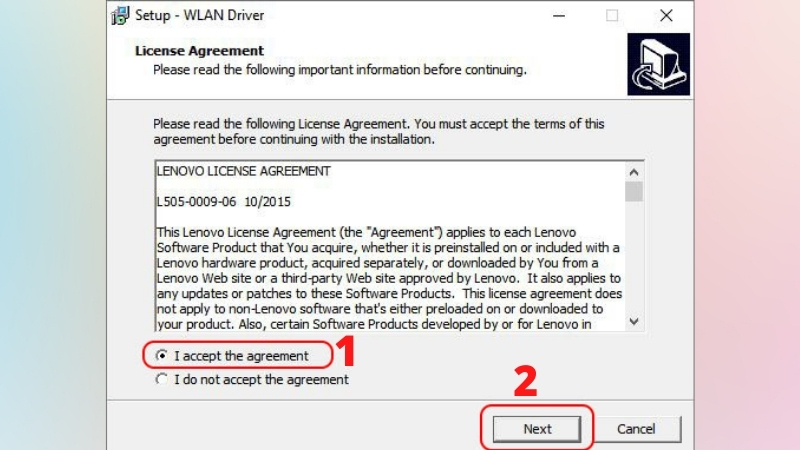
B4: Select Install > Click Next.
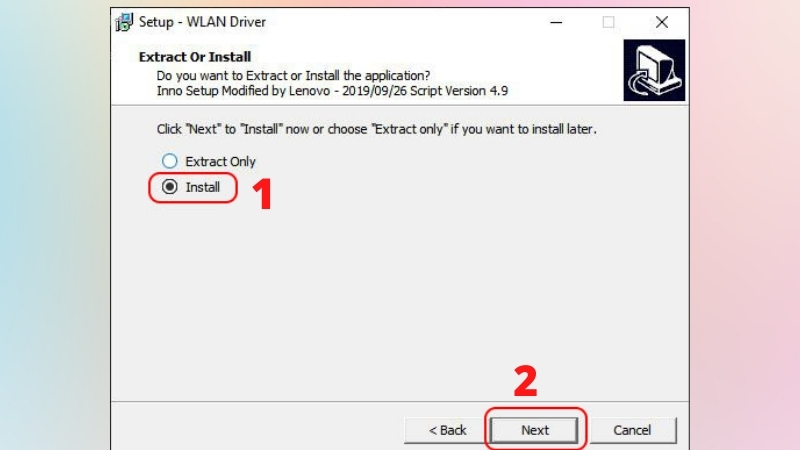
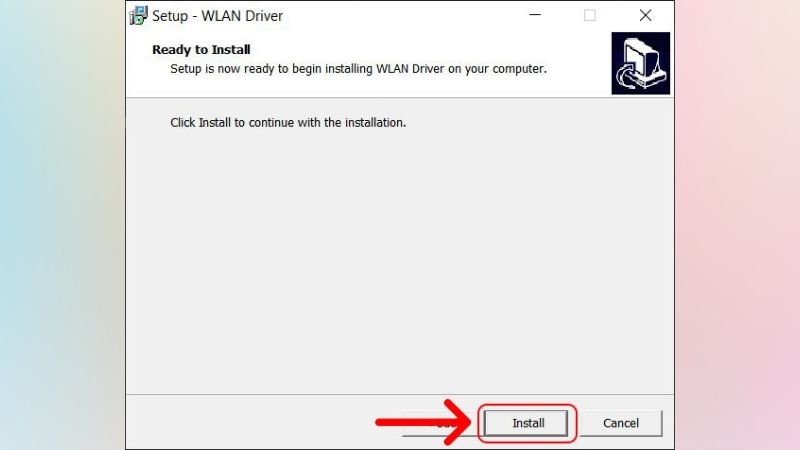
B5: Continue to select Install.
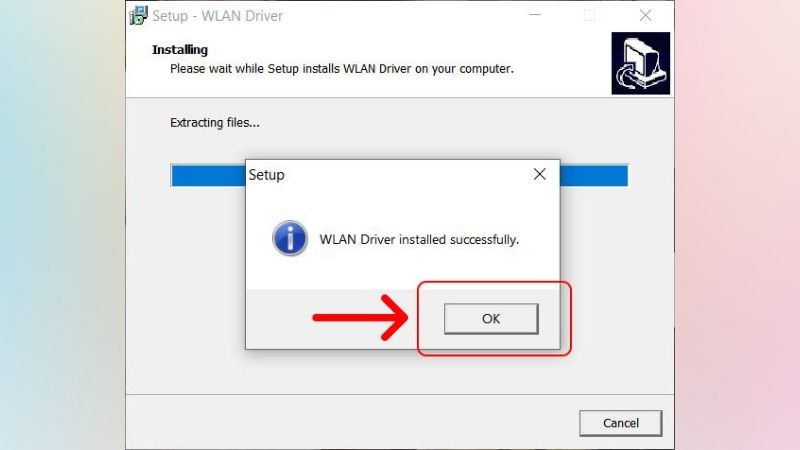
B6: Select OK to install successfully
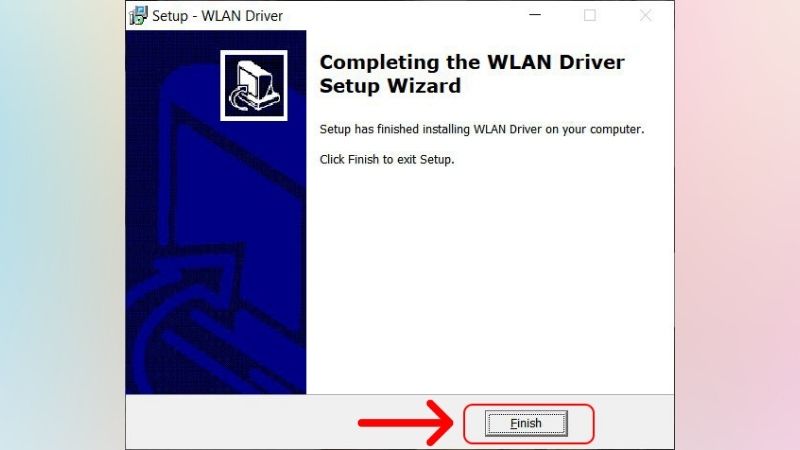
B7: Click Finish to complete.
And finally restart your computer.
Method 3: Fix the error of laptop losing Wi-Fi icon by restarting network services
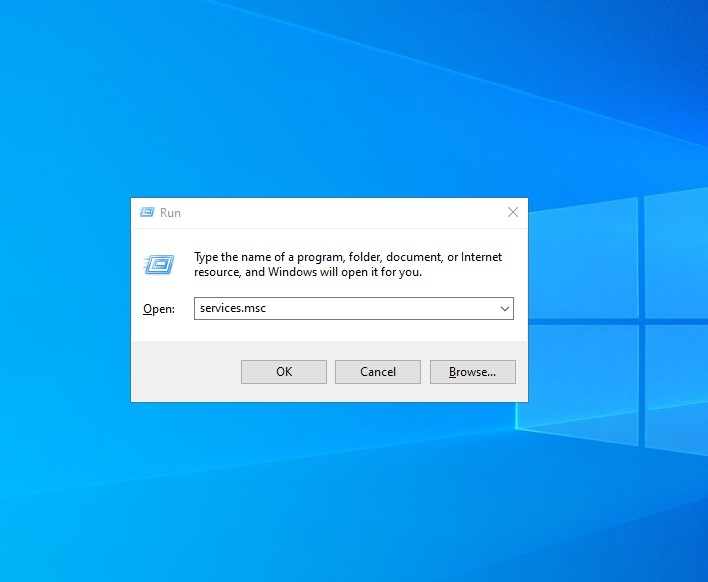
Step 1: Press the Windows + R key combination to => Enter the command services. msc to open the network services window
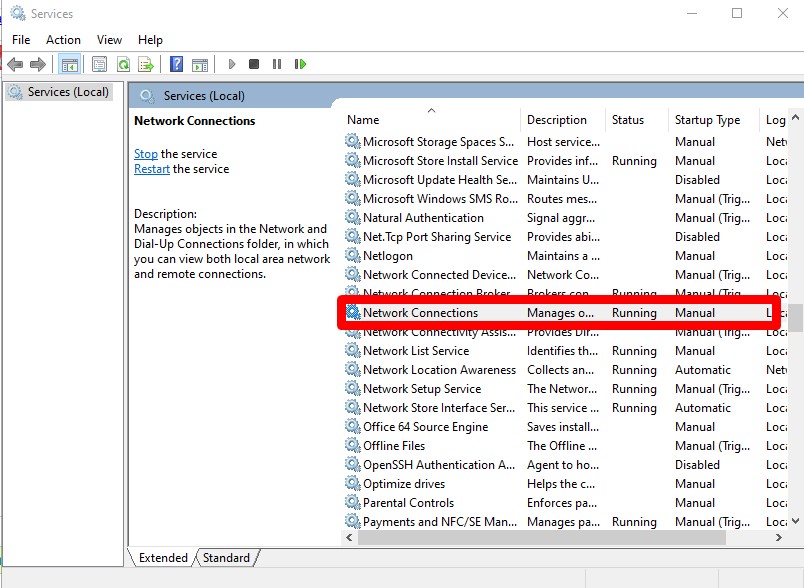
B2: In the Services interface, you find the following services:
- Remote procedure call
- Network Connections
- Plug and Play
- Remote Access Connection Manager
- Telephony
Double click on each service and select Start to make sure they are all running.
Step 3: After completing the above steps, check if the Wi-Fi icon on your computer is turned on.
Method 4: Use Windows' automatic troubleshooter
Another commonly used method is to use Windows 10's automatic error fixer. To use this method, follow these instructions:
Step 1: Right-click on the Wi-Fi icon and select the line Troubleshoot Problems.

B2: Follow the instructions on the screen
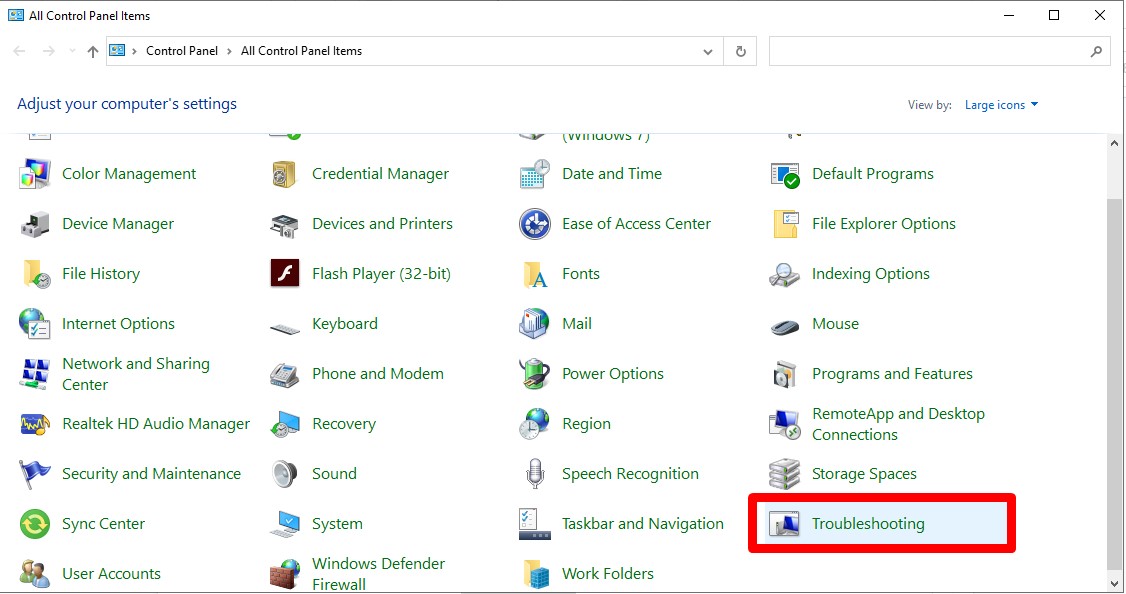
B3: Open Control Panel and select Troubleshooting
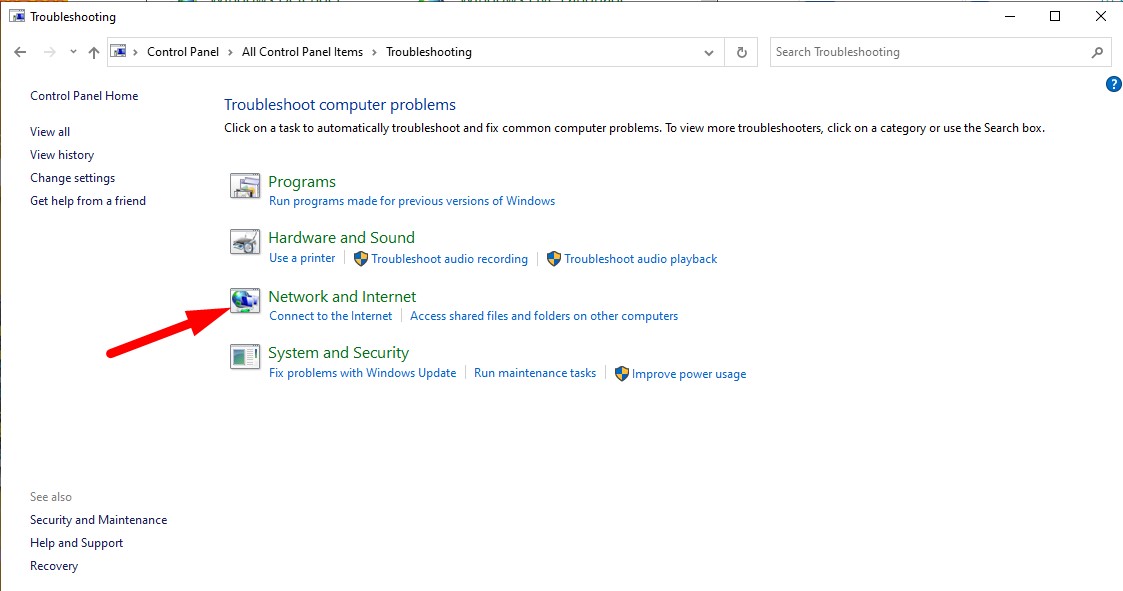
B4: Select Network and Internet
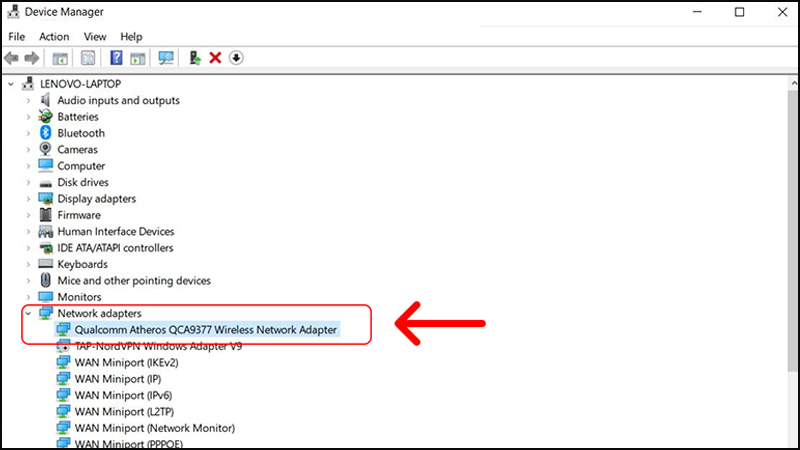
B5: Click Select Network Adapter
B6: Follow the on-screen instructions to troubleshoot
Above are 4 ways to fix the error of laptop losing Wi-Fi icon that this guide guides. Hopefully it can help you solve the problem.
Key Takeaways
Use the guidance above as a practical reference for 4 ways to fix laptop's lost Wi-Fi icon. Check compatibility, follow the steps carefully, and verify important details with official documentation when software, security, accounts, health, or purchases are involved.
FAQ
What is the main point of this article?
This article explains 4 easiest ways to fix laptop's lost Wi-Fi icon, including the central facts, context, practical implications, and details needed to understand the topic.
Why does this topic matter?
It may affect performance, cost, safety, convenience, purchasing decisions, or how people understand a broader development.
Could the information change over time?
Yes. Product details, software features, prices, policies, codes, and news developments can change, so verify time-sensitive information with official sources.
Related Articles
 Wi-Fi Icon Missing on the Taskbar Windows 10, This Is How to Fix4 minutes read
 Lost Wi-Fi Icon on Windows 10 and How to Fix Successfully8 minutes read
 How to fix the missing WiFi icon on a Windows 11 laptop3 minutes read
 6 Simple and Effective Tips to Fix Laptop with Lost Wi-Fi4 minutes read
 Steps to Recover Lost Taskbar Icon on Windows 106 minutes read
 The Wifi Icon Is Missing from the Windows Taskbar; Here's How to Fix It9 minutes read
Reader Comments 0
Sign in with email or Google to join the discussion.