Wireless network traffic security - Part 6
In this next article, I will show you how to deploy policy servers and how to enroll certificates and register Active Directory for that server.
In the previous part of this series, we learned that one of the best ways to secure wireless network traffic is to treat them as an unprotected network. The idea is to authenticate anyone who uses the wireless network in the way that you authenticate users connected to your VPN. Windows Server 2008 can be configured to provide such authentication. To do this, you must configure Windows to work as a network policy server (NPS).
Before start
Before introducing how to configure the network policy server, we want to give you some prerequisites. As explained in the previous section, the authentication process is primarily based on certificates. Therefore you need to deploy the enterprise CA on the network in the way described in the previous section or collect certificates from the business organization.
In addition, we must also set up the Active Directory environment and the server will configure the NPS server as a domain member. In addition, the network will require DNS servers (like all Active Directory environments) and need to have a DHCP server.
Finally, though not necessarily required, we should install the Network Policy Server on a specific computer (either physical or possibly virtual). The idea is that if the Network Policy Server is compromised, hackers cannot increase access to other network services.
Deploy network policy server
To deploy the network policy server, open the Server Manager and click the Roles section. Next, click the Add Roles link, Windows will open the Add Roles Wizard . After the Wizard appears, click Next to bypass the Welcome screen. Here, you will see a screen asking you to select the server role. Select Network Policy and Access Services and click Next .
You should now see an introduction screen for the Network Policy and Access Services role. Click Next again and you will be prompted to select the role service to deploy. Select the Network Policy Server service as shown in Figure A and click Next .

Figure A: Select the Network Policy Server service and click Next.
The next screen will display a summary of the installation options you have selected. Please verify the screen name options and then click the Install button. When the deployment process is complete, click Close .
Request a certificate
So far we have installed the network policy services, the next step is to give it a certificate to use in the authentication process. Since we have set up the enterprise CA in the previous section, we will show you how to issue the request from that CA. The procedure to do this is done on Windows Server 2008 R2. Specific steps may vary slightly if you use Windows Server 2008.
Start the process by entering the MMC command at the Run command prompt of the server. Then the server will load an empty management interface. Select Add / Remove Snap-in from the File menu and then Certificates from the list of available snap-ins, then click the Add button. When prompted, set up using a snap-in to manage certificates for computer accounts. Click Next , then select Local Computer option and click Finish .
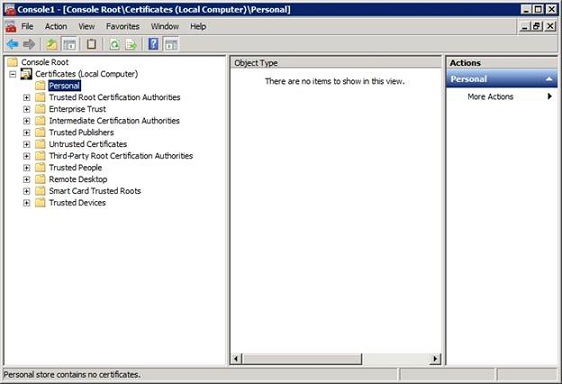
When you click OK , you will see the Certificates interface. Navigate through the interface tree to go to Certificates (Local Computer) | Personal as shown in Figure B.

Figure B: Navigate to Certificates (Local Computer) |Personal
Right-click the Personal item and select All Tasks | Request New Certificate from the menu appears. Windows will then launch the Certificate Enrollment Wizard . Click Next to bypass the welcome screen, and you will be taken to a screen that asks you to select the certificate enrollment policy. Use the default value (Active Directory Enrollment Policy) and click Next .
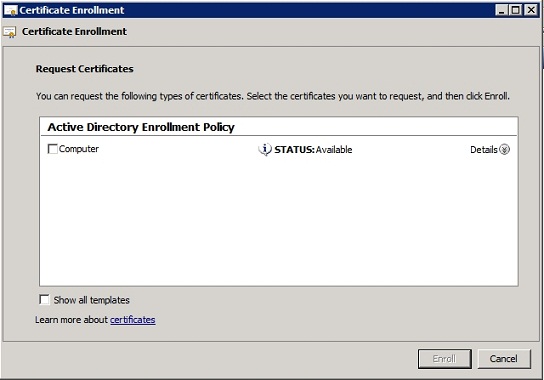
The screen below will ask you to provide the type of certificate you want to request. Select the Computer option as shown in Figure C and click the Enroll button.

Figure C: Select the Computer option and click the Enroll button
Register the network policy server
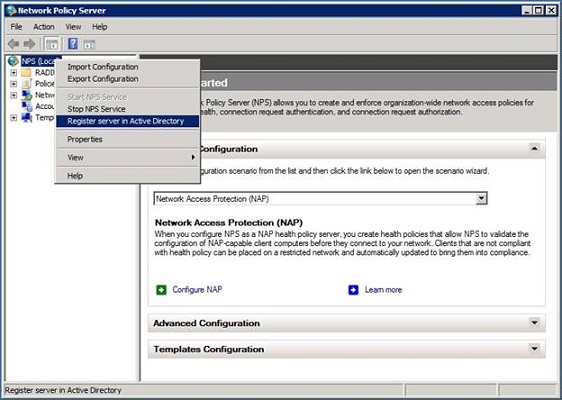
The network policy server has been provided with the necessary certificate, now let's go to register the server in the Active Directory database. To do so, go to Administrative Tools and open the Network Policy Server management interface. Right-click the button ( NPS (Local) ) and select Register Server in the Active Directory command from the right-click menu, as shown in Figure D.

Figure D: You must register the network policy server in Active Directory
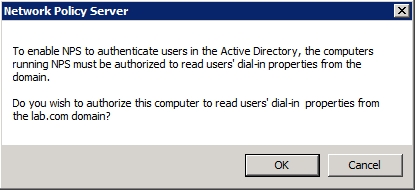
When registering the server in Active Directory, you will see the message that appears in Figure E, which explains to you that in order for the network policy server to be used for authentication purposes it must be Read the 'dial in' attribute of users in the domain. This dialog box will ask if you want to give permission to the network policy server. Please license and click OK . Once done, you will see a message as shown in Figure F telling you that the policy server is currently allowed to read the 'dial in' attributes of the user from the existing domain. However, if you need to authenticate users from other domains, the network policy server must be a domain member of the RAS / NPS server group for those domains.

Figure E: The network policy server must be able to read the user's 'dial-in' attribute from Active Directory

Figure F: The network policy server is only allowed to read the 'dial-in properties of the user from the current domain
Conclude
So far, we have registered the network policy within Active Directory and can start configuring it to authenticate wireless access. We will show you that process in the next part of the series. In the next section, we will configure the network policy server so that it considers your wireless access point as a RADIUS client. Part of the process involves setting up the secrets shared by the network policy server and the wireless access point.