Wireless network traffic security - Part 5
In the next part of this article series, I will show you some of the wireless network security options in Windows Server 2008 operating system.
One of the best possible solutions to secure wireless networks is to avoid connecting wireless access points directly to private network segments that carry sensitive information. It's better to consider the wireless network as an insecure network and ask all clients to prove themselves trustworthy before being allowed to access network resources.
This method is the same as the one used by the VPN server. VPN clients connect to the network via the Internet. Like a wireless network, the Internet is an unreliable environment, so VPN clients must be authenticated before being allowed to access network resources. Given that both VPN and wireless networks require users to establish a connection from an untrusted environment, then the security of these connections will be exactly the same.
Wireless network security options
Microsoft offers two main options for securing wireless networks (besides third-party solutions). The first option is to authenticate wireless connections with PEAP-MS_CHAP v2 (in this article we use PEAP for simplicity) and another option is to use EAP-TLS.
The main difference between these two authentication methods is that the PEAP method allows authentication through the use of passwords. Meanwhile EAP-TLS method uses digital certificates. These digital certificates can exist on smart cards, or can be issued directly to Windows clients by Enterprise Certificate Authority.
In general, PEAP is more suitable for small and medium sized organizations because it is simple to deploy as well as low cost. EAP-TLS is often used in large enterprise models, but can also be used in smaller organizations. Both methods are good at controlling wireless access and both allow you to centrally manage the security of the clients.
Deploy enterprise CA
Regardless of whether you use PEAP or EAP-TLS to authenticate wireless traffic, the authentication process depends on the use of digital certificates. In the case of using PEAP, you can deploy Enterprise Certificate Authority or you can purchase a certificate from a commercial CA like VeriSign or Go Daddy. If you use EAP-TLS, you will need to have an enterprise CA because client authentication will be based on the use of certificates rather than passwords, plus you must be able to issue the certificates needed. set for client.
Since both designs can use the enterprise CA, we will introduce how to deploy and configure your own enterprise CA.
Some note
Before starting, we want to give you some notes. First of all, both of the designs that we will cover require you to have an Active Directory. These designs will not work if your network is a workgroup network.
Another problem is, we will install the enterprise CA on a domain controller computer running Windows Server 2008 R2. When the enterprise CA is installed, you will not be able to rename the domain controller.
You must also work hard to strengthen the server as an enterprise CA. Remember, if someone compromises CA, this person basically owns your network. Adding a server is beyond the scope of this series, but where you can do that is run Microsoft's Security Configuration Wizard.
The most important issue is that you must backup the CA regularly. If the server fails, your authentication process will be broken.
Implementation process
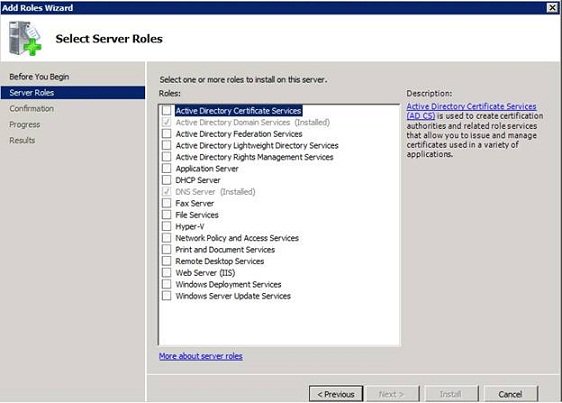
Start the process by opening the Server Manager and selecting the Roles item. Click the Add Roles link , then Windows will launch the Add Roles Wizard . Click Next to bypass the wizard's Welcome screen, and then you will see a screen asking you to install the role. Select the Active Directory Certificate Services role as shown in Figure A and click Next to continue.

Figure A: Select Active Directory Certificate Services role
You will see a screen to introduce Active Directory Certificate Services. Click Next , Windows will ask you about the component you want to install. At this point, select the Certification Authority and Certification Authority Web Enrollment options. Depending on how you configure the server, you will see a message indicating that you need to install some additional role services. If you receive this message, click the Add Required Role Services button .
Click Next , Windows will ask you if you want to create Standalone Certificate Authority or Enterprise Certificate Authority. Select the Enterprise option and click Next.
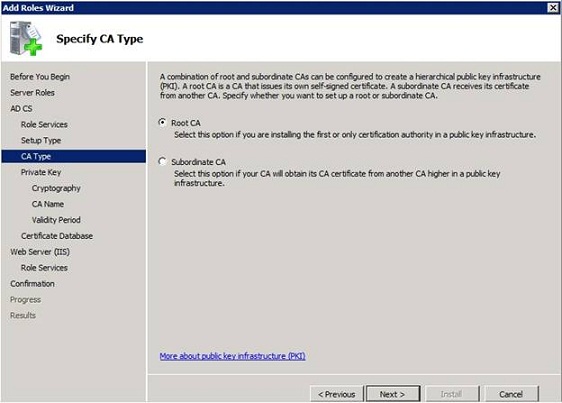
You should now see a message asking you to create a Root CA or a Subordinate CA. Since this is the first CA, you must select the Root CA option as shown in Figure B below.

Figure B: Select the Root CA option and click Next.
The next screen will ask if you want to create a new key or if you want to use an existing one. Since this is a completely new deployment, let's create a new key.
Click Next , Windows will ask you to configure encryption settings for CA. Click Next to accept the default values.
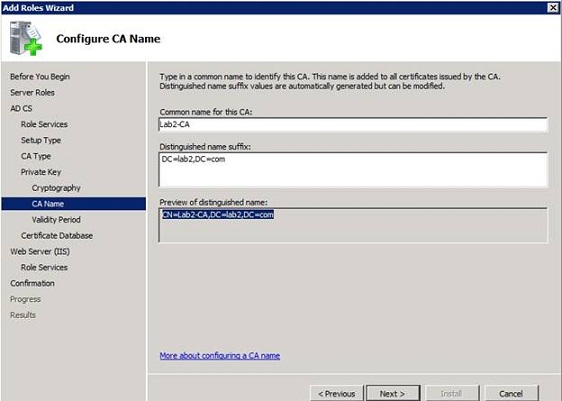
You will now be prompted to provide a name for CA. Although you can use the default values, the best way is to replace them with easy-to-remember names. For example, you can see in Figure C that we named our CA Lab2-CA.

Figure C: Choose a name that is easy to remember
Click Next , and you will see a prompt for the validity period for certificates issued by CA. The default value is 5 years, but you can adjust this parameter if you want.
Click Next , Windows will ask you to choose a location for the certificate database. It should be noted that what we mentioned above is important in protecting the certificate store. The thing to do here is to select a location where an automatic failover array exists if possible.
Depending on whether you are required to add the IIS role service to the server, the next screen you see may be an introduction of IIS. Click Next to move to the next screen.
You should now see a screen asking if you want to install additional role services. Because Windows automatically selects all required role services, you don't need to add any services, just click Next to continue.
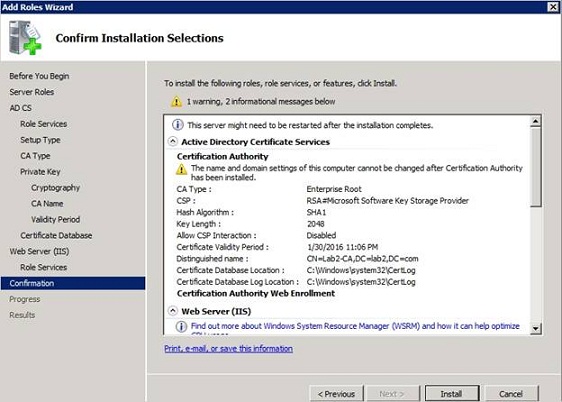
You will then see a screen that summarizes the selected configuration options, as shown in Figure D. Verify that any information that appears is correct, and then click Install . When the installation is complete, click Close .

Figure D: Read through the configuration summary table to make sure everything is correct
Conclude
So far, we've shown you how to deploy an enterprise CA, which is when we can start building the rest of the infrastructure needed for wireless security. In the next part of this article series, I will show you how to enforce security based on PEAP.