Use static IP address in network
In this article, we will show you a few ways to convert from dynamic addresses to static addresses.
Network administration - Do you frequently access shared items or servers on your network? If you regularly perform this action, you should assign IP addresses to these devices instead of automatically receiving them from DHCP. In this article, we will show you a few ways to convert from dynamic addresses to static addresses.
As you probably know, every computer or device connected to an internal network needs an IP address to communicate with other clients and access the Internet.
By default, most other enterprise-class and user-level routers have a DHCP server. This server can manage IP addresses in your local network.
Tip : If you just want to find information about how to configure a static IP address on your computer, then you can skip most of this tutorial and only take care of the steps in the last section. This tutorial will target network administrators.
Because clients are not always assigned the same IP address from the same DHCP server when they connect. This can cause problems, or at least annoy you when you have servers on the network or regularly share files.
For example, remembering the IP addresses of shared computers will make things much easier. In this case, if you can't access the shared computers on the network, you can use its IP address instead of browsing to it or using the Computer Name - this is a pretty useful tip.
Besides, you probably know, sometimes we should configure static IP addresses for servers or all devices on the network.
So in this tutorial, I will show you some methods for moving dynamic IP addresses to static IP addresses.
Some ways to convert dynamic IP addresses to static
Here are three different methods you can use to move dynamic IP addresses, managed by DHCP, into static IP addresses:
- Reserve DHCP addresses on the Router for the selected clients : If your Router has a DHCP backup feature, this is a great way to quickly resolve your IP status. You do not need to physically configure each computer, just set up so that the Router always grants a client a certain IP address.
So when the client probes for the DHCP server at the time it connects to the network, it automatically receives its reserved IP address. Clients without reservation will receive a random IP address in the usual way.
- Manually configure static IP addresses for selected clients : You should only do this only if the selected devices and computers need a static IP address, while the rest can use DHCP. You need to take a few minutes and enter the detailed IP information into the desired computer. Although it is not as fast as the router, but with this method, you do not have to access your router.
With this method, ordinary users can also perform, assuming they have administrator rights on a Windows account or at least the ability to edit network settings.
- Manually configure all clients and disable DHCP on the Router : This method is similar to the above method but requires you or the user to manually configure devices connected to the network.
The fact that all computers and devices have a static IP address has many benefits, but you need to be aware that you need to manage these addresses.
If there are multiple clients on the network, you should store a list of its addresses and references when new clients join, aiming to avoid conflicts.
Below is the detailed content of each of the methods we have introduced above:
Reserve DHCP addresses
As mentioned above, in this method, you can reserve selective IP addresses for certain clients. The first step you need to do now is to access the router's web configuration page by entering its IP address; For example, 192.168.0.1 and 192.168.1.1, these are the common IP addresses for routers.
Once you are logged in with the default password or password you have set up, go to the section where you can change the DHCP settings. Usually the General or Network tabs, but some routers may be DHCP .
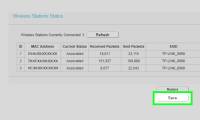
Now see if the Router's DHCP server has a reserve feature. For example, you can see something like the one shown in Figure 1 below. If your router has this feature, configure the backup for the necessary clients.
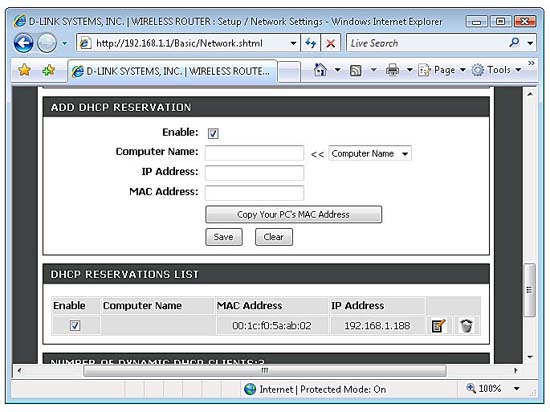
Figure 1
You can see how it works like a D-Link router, for this router, you can choose a computer or client with its name to search automatically in Name, MAC Address, and IP current. Then you can change your IP address to something easy to remember and click Add . After doing the above, you will see the reserved IP appear on the list, the components in this reserve list you can completely change and delete it.
Leave the default settings for the network adapter in Windows configured to automatically receive the IP address. Clients will receive a reserved IP address instead of a random dynamic address when it probes the DHCP server.
Page 2: Manually configure the clients
Manually configure the clients
If your router does not support the reserve feature, or if you prefer to create a manual route, then you need to configure each desired computer with a static IP address. First, you need to go to the properties dialog for a wired or wireless network connection or adapter, in Windows XP or Vista.
Then find and open the Internet Protocol (TCP / IP) section (see Figure 2) from the list box. The TCP / IP Properties dialog box will appear. There are two ways to configure a static IP and we'll show you both.
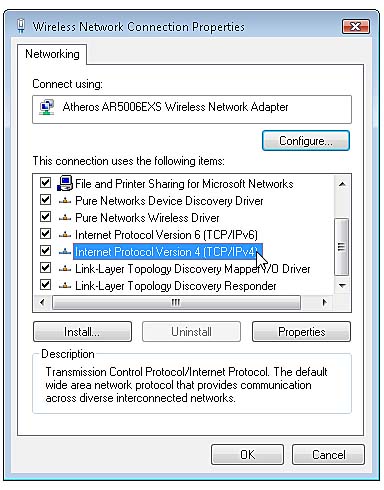
Figure 2
First, you can set up the normal way, the network adapter will always use the details of the static IP that you enter for any network it connects to. Then if it needs to connect to another network with DHCP, you must change the settings back to obtain IP details automatically; then reconfigure it when connecting back to the static network.
To use this method, visit the General tab, click the Use the following IP address radio button (see Figure 3).
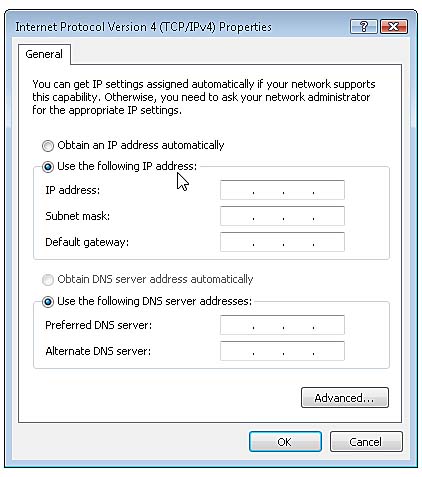
Figure 3
Another way to configure a static IP is to use the Alternate Configuration method. This method has the advantage if you disable DHCP completely on the network. You will have to configure the computer with a static IP address so that this IP will be used only if it is not automatically assigned to the machine.
In this way, users can use their static network and other dynamic networks (for example at this or at the office) without having to switch between static and automatic IP settings.
To use this method, click the Alternate Configuration tab and click the User configured radio button (see Figure 4).
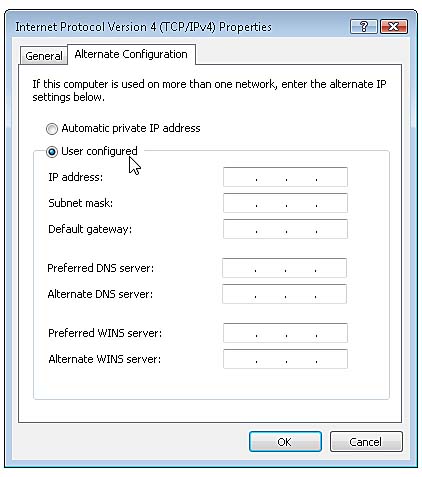
Figure 4
In both ways, you enter the same IP details below:
- IP Address: Select an IP address in the same subnet as the router. For example, if your router is 192.168.1.1 (subnet 255.255.255.0), you will have to choose an IP address between 192.168.1.2 and 192.168.1.255, and if your Router is 192.168.0.1 (subnet 255.255 .255.0), 192.168.0.2–192.168.0.255 will be the range of IP addresses you need to select.
- Subnet Mask: This address will be the same as your Router, for example, 255.255.255.0.
- Default Gateway: This is the Router's IP address
- Preferred DNS: You can enter the DNS server's IP address, if you know it, or just enter the Router's IP address.
Disable DHCP on the Router
If you want to manually configure each client, you can disable the Router to manage IP addresses automatically. Please access the web configuration page of the Router by entering its IP address, for example: 192.168.0.1 or 192.168.1.1.
Log in and navigate to the section where you can change DHCP settings, such as on the General , Network , or DHCP tabs. When you find DHCP settings, you will see a checkbox or option to enable or disable the server (see Figure 5).
Uncheck the corresponding option and save the settings. From now on, users will not be able to access the network or the Internet until they configure a static IP address on their computer.

Figure 5
Conclude
In this tutorial we have shown you how to convert dynamic IP addresses to static IP addresses, in this way we can use servers on the network and access parent computers via the local IP only in a better way. In the article we also mentioned two methods and steps in each of those methods. If you have changed any settings on the Router, make sure you have backed up these settings by saving a restore file to your computer.
Was this article helpful?
Your feedback helps us improve.
Related Articles
 What is a static IP address?11 minutes read
 How to Configure a Static Internet Protocol (IP) Address on a Computer5 minutes read
 Set static IP settings for Windows XP, 7, 8, and 8.1 computers7 minutes read
 Here's how to check if your IP address is static or dynamic3 minutes read
 A simple guide to setting a static IP address on a MacBook.2 minutes read
 How to configure static IP address on Ubuntu 22.04 LTS and 22.105 minutes read
Reader Comments 0
Sign in with email or Google to join the discussion.