Use BitLocker to encrypt external storage drives - Part 1
In this article, I will show you how to use BitLocker-to-go to avoid exposing important data by encrypting an external storage drive.
Employees working outside the organization always face security challenges. They need to access company data on their laptops or mobile devices. Thus data on those devices is always in high risk when they are lost or stolen.
Many organizations do not allow their employees to store data on laptops or mobile devices for this reason. Even so, this method sometimes seems unrealistic. Prohibiting users from saving data on their laptop or mobile device is like making them connect to the Internet whenever they need to access data, and one thing that everyone knows, access The Internet is not anywhere that can be successfully implemented. For example, some people may need data to do the job when they are on a long flight. If you can't access the data without an Internet connection, it means that their productivity will definitely decrease.
Over the years, Microsoft has created several different solutions, which are solutions designed to secure data when stored on laptops. In Windows Vista, for example, Microsoft introduced BitLocker drive encryption. This feature allows users to encrypt the entire drive on their laptop.
While many improvements have been made to the security level, compared to the previous operating system version, Windows XP, BitLocker still has many limitations. For example, Windows Vista version of BitLocker can only encrypt the system partition. If the computer contains many other partitions, users need to use EFS encryption or third party products to secure these partitions.
Another limitation of BitLocker is the inability to encrypt external storage. We know that external storage devices, especially USB drives, are present everywhere. In addition, the capacity of these storage drives has increased significantly in recent years. All of that said, users can store a wealth of data on this tiny, cheap, large and easy-to-lose device without any security encryption.
Because of that, when Microsoft developed Windows 7, one of the things they had to do was to improve some of BitLocker's missing issues. Some of these improvements are:
- BitLocker is currently capable of encrypting all system partitions, not just each partition containing the operating system.
- The system can perform integrity checks as part of the boot process. This method helps to verify that the computer is not tampered with when offline and the encrypted drive is in its original computer.
- It can transfer an encrypted drive to another computer, or replace the system board in a system encrypted by BitLocker without losing access to encrypted files.
- Windows ensures against cold boot attacks by asking users to enter a PIN code or insert a USB drive that includes the security key first to boot the computer.
- BitLocker recovery keys are stored in Active Directory. These keys can be used to increase access to BitLocker encrypted data in case users forget their PIN, or lose a USB drive containing key information.
BitLocker to Go
Perhaps the most significant new BitLocker feature is the BitLocker to Go. BitLocker to Go allows users to encrypt external storage devices, such as USB flash drives. Therefore, if the storage device is lost or stolen, the data contained in it is not compromised.
As expected, BitLocker encryption is not enabled by default for USB flash drives. However, it can be enabled by an administrator (through Group Policy settings) or by the user.
What's great is that Microsoft has made the feature extremely easy to use when it comes to enabling BitLocker encryption. BitLocker is integrated directly into Windows Explorer. This means that if a user wants to enable BitLocker encryption for a USB device, they do not need to access the Control Panel and search for the correct settings.
To demonstrate what we want to say, look at Figure A below. In this picture, we have plugged a USB into the computer that is using Windows 7 operating system. When right-clicking on USB, Windows will display an option to enable BitLocker.
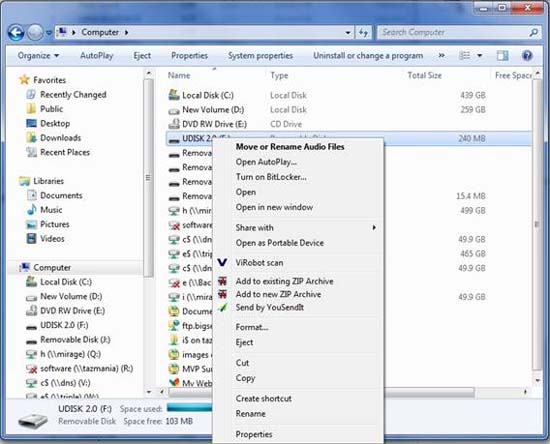
Figure A: Windows Explorer has the option to turn on BitLocker
If you select the Turn on BitLocker option , BitLocker will only be enabled for the selected drive, not for the entire system. When you enable BitLocker, Windows will prompt you to enter a password to unlock the storage drive. As you can see in Figure B, you also have the option to use smart cards to unlock storage devices.
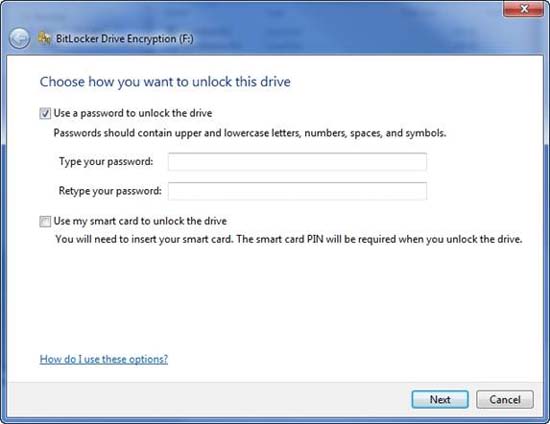
Figure B: You must provide the password or smart card used to unlock the storage drive
After entering the password, Windows will give you a recovery key, prompt you to save this recovery key to a certain file or print them, as shown in Figure C. You will see in the figure below, the Next button. will be gray until you have done at least one of these options. Microsoft requires that the recovery key be saved or printed to prevent data loss caused by a forgotten user password.
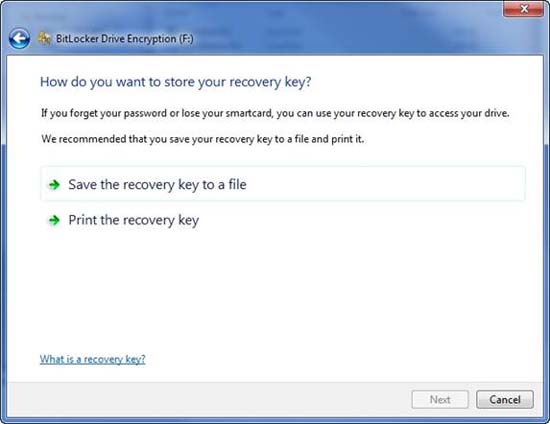
Figure C: You must save and print your recovery key
After saving or printing your recovery key, it's time to encrypt the storage drive. To do so, simply click the Start Encrypting button, as shown in Figure D below.
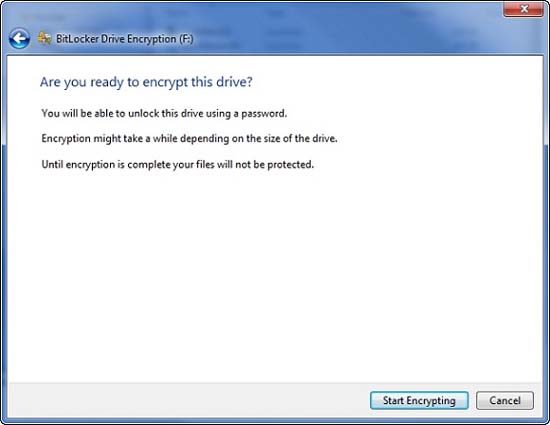
Figure D: Click the Start Encrypting button to encrypt the drive
Use encrypted USB
The use of encrypted USB drives is not really different from using regular USB devices. If you look at Figure E, you will see that when we use the USB drive, there is a prompt that appears asking for a password. You will also see an icon of a storage drive with a key chain.
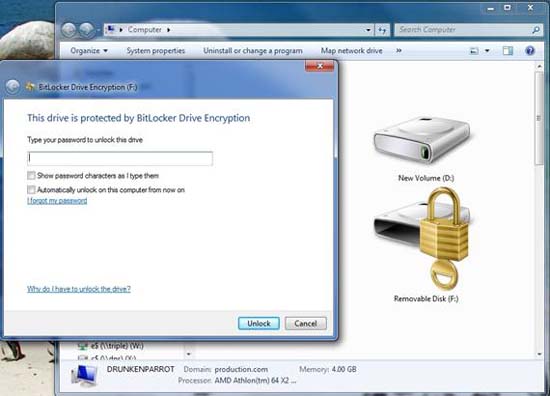
Figure E: When inserting an encrypted USB, you need to enter the password
After entering the password, the icon will change and show that the storage drive has been unlocked, as shown in Figure F.
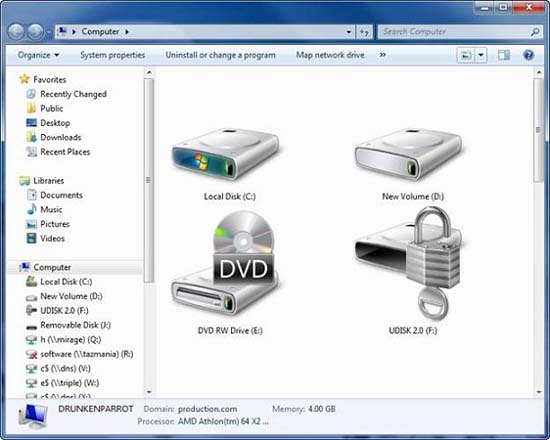
Figure F: After entering the password, the device is unlocked
Other operating systems
Because BitLocker to Go was first introduced in Windows 7, you might wonder what would happen if you plugged that encrypted USB into a computer that is using older operating systems. Figure G shows what happens when inserting an encrypted USB into the computer running Windows Vista.
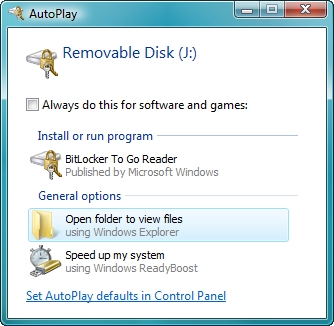
Figure G: Vista allows you to install BitLocker to Go Reader
Although Vista does not support the original BitLocker to Go, you have an option for installing the BitLocker to Go Reader. This reader is stored on an encrypted drive (in an unencrypted format), so it is possible to install this reader even when you do not have Internet access.
Since the dialog also includes the option to open the folder to view the files, we decided to click on this option to see what Vista will display. As you can see in Figure H, Vista displays the system files of BitLocker Reader. All real data stored on the encrypted drive is contained within a series of .NG encoded files.
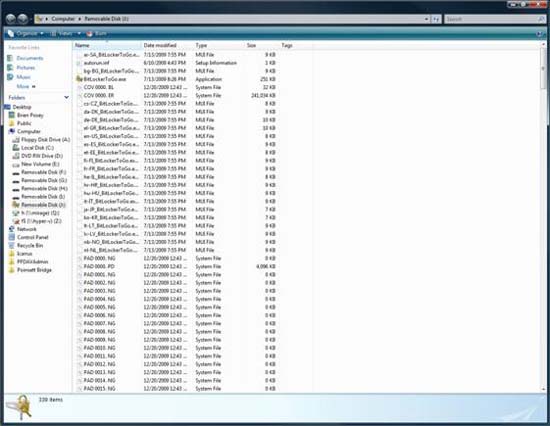
Figure H: BitLocker to Go Reader is saved on USB
Conclude
In this article, I have shown you how to use BitLocker to Go to encrypt USB drives. In part two of this series, we will show you how to use group policies to automate the process.