Use BitLocker to encrypt external storage drives - Part 3
In the third part of this series, I will show you how to save BitLocker Recovery keys in the Active Directory database.
>> Using BitLocker to encrypt external storage drives - Part 1
>> Using BitLocker to encrypt external storage drives - Part 2
In the previous article of this series, I showed you how to adjust how BitLocker is used in the organization through group policy settings. As we said at the end of the previous section, one of the big problems with storage device encryption is the potential for data loss.
As you know, BitLocker encrypted devices will be password protected. However, the problem here is that users can very much forget their passwords and become the victims of encryption themselves, they cannot get the data in the device they have encrypted. If you stop and think about it, the encrypted data that cannot be decrypted will be no different from the data being corrupted.
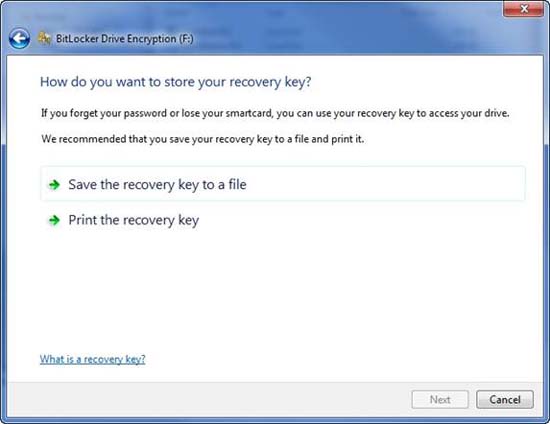
If you go back to the first part of this series, you'll see that when you encrypt a drive with BitLocker, Windows will display a message, as shown in Figure A below, that tells you that When you forget your password, users can use the recovery key to access the drive. Windows not only automatically provides you with this recovery key, but it also forces you to print a paper recovery key or save it to a file.

Figure A: BitLocker protects users from data loss by providing them with recovery keys
It is a good idea to create a recovery key to avoid losing data, but in the real world it is not realistic. Losing the encryption key can have a serious consequence in the corporate environment, where data is irreplaceable. However, thank you for not having to rely on users to track their recovery keys, but to save recovery keys in Active Directory.
Prepare Active Directory
Before going to configure BitLocker to save recovery keys in Active Directory, we need to do some preparatory work. We make sure you know this, BitLocker to Go was first introduced in Windows 7 and Windows Server 2008 R2. It is added with the reason for supporting BitLocker to Go key recovery at Active Directory level, then you will need to run some Windows Server 2008 R2 code on your domain controllers.
Believe it or not, you don't have to upgrade all domain controllers to Windows Server 2008 R2 unless you want to. Instead, you can use the Windows Server 2008 R2 installation DVD to extend the Active Directory schema on the domain controller that is acting as the schema master for your Active Directory forest.
Before I show you how to extend the Active Directory schema, we need to warn you that this procedure assumes that all domain controllers are running Windows 2000 Server SP4 or higher. If there are only old domain controllers, you need to upgrade them to be able to implement the necessary schema extensions.
You should also perform a full system state backup of domain controllers before extending the Active Directory schema. This is to prevent if something goes wrong during the expansion process, you can still restore your previous state.
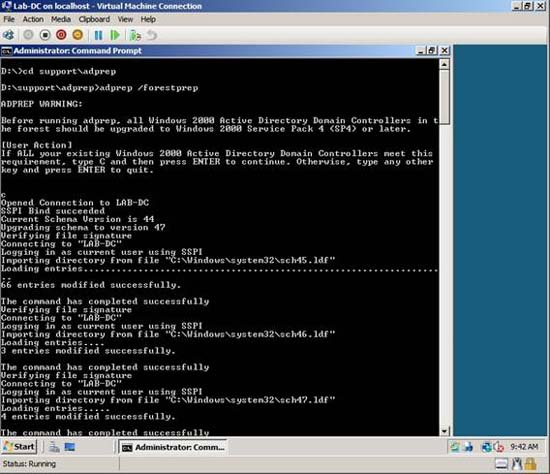
With these preparations, you can extend the Active Directory schema by inserting your Windows Server 2008 R2 installation DVD into the schema master. Then, open the Command Prompt prompt window using the Run As Administrator option and enter the following command (here D: is the drive containing the installation disc):
D:
CD
CD SUPPORTADPREP
ADPREP / FORESTPREP
When the ADPrep utility loads, you will be asked to verify that domain controllers are running the appropriate versions of Windows Server. Simply press C and then press Enter to begin the schema expansion process, as shown in Figure B. The entire schema expansion process will only take a few minutes to complete.

Figure B: The Active Directory schema must be expanded before BitLocker keys are stored in Active Directory
Group policy configuration (Group Policy)
Simply expanding the Active Directory schema does not require BitLocker to save recovery keys in Active Directory. So in order to get what we want, we need to configure some group policy settings.
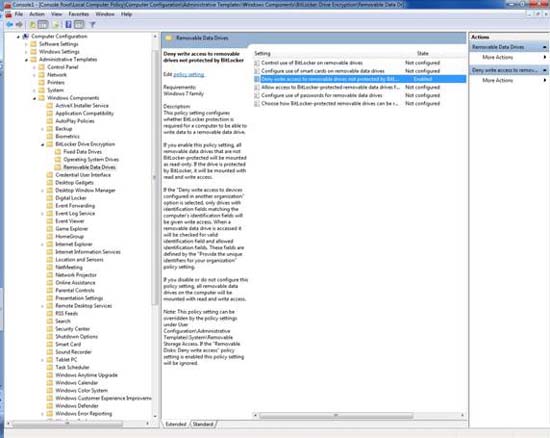
Begin the process by loading the group policy used for your workstations in the Group Policy Management Editor. Navigate through the interface tree to Computer Configuration | Policies | Administrative Templates: Policy Definitions | Windows Components | BitLocker Drive Encryption | Removable Data Drives . As you may recall, we introduced most of the individual policy settings in the previous article of this series.
At this point, you need to enable the Deny Write Access setting to Removable Drives Not Protected by BitLocker , as shown in Figure C. Indeed, this is not a mandatory requirement, but it will give you a way to Forcing users to encrypt their USB drives. If you require users to use BitLocker encryption, you should also select the Do Not Allow Write Access to Devices Configured in Another Organization option . Again, this is not a mandatory option, but it will help you improve security.

Figure C: If you want to execute backup encryption for external drives, you need to enable the Deny Write Access setting to Removable Drives Not Protected by BitLocker.
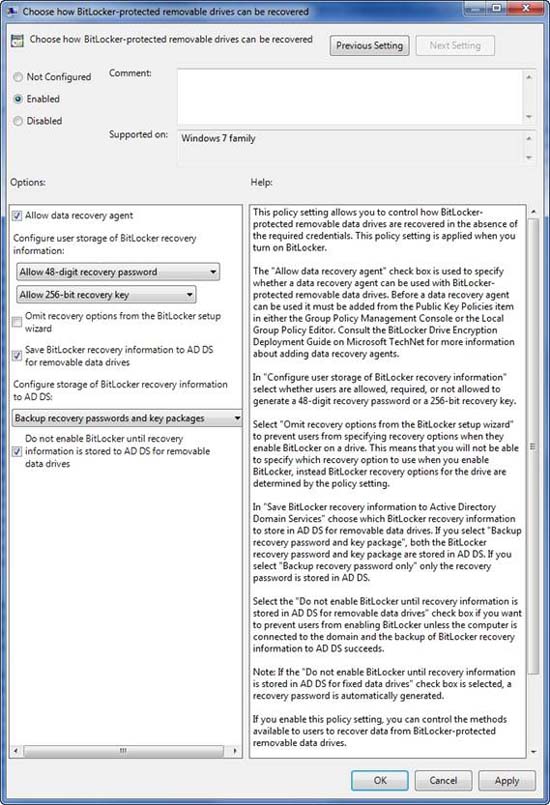
The next step in the process is to activate the Choose How BitLocker Removable Drives Can Be Recovered setting. If you look at Figure D, you will see the dialog box displayed when you double-click the Deny Write Access setting to Removable Drives Not Protected by BitLocker . As you can see in the figure, there are a series of checkboxes that you can select when this group policy setting is enabled.

Figure D: There are three options you should activate
If the goal is to save a copy of each recovery key in Active Directory, then there are indeed three options that you need to enable. The first is the Allow Data Recovery Agent option . This option is selected by default, but this is an important option for the success of the entire key recovery process, so you need to verify that it is enabled.
Next, you need to select Save BitLocker Recovery Information to AD DS for Removable Data Drives . As you can guess, this is the option to save BitLocker recovery keys to Active Directory.
Finally, you need to select the Do Not Enable BitLocker Until Recovery Information Is Stored To AD option for AD DS For Removable Data Drives . This option will force Windows to confirm that the recovery has been written to Active Directory before BitLocker is allowed to encrypt the external drive.
Although not required, some administrators can also enable the Omit Recovery Option From The BitLocker Setup Wizard . This will prevent users from saving or printing their recovery key copies.
Conclude
In this article, I have shown you how to configure Active Directory to save BitLocker recovery keys for external drives. In Part 4 of this series, we will show you how this process works.