Protect system files with UAC Virtualization - Part 2
 Protect system files with UAC Virtualization - Part 1
Derek Melber
Network Administration - Windows Vista has a great tool to protect the files and system folders of the Registry to avoid compromise, which is User Account Control Virtualization. UAC Virtualization does not allow applications to write to protected system resources by redirecting 'write to a location, where users can access, this locatiion is each individual profile. people. So this virtualization allows users to still be able to run these applications, but the data recorded by the application is not sent to the system location, which ensures the stability of the entire system . By doing so, virtualization allows multiple users to run applications on the same computer because each of their personal data is written to their own profile. In this article, I will show you how to control UAC virtualization using Group Policy, Registry and Task Manager.
Group Policy settings are related to UAC
UAC has many related options to help control the behavior of UAC on all Vista computers. Clearly, Group Policy is an ideal solution for controlling UAC, as well as most other Vista configurations because it provides a centralized management solution for these settings.
Within any GPO, you can find the settings used to control UAC in the Computer Configuration section. Because UAC is a security-related setting, you will see it in the Security Options section, which can be found in Computer ConfigurationWindows SettingsSecurity SettingsLocal PoliciesSecurity Options, as shown in Figure 1.
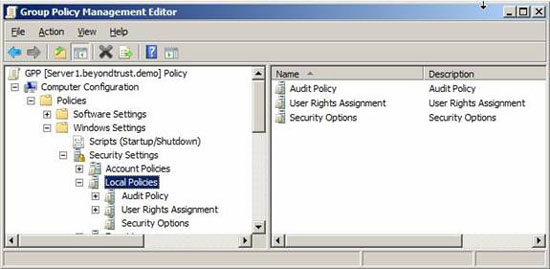
Figure 1: UAC settings are located inside the Security Options button in the Computer Configuration section
UAC settings within the GPO are located at the end of the Security Options list, the list appears in the right pane. To see this list, simply select the Security Options button on the left panel, as shown in Figure 2.
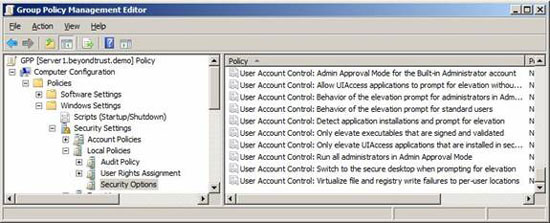
Figure 2: UAC settings are located below in the Security Options list
Here you will see all the controls that need to be set up for UAC on Vista and Windows Server 2008 computers. Note that it is possible to control how UAC works when an administrator logs in, as well as when a user logs in. The final option controls how Virtualization is linked to UAC behaviors. This setting is labeled 'User Account Control'; Virtualize files and registry will write errors to the location on each user.
Enabling this policy setting will virtualize the settings. If this setting is not configured for Vista computers, but you want to set it up, you need to set this policy to Enabled, as shown in Figure 3.
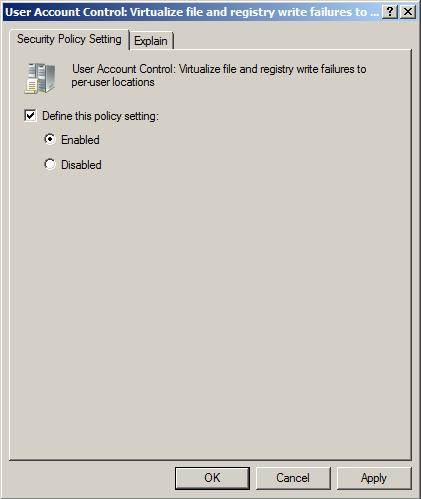
Figure 3: To virtualize the file and the Registry while writing, the policy setting is Enabled
After configuring this policy setting, you need to ensure that it is used for Vista computers. It is also necessary to restart the Vista computer so that this setting is valid, as it only adheres to the foreground policy refresh to perform virtualization of files and registry. When the Vista computer is finished, you will have virtualized Registry files and locations.
Tips :
Foreground policy settings within the Computer Configuration need to be restarted by the computer, while the foreground policy setting in User Configuration needs to log off the user then log back in to take effect.
Virtualization of Task manager
Now that you have ensured that UAC will virtualize your files and registry updates, you need to verify that each process is performing virtualization properly. To see that, you need to have control, UAC virtualization, to launch Task Manager. The simplest thing we found to launch Task Manager is to right-click on the Start bar. You need to go to the Processes tab to see virtualization here.
Once in the Processes tab in Task Manager, you will see that there is no initial indication of virtualization. Even so, to see what is virtualized is quite easy. See what is virtualized, select the View menu option, then click on the Select Columns option. At the bottom of this list you will see a Virtualization check box, shown in Figure 4.
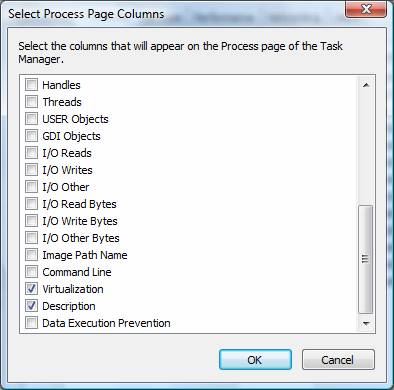
Figure 4: Adding Virtualization column to Task Manager
Save your new window, and you'll see a new column called Virtualization in the main Task Manager window under the Processes tab, shown in Figure 5.
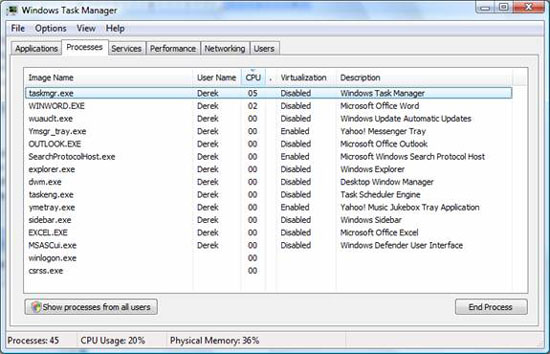
Figure 5: The Virtualization column has added to the Processes tab in Task Manager
If you want to see all of their processes and virtualization issues, click the 'Show processes from all users' button, which will contain system processes. You will see that the processes owned by the SYSTEM, Network service, and Local Service are not allowed to be virtualized.
Organize registers to add extensions
As you can see in Figure 5, none of the executables that are run directly are virtualized. This is because the executable files .exe, .bat, .scr, .vbs, and other executables are excluded here. This causes some problems if a program needs to upgrade itself. Standard users will not be able to do this, because the application will be running in protected areas.
If you have an application extension that needs to be removed from this initial list of non-virtualized extensions, you need to change the Registry. To add your extension to the list of non-virtualized extensions, go to HKEY_LOCAL_MACHINESystemCurrentControlSetServicesLuafvParametersExcludedExtensionsAdd Registry value. To add your extensions, you need to create an ExcludedExtensionsAdd Registry value. When you add a new value, use the multi-string Registry value type. Extensions will be added without the forward dot, for example, .exe will only be exe. After changing the entire list of extensions, restart the computer for the changes to take effect.
Real-time virtualization
If you want to virtualize an application or process that is not virtualized, you can do that when the system is running. To perform this task, you need to go to Task Manager. Inside Task Manager, go to the Processes tab just like you did before. Then select the process you want to virtualize. From there, right-click the process and then click the Virtualization menu option. This will show you a confirmation dialog, as shown in Figure 6.
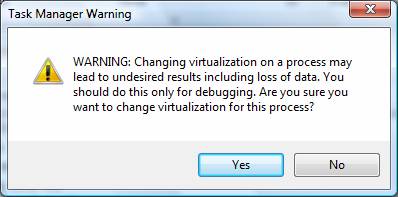
Figure 6: The configuration dialog allows you to virtualize the processing
After you virtualize the application, the process will have Enabled status in the Processes tab list of processes.
Conclude
The ability to control different aspects of UAC virtualization allows administrators to manage which applications are virtualized. Within any GPO, control over UAC is easy to use and easy to deploy via Active Directory. After UAC is enabled and the virtualization of files and Registry is also activated, your Windows Vista will launch virtual processes that were not previously available. What you can see inside Task Manager, it shows you a clear picture of what has been virtualized and what is not.