Optimize USB memory on Windows 10 for better performance
According to Microsoft, Windows 10 no longer optimizes external storage devices with Better Performance since October 2018 Update. Instead it will optimize with Quick Removal. So what is this option and how to reactivate Better Performance?
- 5 ways to simply reconnect USB without "unplugging"
- How to safely remove a USB even if the computer says it can't
- These tools help to safely disconnect the USB from the computer
Quick Removal and Better Performance
Windows has different 'policies' to connect external storage devices via USB or Thunderbolt. Each individual storage device has a specific policy setting, so you can choose different policies for different devices.

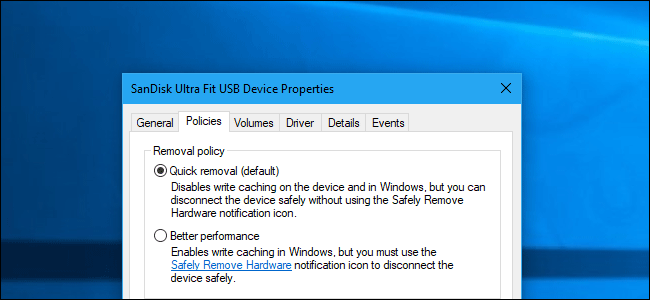
By default, Windows 10 currently uses Quick Removal policy. It will write data to the drive as quickly as possible to ensure when you disconnect the USB drive without clicking on the Safely Remove Hardware option.
- Disconnect secure USB devices in a simple way
However, this may slow down your application. For example, when saving files to an external drive, the program you are using may stop and wait for the save process to finish before you can continue working.
The Better performance option eliminates this slowness. With this option, Windows will save write operations to the drive and let the application proceed as if they were recorded. Windows then performs write operations in the background.
On the other hand, this may result in data loss. Users think their files have been saved and deleted from the hard drive, but the data is actually not saved and the files on the drive may be corrupted. That's why you should use the Safely Remove Hardware option before removing the drive on Windows. It will tell Windows to write all the data stored on the drive, making sure the data is safe before removing it.
Better Performance depends on the speed of the external storage device, how the application handles recording data and the amount of recorded data at any time. Microsoft thinks the Quick Removal option defaults to most users because avoiding data loss is a top priority. Many people do not bother to remove devices safely before removing them. Therefore, Quick Removal is the best solution for many people to reduce the risk of data loss when removing the drive in an unsafe way.
How to enable Better Performance
If you want to enable Better Performance, you will have to perform for each external storage device that you connect to the computer. However, Windows will remember this setting so if you change this option for a USB flash drive, this setting will be used when you plug the same USB drive into the current machine. Windows will not use this setting when you plug another USB drive into this computer or use that USB for another computer.
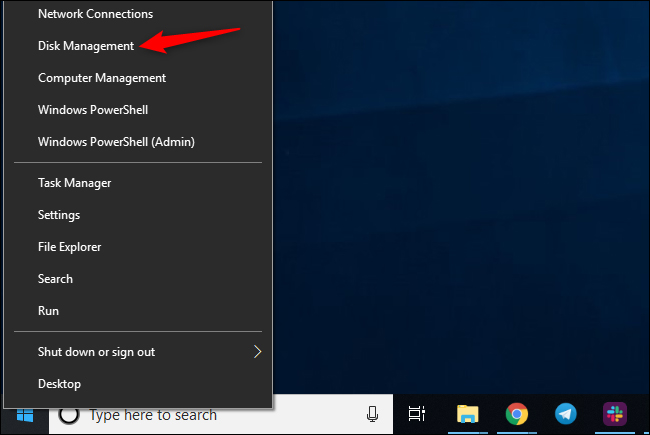
To enable Better Performance, first connect an external storage device to the computer. You can control this setting from the Disk Management tool. To open it, right-click the Start button on Windows 10 and select Disk Management . (If using Windows 7, press Windows + R , type diskmgmt.msc and press Enter to launch the Disk Management tool.)
- How to delete a drive cannot be deleted with Disk Management

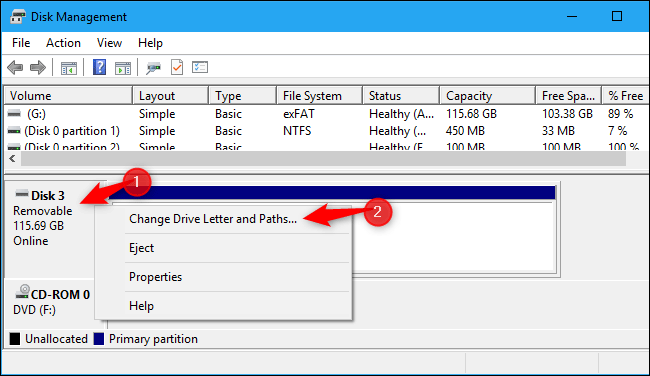
Determine the drive name at the bottom of the Disk Management window, right-click it and select Properties . You must right-click on the name on the left of the list.
If you are not sure which drive is the external storage device, see the drive letter shown here. You can check File Explorer to see the drive letter for an external storage device if needed.

Click the Policies tab and select Better performance in Removal policy to use this policy. Microsoft recommends that you enable the Enable write caching option on the device in Write-caching policy if you choose Better Performance .
Do not activate the option Turn off Windows write-cache buffer flushing on the device unless the external storage device has its own power supply. Because it can lose data if the computer loses power.

Click OK to save the changes. As mentioned above this change only applies to the USB device you are setting up and will have to repeat the above procedure for other devices. Remove the safety device before unplugging it from the computer.

If you change, you can return to the Properties window of the device and select Quick removal (default) .
I wish you all success!