Instructions for using Clonezilla to copy Windows hard drives
Use Clonezilla to copy your entire hard drive to a new hard drive quickly and simply. This article will show you how to copy Windows 10 drive with Clonezilla and USB flash drive.
- Instructions for using Clonezilla to copy Windows hard drive
- What is Clonezilla?
- How to copy Windows hard drive using Clonezilla
- Step 1: Download Clonezilla
- Step 2: Creating a USB can boot with Rufus
- Step 3: Boot into the Boot Selection menu
- Step 4: Set up Clonezilla
- Step 5: Copy your drive to the local drive
When buying a new computer, you must transfer old files to the new system. Copying this data is tedious and time consuming. Fortunately, you can use the Clonezilla tool to copy your entire hard drive to your new hard drive. Copy hard drive with Clonezilla fast, simple and completely free. This article will guide you to copy Windows 10 drive with Clonezilla and USB flash drive.
- How to back up the entire operating system from the old computer to the new computer
What is Clonezilla?
Clonezilla is a free image copying program and open source drive partition. You can use Clonezilla to back up your system, copy the entire drive, deploy the system and more. In addition, this tool also supports file system, bootloader, encryption, etc.
One thing to keep in mind is that to copy a Windows 10 drive, you need a second hard drive with a larger capacity or an old hard drive. For example, you need to copy the current hard drive with a capacity of 60 GB, the hard drive must also have at least 60 GB of storage.
How to copy Windows hard drive using Clonezilla
Step 1: Download Clonezilla
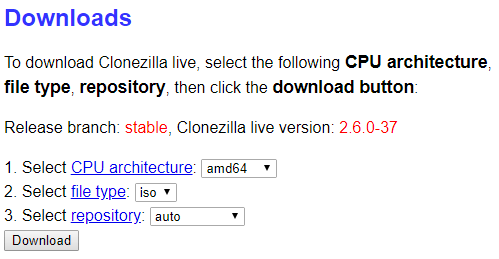
First, you need to download Clonezilla.
Step 1 . Go to the Clonezilla download page and move Select file type to ISO .
https://clonezilla.org/downloads/download.php?branch=stable
Step 2 . Click Download .
Step 3 . Install it like other programs.
Step 2: Creating a USB can boot with Rufus
To create a bootable USB Clonezilla, you need a 1GB or larger USB flash drive and a USB boot creation tool. Here will use the Rufus tool, you can use any other USB boot creation tool.
Note : Creating USB boot Clonezilla will delete all existing data in the USB drive.
Follow the steps below.
Step 1 . Download Rufus latest version.
Step 2 . After installation, open Rufus. Remember to insert the USB into the computer.
Step 3 . Select USB flash drive in Device .
Step 4 . In the Boot selection section, select SELECT . Browse to the Clonezilla ISO file you downloaded earlier and click Open . Rufus will automatically enter the correct option to create a USB boot. You can change the Volume Label to something easier to remember if you want.
Step 5 . When ready, press START .
Step 6 . Rufus will detect ISOHybrid image, continue recording in ISO Image mode.
Clonezilla is a small ISO. Therefore, the process of creating a USB flash drive that can boot does not take much time. Next, connect the second hard drive to the system, making sure it works.
- How to create USB Boot, USB install Windows by Rufus
Step 3: Boot into the Boot Selection menu

Now you need to reboot the system, press the button to select the boot mode menu.
Access the Boot Selection menu with the function key
If you do not know which button to click, you can see instructions for accessing the BIOS on different computer lines. After rebooting into the system, press the specific key to enter the Boot Selection menu. When the menu appears, scroll down and select the USB boot drive Clonezilla.
Access the Boot Selection menu through the Advanced Startup of Windows 10
Some UEFI systems do not allow users to access the manual boot menu to stay safe. Users can access the boot menu select from menu UEFI firmware.
Press and hold the Shift key and press Restart in the Start menu to open the Advanced Startup menu. From here, you can select Troubleshoot> Advanced Options> UEFI Firmware Settings . When the UEFI firmware menu opens, select the boot option from USB
Step 4: Set up Clonezilla
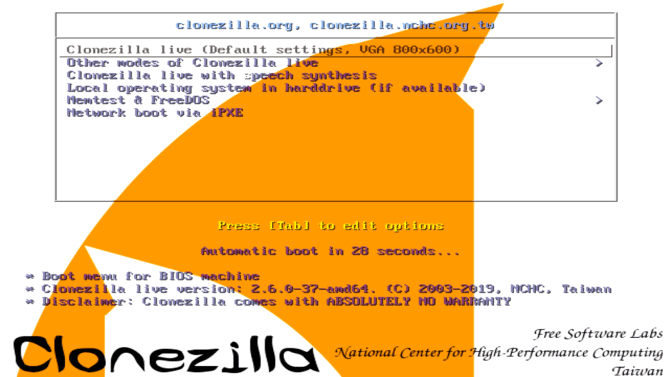
When Clonezilla starts, select Clonezilla Live (Default Settings, VGA 800 × 600) and wait for Clonezilla to download. You will have to choose the keyboard layout and language. When you go to Start Clonezilla screen, select Start Clonezilla .
The next screen will display the Clonezilla options, you only need to care about the two options below:
- device-image : Create a copy of the device (eg hard drive) on a disk image.
- device-device : Works directly with the device (eg hard drive) to create a copy directly to another storage type.
The first option will create a disk image of the device memory you are working on. The second option helps you create a memory copy of the device currently working, copying it into another form of direct storage.
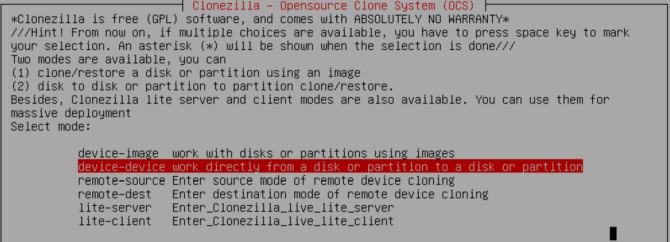
Since we're copying the drive here, we should choose the second device-device option. Then select Beginner Mode . Now you have two more options to choose from:
- disk to local disk : Copy the current drive to another local drive (eg a second hard drive).
- part to local part : Copy a drive partition to another local drive partition (the process also uses a second hard drive).
Here we will choose the first option.
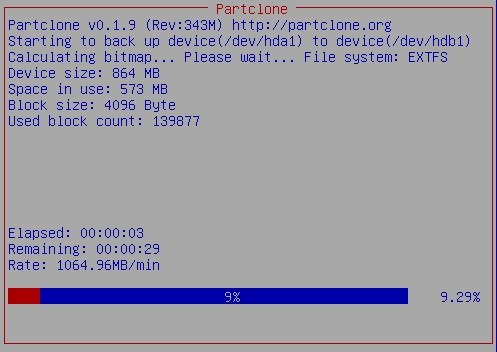
Step 5: Copy your drive to the local drive
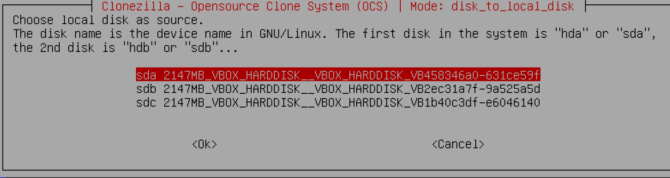
Now you need to import the drive Clonezilla will copy. Clonezilla is a Linux-based utility, so drives use Linux naming conventions. Therefore, the primary partition will be named sda, the second drive is sbd. You can also reference the drive diagonally with their size.
On the second screen, select the hard drive you want to copy. Now, choose what you want Clonezilla to do when the copy process is complete.
- choose : Clonezilla continues to run after the process is complete.
- reboot : Restart Clonezilla after the process is complete.
- poweroff : Turn off Clonezilla after the process is complete.
The last option is to copy the bootloader of the local drive. If you are creating a copy of the Windows 10 drive and want it to boot, enter Y and press Enter .
If you want to restore the drive when copying it, follow the steps in the guide but copy the drive copied to the second drive, make sure to copy the bootloader again.
Now you know how to copy Windows 10 drives with Clonezilla. You can also restore the copied drive in the same way.
I wish you all success!
- 4 methods to copy Linux hard drive
- Looking back on 60 years of miraculous development of hard drives today
- Multi-level SSD: SLC, MLC, TLC, QLC and PLC?
- 4 ways to reuse hard drives
- How to combine multiple hard drives into a Volume on Windows 10
- The Best External Hard Drives for 2020
- How to Transfer Data Between Two Hard Drives
- Instructions to mount the hard drive into a folder on Windows 10
- How to copy text from Wattpad to word
- 5 best free CSV splitting tools, CSV file splitting software
- How to create ISO file with WinRAR
- Using Notepad ++ compare two files with a plugin
- How to get Cookies and Facebook Token simple
- Top 5 software to change MAC address on Windows 10
- Encoding of Vietnamese typing methods Telex, VNI and VIQR on UniKey
- 4 simple ways to extend any trial period to a software
- 7 best open source private cloud software to set up cloud storage
- Top 5 best keyboard test software


-
 How to scan documents into PDF files on your phone using Google Drive
-
How to safely and easily recover data from a damaged laptop hard drive.
-
Instructions on how to easily transfer data from drive C to drive D.
-
Fixing CD/DVD drive not working on Windows 7
-
How to effectively fix a CD-ROM drive that won't read a disc.
-
How to create a bootable USB drive using Grub4dos to install and fix operating system errors.
 How to scan documents into PDF files on your phone using Google Drive
 How to safely and easily recover data from a damaged laptop hard drive.
 Instructions on how to easily transfer data from drive C to drive D.
 Fixing CD/DVD drive not working on Windows 7
 How to effectively fix a CD-ROM drive that won't read a disc.
 How to create a bootable USB drive using Grub4dos to install and fix operating system errors.
-
Application
-
Web Email
-
Website - Blog
-
Web browser
-
Support Download - Upload
-
Software conversion
-
Social Network
-
Simulator software
-
Online payment
-
Office information
-
Music Software
-
Map and Positioning
-
Installation - Uninstall
-
Graphic design
-
Free - Discount
-
Email reader
-
Edit video
-
Edit photo
-
Compress and Decompress
-
Chat, Text, Call
-
Archive - Share
-
-
System
-
Mac OS X
-
Hardware
-
Game
-
Tech info
-
Technology
-
Science
-
Life
-
Electric
-
Program
-
Mobile