Instructions for installing Tails on Windows
Tails is a live operating system that you can boot on almost any computer from a USB or a DVD..
Tails is a live operating system that you can boot on almost any computer from a USB or a DVD.
It aims to maintain privacy and anonymity, helping you:
- Use the Internet anonymously and avoid censorship.
- Forcing all connections to the Internet to go through the Tor network.
- Do not leave any traces on the computer you are using.
- Use modern encryption tools to encrypt your files, emails and instant messages.
Install an intermediate Tails
In this step, you will install an intermediate Tails by copying Tails' ISO image on the USB first using a program called Universal USB Installer.
On this intermediate Tails, you will not benefit from important features such as automatic security upgrades or the ability to store some documents and configurations in encrypted memory.
All data on this USB will be lost.
1. First, plug the USB stick into the computer.
2. Click the following link to download the Universal USB Installer.
3. At Windows security warning, confirm that you want to run the program.
4. Read the license agreement and click I Agree to continue and start the Universal USB Installer.

5. Select Tails from the menu.

6. Click Browse and select the ISO image you downloaded earlier.
7. Use the drop-down list to specify the USB to which you want to install the ISO image.
If the USB does not appear in this drop-down list, make sure it is plugged in correctly and restart the Universal USB Installer.
8. Select the Fat32 Format option.

If you forget to select Fat32 Format, you will not be able to install the last Tails in step 4.

9. Click Create.
10. A warning appears. Click Yes to start the installation. The installation process will take several minutes.
11. After installation is complete, click Close to exit the Universal USB Installer.
Great, now you have an intermediate Tails on USB. You will soon have to restart your computer with this USB. It may be a bit difficult, so good luck!
Open these instructions on another device
In the next step, you will turn off the computer. To be able to follow the remaining instructions later, you should:
- Open this page on a smartphone, tablet, or other computer (recommended).
- Print the rest of the paper guide.
- Save the URL of this page so you can return later: https://tails.boum.org/install/win/usb/#back
Restart on intermediate Tails
1. Turn off the computer while still plugging in the USB.
2. Turn on the computer.
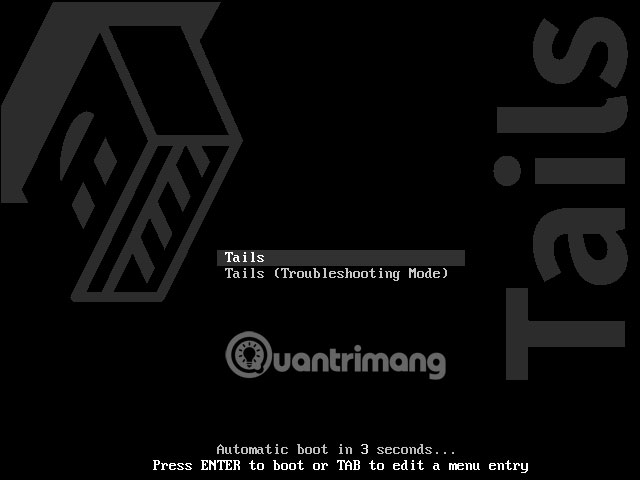
3. If the computer boots on Tails, the Boot Loader Menu appears and Tails will automatically start after 4 seconds.

Most computers usually do not boot into Tails by default. If your computer boots straight into Tail, you are quite lucky. If not, follow the instructions in the troubleshooting section on not starting on Tails.
4. After 30 - 60 seconds, another screen named Tails Greeter appears.
If the computer displays the error message Error starting GDM with your graphics card, refer to the list of problems with the graphics card at: https://tails.boum.org/support/known_issues/graphics/index.en. html
If the computer stops responding or displays other error messages before going to the Tails Greeter screen, refer to the Troubleshooting section on non-booting problems on the Tails below.
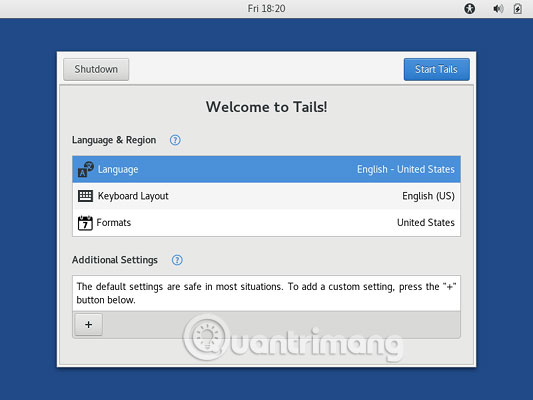
5. In the Tails Greeter, select the keyboard and language layout in the Language & Region section . Click Start Tails .
6. After 15 - 30 seconds, the Tails screen appears.

The hardest part is over! Now get your second USB because it's time to install the last Tails on it.
Final Tails installation is very important because it allows you to store some documents and configurations, as well as benefit from automatic security updates.
Install the last Tails
In this step, you will install the last Tails on the second USB using Tails Installer.
All data on this USB will be lost.
1. Plug the second USB into the computer.
2. Select Applications > Tails > Tails Installer to start installing Tails.

3. Select the second USB in the Target USB stick drop-down list.
4. To start the installation, click the Install button .
If the Install button is not available, you may have forgotten to select the Format Fat32 option in the Universal USB Installer in step 2.
Reboot on Windows and go back to the 'Installing an intermediate Tails' step.
5. Read the warning message in the confirmation dialog. Click Yes to confirm.
The installation process takes a few minutes.
The progress bar usually freezes for a while while synchronizing data on the drive.
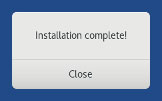
6. After installation is complete, close Tails Installer.
Restart the last Tails
1. Turn off the computer.
2. Unplug the first USB and re-plug the second USB.
3. Turn on the computer.
Some computers successfully boot on the intermediate Tails but cannot boot on the last Tails. If this is your case, refer to the Troubleshooting section about not starting on Tails.
4. The Boot Loader menu appears and Tails starts automatically after 4 seconds.
5. After 30 - 60 seconds, the Tails Greeter appears.
6. In the Tails Greeter, select the keyboard layout and language in the Language & Region . Click Start Tails.
7. After 15-30 seconds, the Tails screen appears.
Finally, you have finished installing Tails!
If you want to save some of your documents and configurations in encrypted memory on the last USB of Tails, follow the instructions in this article from start to finish.
Create encrypted integrity memory (optional)
You can optionally create an encrypted integrity storage in the remaining free space on the last USB, to store any of the following information:
- Personal file
- Some settings
- Additional software
- Encryption key
Data in encrypted storage memory:
- Still available on separate sessions.
- Encrypted with the passphrase you choose.
Encrypted integrity memory is not hidden. The USB owner may know whether it has encrypted storage memory. Be careful because you may be forced or tricked to give the passphrase for it.
The encrypted integrity storage can be opened from other operating systems. But, doing so could compromise the security features provided by Tails.
For example, the image thumbnail can be created and saved by another operating system. Or, the content of the file can be indexed by another operating system.
Other operating systems may not be reliable to handle sensitive information or leave no trace.
How to create memory integrity
1. Select Applications > Tails > Configure persistent volume .
2. Specify a passphrase in both the Passphrase and Verify Passphrase text boxes .
3. You should choose a long passphrase made from 5 to 7 random words. (See more article: Summary of how to create strong passwords and password management most secure).
4. Click the Create button .
5. Wait for the creation process to finish.
6. The list of usable integrity features will be displayed. Each feature corresponding to the set of files or settings will be saved in the encrypted integrity storage.
7. You should only enable personal data integrity protection during this time. You can enable more features later on depending on your needs.
7. Click Save.
Reboot and activate memory integrity
1. Turn off the computer and restart with USB containing the last Tails.
2. In the Tails Greeter:

- Select the keyboard and language layout in the Language & Region section .
- In the Encrypted Persistent Storage section , enter the passphrase and click Unlock to activate the encrypted integrity memory for the current session.
- Click Start Tails.
3. After 15 - 30 seconds, the Tails screen appears.
4. Now you can save your personal files and working documents in the Persistent folder . To open the Persistent folder select Places > Persistent.
Fix the problem of not starting on Tails
The following section will apply if the Boot Loader menu does not appear when booting with USB.
It is quite common for computers that do not boot automatically using USB that contains Tails installed. Here are some troubleshooting techniques. You should try them one by one.
Start with the boot menu
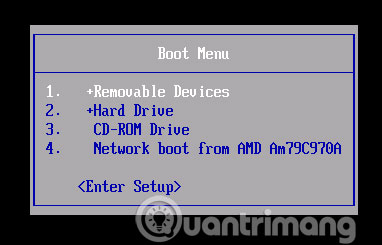
On most computers, you can press the boot menu key to display a list of bootable devices. The following instructions explain how to display boot menu and boot using USB. The following screenshot is an example of a boot menu like this:
1. Turn off the computer.
2. Ensure that the first USB is plugged into the computer.
3. Determine the boot menu keys for the computer depending on the computer manufacturer in the following list:
Manufacturer, Fear, F12, F9, Asus F8, F12 Dell F12, Esc HP Esc, Lenovo F9, F12, F8, F10 Samsung Esc, F12, F2 Sony F11, Esc, F10 Toshiba F12 Other brands F12, Esc4. Turn on the computer.
5. Immediately press multiple boot menu keys as specified in step 3.
a. If the boot menu has a list of devices that appear, select your USB and press Enter.
b. If the computer boots on another operating system, then:
- Turn off the computer.
- Press and hold the boot menu key specified in step 3.
- Turn on the computer while keeping the boot menu key.
- If the boot menu has a list of devices that appear, select your USB and press Enter.
- If the computer boots on another operating system or returns an error message, turn off the computer and repeat step 4 with the boot menu key specified in step 3.
If the boot menu key specified in step 3 does not work or if your USB does not appear in the list, try the second troubleshooting technique described below.
Edit BIOS settings
- How to set up BIOS to boot from USB / CD / DVD, external hard drive
You may need to edit your computer's BIOS settings.
Search the computer user manual on the manufacturer's website to learn how to edit BIOS settings:
- Acer: http://us.acer.com/ac/en/US/content/drivers
- Asus: https://www.asus.com/us/support/
- Dell: https://www.dell.com/support/home/us/en/19/Products/
- Fujitsu: https://www.fujitsu.com/global/support/products/software/manual/
- HP: https://support.hp.com/us-en/products/
- Lenovo: http://support.lenovo.com/us/en/
- Samsung: http://www.samsung.com/us/support/downloads
- Sony: http://esupport.sony.com/US
- Toshiba: http://support.toshiba.com/support/products?cat=Computers
In BIOS settings, try applying each of the following changes and restart the computer after each change. Some changes may not apply to certain models.
Please note the changes you apply to the BIOS settings, so that they can be reverted if they prevent the computer from booting on a regular operating system.
1. Boot Order editing: Depending on the model, you may see an entry for mobile or USB devices. Move this item to the top of the list to force the computer to try to boot from the USB first before starting from the internal hard drive.
2. Disable Fast boot.
3. If the computer is configured to boot with the old BIOS, try configuring it to start with UEFI. Also, if the computer is configured to start with UEFI, try configuring it to start with the old BIOS. To do so, try any of the following options if available:
- Turn on Legacy mode.
- Turn off Secure boot
- Enable CSM boot
- Turn off UEFI
4. Try upgrading the BIOS to the latest version provided by the manufacturer.
If none of these options work, unfortunately you must inform that you cannot use Tails on this computer.
See more:
- How to create a list of installed programs on Windows
- Instructions to reset a program on Windows to the default installation state
- How to install PuTTY on Windows