Instructions for deleting DNS on Windows
When surfing the web, a problem can arise whenever a user receives a lot of DNS errors or 404 errors in a web browser even though the network connection is still working normally. In this case, learning how to delete DNS for the computer operating system is the key to accurately recover the quality of service for the computer's browsing capabilities. DNS deletion will help remove the location and name of saved web pages or cache on the computer. This can affect the speed when accessing the site again (slower), but it will minimize errors when browsing the web from the entry that is in error.
Explore more:
- Change DNS usage to make surfing faster
- Instructions for removing DNS Unlocker adware
What is DNS?
Domain Name System (DNS) is a database system that can translate the native language of a web address or URL into an IP address. This system is created because it is much easier to remember the domain name (eg www.quantrimang.com.vn) when remembering the IP address. Basically, any computer on the local network has at least one server acting as a DNS query manager, doing a cache job or a quick search to minimize the time needed to find the domain. If the local server does not host the domain name, it will require identification from the next server name and so on.

Read the article: Learn about DNS? What is DNS Lookup? to better understand DNS.
DNS record
Before DNS was created in 1982, the idea of using a name instead of the computer's digital address on the network connected to ARPANET. Before 1982, any computer connected to the network needed a HOSTS.TXT file that could be retrieved from a computer at SRI. This file will map the digital addresses. The host file is still used in modern operating systems to map 127.0.0.1 to 'localhost'. However, the rapid development of the computer network has turned the host editing file into useless. Therefore, Paul Mockapetris created the Domain Name System in 1983 and wrote the first deployment. The original implementation was then considered the IETF standard and has been replaced since that time. The first Unix deployment of DNS was completed in 1984 by Douglas Terry, David Riggle, Mark Painter, and Songnian Zhou referring to BIND server (Berkeley Internet Name Domain). BIND was later imported into Windows NT in early 1990s.
DNS Cache Poisoning
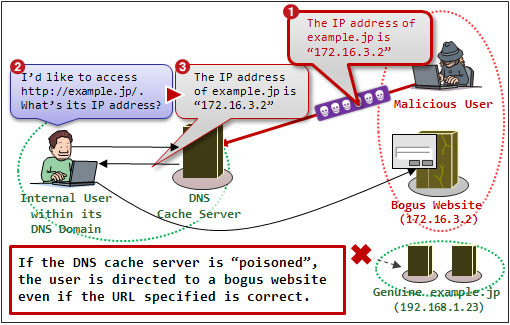
Similar to other basic Internet structures, the original Domain Name System was not designed to be very secure. DNS cache poisoning is the term used to describe data or DNS security is compromised. Infringement occurs when data is introduced to DNS cache that does not originate from or originate from a valid DNS source. This could be due to malicious attacks or bad DNS cache or incorrectly configured DNS. Once the DNS Server receives invalid information and cache into the database, then it will give this bad information malicious. At the very least, the infected server will transfer end users to sites they don't want. During malicious attacks, they may be redirected to malicious websites designed to sabotage the client computer or to sites dedicated to stealing information or user money.
Prevent DNS Cache Poisoning
Many traditional DNS cache poisoning attacks are blocked by helping DNS servers trust information passing through it with other DNS servers. This can be accomplished by omitting the DNS record that will return to the server that has the request unrelated to the query. The current version of BIND focuses on malicious attacks in this way. In addition, deploy random source port for DNS request (request variables become more difficult to mimic) with the use of random security encryption numbers to select source port and immediately reduce significantly DNS attack capability. Secure DNS or DNSSEC is an initiative that is currently being implemented slowly to completely address the malicious DNS cache problem by using digital signatures and public validation to validate the data.
Common errors with DNS
There are many problems with DNS that can arise at the level of network administrators or advanced users. However, for the end user, the main problem with DNS arises because they are misconfigured or the DNS host on the local computer requires cleanup. Regardless of the type of operating system, many home computer users will enter the wrong DNS Server of the service provider they are using, leading to a problem with the Internet connection. Each service provider has its own configuration process and the IP address of the DNS Server for the local network to use is provided in the contract. Many cases the provider uses its primary DNS Server address, whether it is the same address as the Gateway IP or not (as well as the router's IP address).
What to delete DNS Cache for?
DNS cache stores the locations (IP addresses) of the web server that contain the website you just viewed. If the location of the web server changes before the item is updated in the DNS cache you will not be able to access the site. If you encounter a lot of HTML 404 errors, you will have to delete the DNS cache. After the deletion is complete, the computer will query the name server to retrieve the new DNS information and you can access the website.
Guide the Flush DNS in Windows using the command
Step 1 - Close all open web browsers and applications on the computer.
Step 2 - Open the Windows command prompt by selecting the ' Start ' menu and typing ' cmd ' in the search field, then press enter .
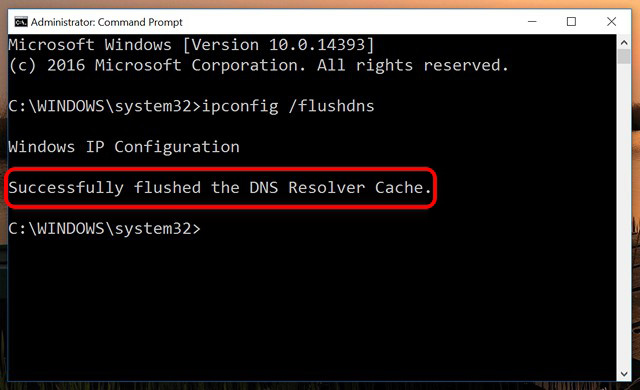
Step 3 - In the command, type ' ipconfig / flushdns ' and press enter . After a while, Windows will display a message like: ' Successfully flushed the DNS Resolver Cache '. After this message is displayed, it means that DNS has been deleted and all invalid entries removed.

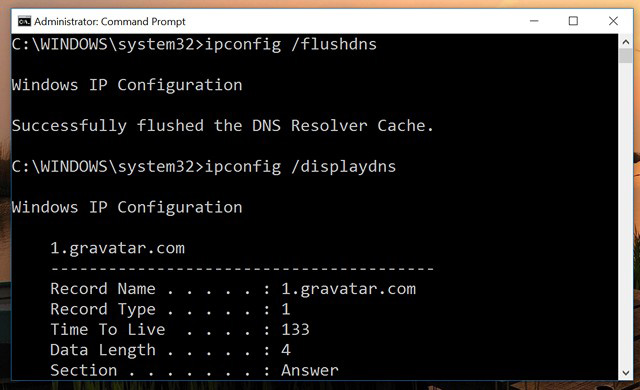
Step 4 - Display the DNS resolver cache by typing ' ipconfig / displaydns ' in the command then pressing the enter key.
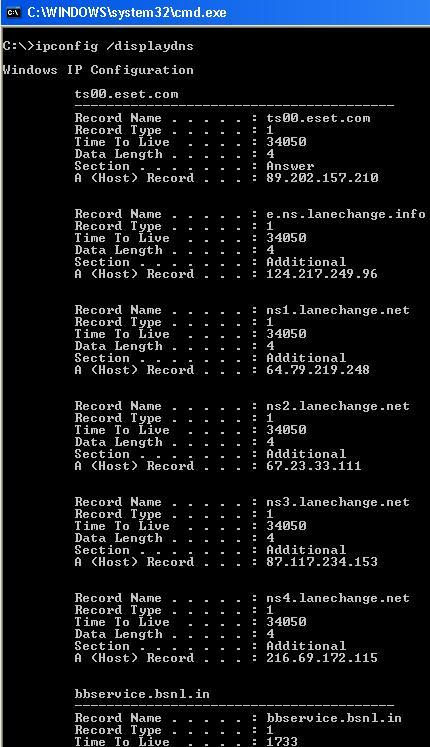
Instructions for deleting DNS Cache on Windows 10
Method 1: Use the command line
This is similar to previous Windows operating systems, specifically:
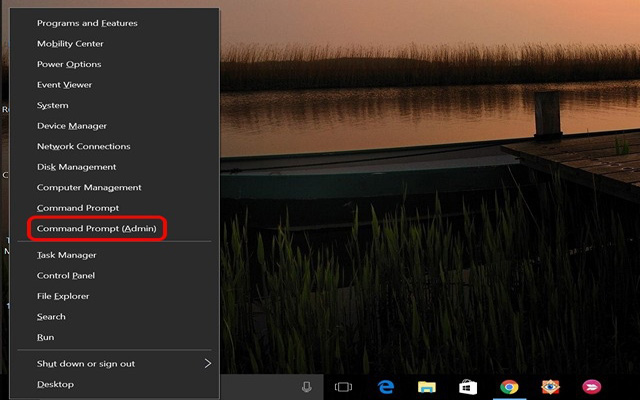
- Right-click on the Start Menu and open Command Prompt (Admin), the UAC (User Account Control) window appears, click Yes to start the command line window with administrative rights.
- In the command line interface, paste the command ipconfig / flushdns and press Enter
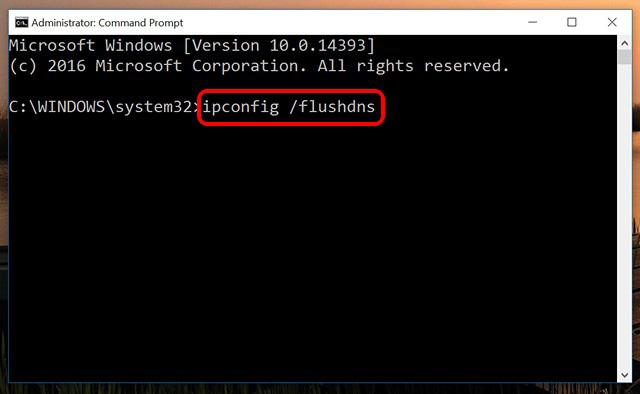
- This will clean up the DNS Cache, remove too large cache files (sometimes causing errors when loading a web page) and you will receive a message Successfully flushed the DNS Resolver Cache .
Method 2: Delete DNS memory using Batch File
You can clean up DNS Cache by using an executable file in Windows 10. This file includes many commands, just run the file to execute the commands contained in it. Therefore, if you are afraid to use the command line interface, just download the executable file, run it to delete the DNS Cache on Windows. Download the file here.
Some useful commands related to DNS and IP addresses
If you are still facing problems on the site, you can use the following commands to fix DNS errors or IP address issues:
- ipconfig / displaydns: Check DNS records according to Windows IP configuration
- ipconfig / release: Exit the current IP address settings
- ipconfig / renew: Reset the IP address settings
Instructions to turn off DNS Cache in Windows
If clearing DNS cache does not help resolve DNS errors that occur frequently on computers running Microsoft Windows operating systems, DNS client caching can be disabled. When the DNS cache on the client is disabled, your computer is still usable, but not as efficient or as fast as when the service is activated and working normally.
Step 1 - Open the Windows command prompt by selecting the ' Start ' menu and typing ' cmd ' in the search field and pressing the enter key.
Step 2 - Type ' net stop dnscache ' or ' sc servername stop dnscache ' in the command window and press enter . DNS cache will be disabled until the computer starts or restarts at the next time. In order to keep this change permanent, the DNS Client Service needs to be changed to disable using Microsoft Service Controller or Services tools.
Steps to stop DNS Client Services in Windows using the Services Tool
Step 1 - Open the command window. Then, enter services.msc into the command prompt and press enter .
Step 2 - Locate the ' DNS Client ' application and double click on the icon of this software.
Step 3 - Select the ' Stop ' menu. In contrast, the application will restart in the same area.
Change the DNS Cache settings in Windows
The following method can also be used to modify the Windows DNS client cache: change the 2 registry entries in the registry corresponding to this service.
Step 1 - Select the ' Start ' menu and type ' regedit ' in the search dialog box and press enter.
Step 2 - Click on ' Edit ' and ' Find ' and type ' DNSCache ' or use the menu on the left to locate: HKEY_LOCAL_MACHINESYSTEM → CurrentControlSet → Services → Dnscache → Parameters .
Step 3 - MaxCacheTTL is the maximum amount of time that Windows will cache a DNS lookup. The default value at the time of writing this article is 86,400 seconds. Users can change this entry to 1 to ask Windows to clear the cache every second. This may adversely affect the performance of the computer.
Step 4 - Another installed registry key can be changed to MaxNegativeCacheTTL, the maximum amount of time a failed DNS result will be cached. Normally it will be set to 900 seconds, but if you change to 0, Windows will not store failed searches.
Note : The path to the DNS cache registry key will vary slightly depending on the version of Windows installed on your computer. Users should be careful when editing the registry and this job is absolutely not for those who do not have experience using computers.
Instructions for deleting DNS in Mac OS X operating system
If you are a large Internet user or a web developer or have a lot of management jobs on a Mac computer, clearing DNS cache is a sure requirement to arise. Depending on the version of the operating system installed on your computer (Leopard or Tiger), there will be a slight difference in the command to delete DNS.
Step 1 - If you have installed Mozilla Firefox on your computer and are opening it, exit this application.
Step 2 - Open Terminal on the computer.
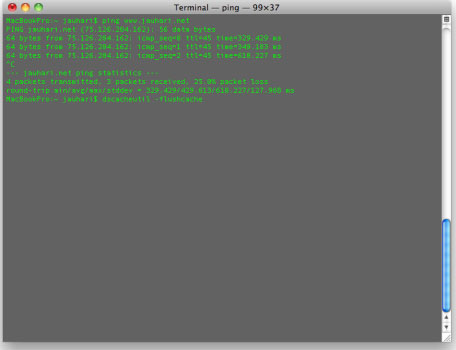
Step 3 - On the computer running Lion (Mac OS X 10.5, 10.6, or 10.7) type the following command and remember to press ' return ' when done:
dscacheutil –flushcache
Step 4 - In Mac OS X 10.4 Tiger, type the following command and remember to press ' return ' when done:
lookupd –flushcache
Instructions for deleting DNS in Linux
In many versions of Linux, the nscd daemon is used to manage DNS caching on the client. For versions that use this method, restarting nscd daemon is the first way to clear DNS cache. Other versions of Linux can use BIND or dnsmasq to delete.
Steps to delete NSCD DNS Cache
NSCD is used to speed up continuous access to the same data and improve the overall performance of the system.
Step 1 - type $ sudo /etc/init.d/nscd restart and press enter or return key.
Step 2 - After nscd starts, DNS will be deleted. Instead, the user can type ' # service nscd restart '.
Steps to delete the DNSMASQ DNS Cache
DNMASQ is used as a compact DHCP, TFTP, and DNS server. It was originally designed to improve DHCP services and DNS to LAN, accept DNS queries and answer them. It is also installed on many routers to cache DNS queries or searches.
Step 1 - type ' $ sudo /etc/init.d/dnsmasq restart '
Step 2 - After dnsmasq starts, DNS will be deleted.
Steps to delete BIND Server DNS Cache
Similar to nscd and dnsmasq, to delete the DNS cache in BIND, simply request the boot to clear the cache.
Step 1 - type ' # /etc/init.d/named restart ' then press enter or return key.
Step 2 - After BIND has finished booting, DNS will be deleted.
Instructions to Disable Firefox DNS Cache
Unlike other popular web browsers, Firefox runs its own DNS cache independent of other services on the computer. Therefore, if you frequently switch between VPN, home ISP or other connections, unexpected results can occur if users access services that require using VPN, ISP, . Do When you perform an erase of DNS on the computer, users should close Firefox. If DNS problems still appear on your computer and Firefox is your favorite browser, the answer probably lies in whether users should disable DNS cache in this browser.
Step 1 - Run Mozilla Firefox on the computer.
Step 2 - Install the Firefox DNS cache plugin.
Step 3 - Right-click the ' Home ' menu in Firefox and then select the ' Customize ' menu.
Step 4 - Search for the ' DNS Cache ' button and then drag it to the next ' Home ' button in Firefox and then click the ' Done ' button.
Step 5 - Click the ' DNS Cache ' button whenever you want to disable Firefox DNS cache.
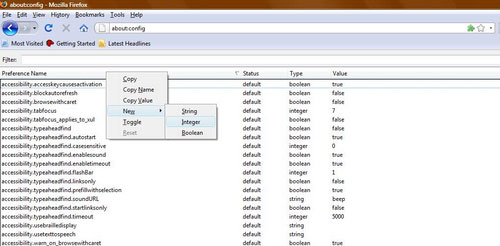
Step 6 - In addition, users can change the FireFox DNS settings to set the expiration time for the cache after 0 seconds. To do so, type ' about: config ' in the address bar and press enter or return key. Right-click an empty area in the screen that appears then select New → Integer .
Step 7 - Type ' network.dnsCacheExpiration ' and set 0 to be the value of the integer. If ' network.dnsCacheExpiration ' is available, adjust the integer value to 0 . If you later want to restore Firefox's defaults, just change the value back to the default of 3600 . When 0 key is pressed, DNS cache in Firefox will automatically expire on your computer.
You should read it
- ★ How to delete cache and cookies on Chrome, Firefox and Coc Coc
- ★ How to view or delete browsing history on the PlayStation 4
- ★ Instructions on how to increase processing speed for Smart TV
- ★ Increase the browsing speed of Google Chrome
- ★ Clear browsing history, Firefox browser cache on Windows and Mac OS X