How to zoom in on a specific location in a screenshot on iPhone
Taking a screenshot is one of the basic tasks that probably any iPhone user has ever used.
However, not many people know that iOS also offers options to help customize screenshots on iPhone, as well as highlight certain content in photos. Let's find out how to proceed right below.
Step 1: The first thing you have to do is take a screenshot on your iPhone.
Step 2: Tap the floating screenshot at the bottom left of the screen.
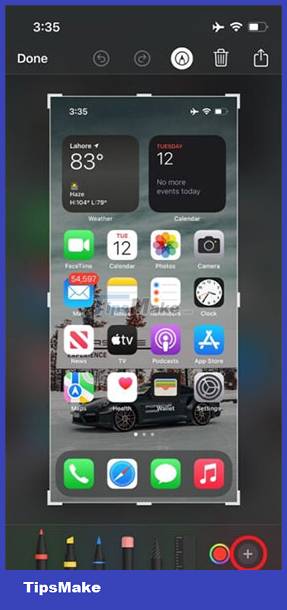
Step 3: Click the (+) button and then select the Magnifier option.
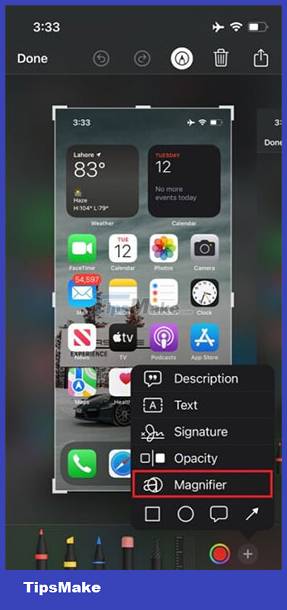
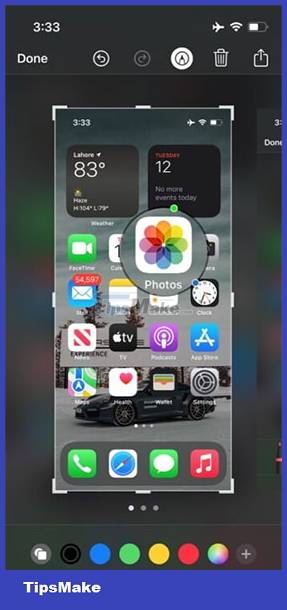
Step 4: Hold down the magnifying glass and drag it to the inner position of the screenshot you want to focus on, such as the Photos app in the screenshot below.
Step 5: Now tap the (+) button again and choose Opacity.
Step 6: You will see a slider at the bottom. Just drag it to the right, you will see that the entire screenshot has been blurred except for the area you have set as focus as stated above.

Step 7: Just tap Done to save the screenshot.
It's all simply that. You now have a unique custom screenshot, with a special area in the image highlighted and enlarged. You can share or archive this photo as usual.
Hope you are succesful.
Was this article helpful?
Your feedback helps us improve.
Related Articles
 How to save a location on Google Maps from a screenshot2 minutes read
 How to take a screenshot of the iPhone X screen2 minutes read
 How to create location based reminders with iPhone3 minutes read
 5 quick and easy ways to take screenshots on iPhone and iPad.4 minutes read
 How to change where Windows screenshots are saved2 minutes read
 Trick to take screenshots using iPhone's Action button2 minutes read
Reader Comments 0
Sign in with email or Google to join the discussion.