Table of Contents
This updated guide explains how to Use TeamLink on an Online Learning Computer through clear steps, practical examples, and important checks that help prevent common errors.
Instructions to Create a TeamLink Account for PC
Step 1:
Users click the link below to download and install the TeamLink software on your computer.
- Download TeamLink for PC software: http://v1. getpedia. net/data/? q=wMDN5ATN4gjN2AjN0IjM3MjN8NDO2gDNxwXZ4VmLwVHdlNVLr5WaM1WYlR1L4AzL0AzLwIDMy8SZslmZvEGdhR2L&e=o
At the interface, click Log in / Sign up to create an account.

Step 2:
Enter your personal email address to register and click Get code below to get verification codes sent to your email address. Then the teachers enter the code to send .

Step 3:
Finally, the teachers enter their name and download a personal avatar and click Save to save. Thus, the teachers have created a TeamLink account to teach online.

2. Instruct and Teach on TeamLink Online
This is the interface of TeamLink on your computer after you've installed and created an account.

Create a Class on TeamLink
Step 1:
The teachers click Start / Join a meeting to start creating a new classroom on the software. Next you are selected to use the personal Meeting ID provided by the software, click Use an existing Meeting ID . If you may need to createa new Meeting ID , click Create a new Meeting ID . You will then be asked to enter the classroom password and the classroom name.

Step 2:
The teachers then switch to the online teaching interface with the classroom ID to send to the student and include the room password you created.
- Square icon: Zoom in on the screen.
- Video icon: Turn on / off the video.
- Microphone icon: Turn on / off the sound.
- Screen icon: Share screen.
- Circle icon: Record online teaching process.
- Red circle icon: Stop the classroom.
- People icon: Invite others to join via the share link.
- Chat icon: Text while teaching.
- Participants icon: Number of participants.
- Gear icon: Set microphone and webcam.

Step 3:
When a student joins the classroom, the teachers can set and adjust the audio and video of the student by clicking on the humanoid icon and selecting the silent mode they want.

Step 4:
The classrooms created from the new Meeting ID will be saved for user control outside the main interface. Click the 3-dot icon to delete or reset the username and password.

Schedule a Class on TeamLink
Step 1:
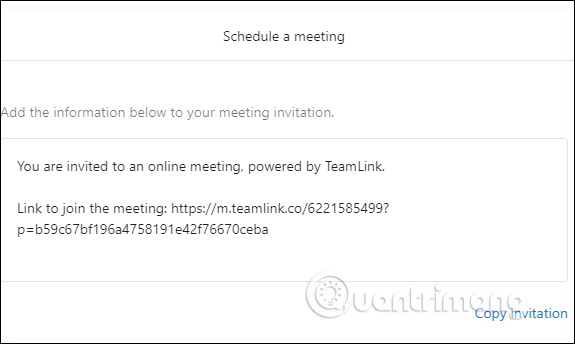
At the main interface we click Schedule a meeting . This time also displays the interface to select a new Meeting ID or Personal Meeting ID. This step is like creating a new classroom. Click Next to continue.

Step 2:
You will then see a link for us to send students to the class. Students can access the link, if the Host is a teacher who has not opened the class yet, they cannot participate.
FAQ
What is the easiest way to Use TeamLink on an Online Learning Computer?
Start with the requirements in this guide, then follow each step in order. Check the result after every major change so problems are easier to identify.
Can beginners follow these instructions?
Yes. The process is organized into practical steps, and you can repeat any step before moving forward.
What should I check if the method does not work?
Confirm your software or device version, permissions, settings, file format, and internet connection when the task depends on online services.
Related Articles
 Top 6 Outstanding Online Learning Trends in 20186 minutes read
 Online Learning Application: How to Learn Online on Hanoi TV3 minutes read
 Study Online on E-learning Lectures2 minutes read
 What to Look for in a Quality Online Learning Platform7 minutes read
 Turn Off Facebook, Take Time to Visit These 37 Web Sites to Add New4 minutes read
 Bookmark 5 Best Python Programming Learning Websites8 minutes read
Reader Comments 0
Sign in with email or Google to join the discussion.