Table of Contents
Learning how to use smart DNS proxy to access Geo-Restricted content doesn't have to be complicated. This updated guide presents a clear workflow, practical checks, and troubleshooting advice you can use while completing the process.
Key Takeaways
- Understand why do many people prefer to use smart DNS proxy over VPN.
- Follow the steps to use smart DNS proxy to access Geo-Restricted content.
- Understand step 1: create a SmartDNS account.
Why Do Many People Prefer to Use Smart DNS Proxy Over VPN?

Smart DNS Proxy is a simpler and more efficient solution because it only redirects DNS queries instead of routing all traffic through an encrypted tunnel. This allows you to watch high-quality video online without buffering (the process of temporarily storing data before it is processed or played back), because the traffic doesn't have to go through additional encryption steps.
It also doesn't hide your IP address, preventing issues like security flags on banking websites or annoying CAPTCHAs. You can access region-restricted content while still having seamless access to other online services.
Unlike VPNs, which require software installation and may not work on smart TVs or game consoles, Smart DNS Proxy can also be set up directly on your router and media player, allowing you to access popular TV streaming services using your preferred device. Plus, because it only changes DNS queries instead of rerouting traffic, it's harder for streaming services to detect and block, ensuring more reliable access.
How to Use Smart DNS Proxy to Access Geo-Restricted Content

Setting up Smart DNS Proxy is simple and works on a variety of devices. This example is using Windows 11, but Smart DNS Proxy has instructions for macOS, smart TVs, consoles, and more.
Step 1: Create a SmartDNS Account
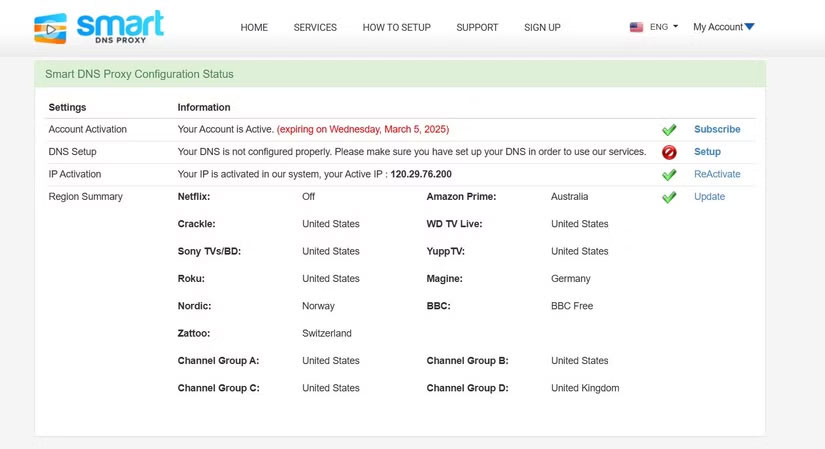
First, you'll want to create a Smart DNS Proxy account using your email. They offer a free two-week trial (no credit card required) with full access to all services, except Netflix, which is only available with a paid subscription. So unless you mostly watch Netflix, there's no need to sign up right away.
Step 2: Configure DNS Proxy on the Device
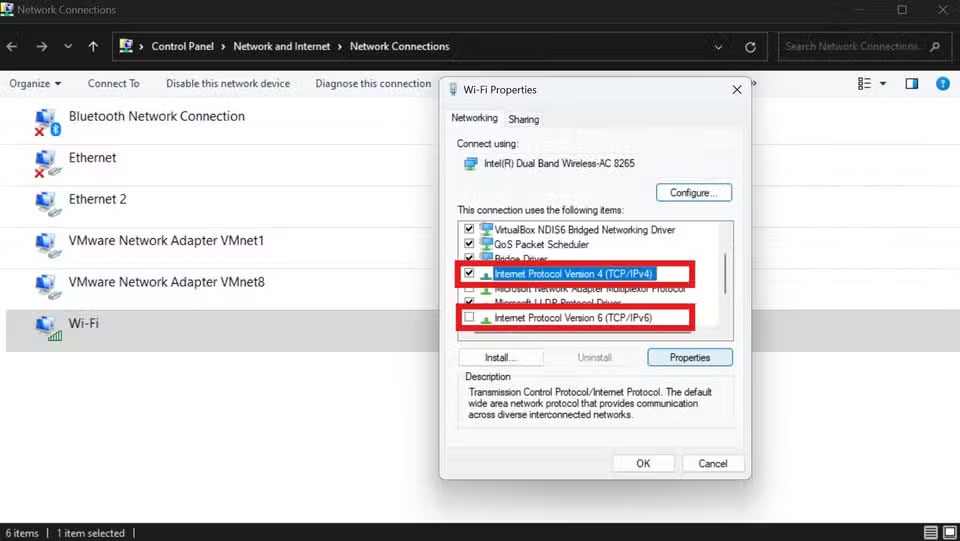
- Start by opening View Network Connections by navigating to Control Panel > Network and Internet > Network Connections.
- Right-select the adapter and select Properties, then scroll down to display the IPv4 and IPv6 options.
- Uncheck Internet Protocol Version 6 (TCP/IPv6) to ensure SmartDNS Proxy only works with IPv4.
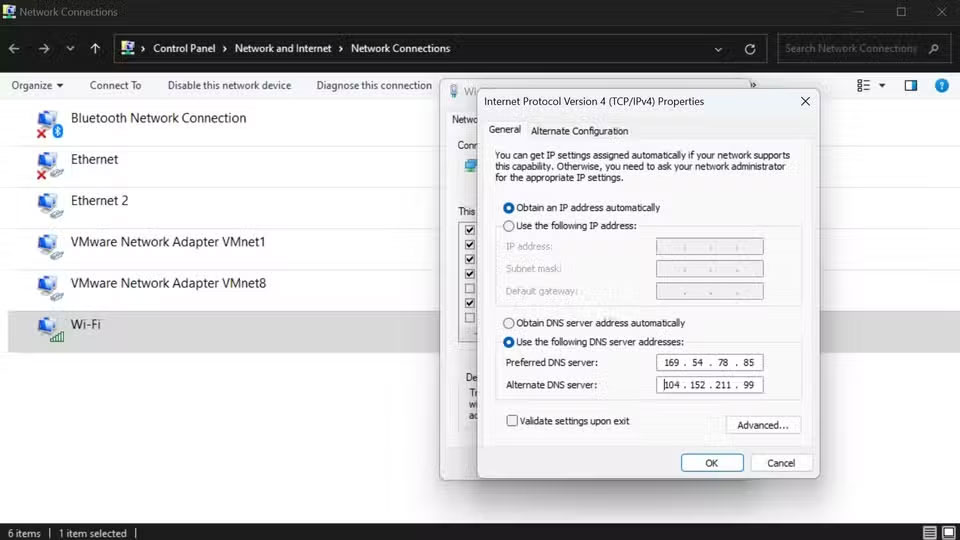
- Then, select Internet Protocol Version 4 (TCP/IPv4) and click Properties.
- Now, check Use the following DNS server addresses. Then, open SmartDNS's list of available DNS servers. Select any two servers that you think the content you want to view is not blocked and copy the IP addresses. Now, go back to the IPv4 configuration panel and paste both IP addresses into the box provided.
Note that your device will default to the DNS server you set in Preferred DNS server and will only use the Alternative DNS server if the preferred server is not available. Restart your computer to ensure that all changes have been set after configuring the network.
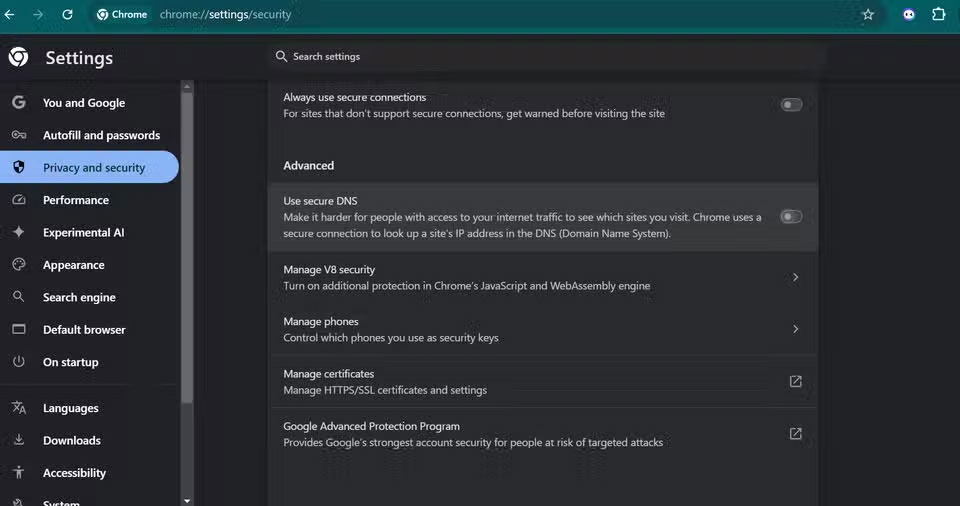
Sometimes, Google Chrome blocks Smart DNS Proxy when accessing online content. Scroll down to Advanced and disable Use secure DNS. Open Settings > Privacy and security > Security. This helps you make sure you're not experiencing this issue. This should fix the problem of Chrome blocking websites due to DNS proxy.
Step 3: Enable and Verify Proxy DNS Service
- Open your web browser and open the My Account page on Smart DNS Proxy after restarting your computer.
- Click Update, then select Activate/ReActivate to register your IP address with the system.
- Check the Setup page - if it shows a green checkmark, your DNS proxy is working properly. This helps you verify that SmartDNS is working.
Once enabled, open your favorite streaming service and test by accessing region-locked content. Make sure to check that IPV6 and secure DNS are disabled if the content is still locked. You may also want to change your DNS server region, as it's possible that the region you're using the proxy for is also blocking the specific content you want to access.
Final Thoughts
The most reliable way to handle use smart DNS proxy to access Geo-Restricted content is to follow the process in order, verify each important setting, and test the result before moving on. Use the guidance above as a practical reference, then adjust the details for your device, software version, or specific goal.
FAQ
What should I check before I use smart DNS proxy to access Geo-Restricted content?
Use the latest available software, confirm that your device meets the requirements, and make sure you have the necessary permissions, account access, or backup before changing anything.
Why might I be unable to use smart DNS proxy to access Geo-Restricted content?
Common causes include outdated software, missing permissions, incompatible settings, incomplete setup steps, or a temporary network problem. Recheck the process from the beginning and restart the app or device if needed.
Is it safe to use smart DNS proxy to access Geo-Restricted content?
It is generally safe when you use official tools, review every permission, and back up important data before making system-level or account-level changes.
Related Articles
 DNS Tricks to Access More Content on Smart TV8 minutes read
 What Is Proxy? Features, Uses, and Key Details6 minutes read
 Using a Proxy to Hide Might Just Be What You Need7 minutes read
 What Is Web Proxy?8 minutes read
 What Are the Three Types of Proxy Servers?6 minutes read
 What Is Proxy? Instructions for Installing Proxy Server on PC7 minutes read
Reader Comments 0
Sign in with email or Google to join the discussion.