Table of Contents
This guide explains how to use real time text (rtt) on mac and iPhone using a clear, step-by-step process. It also highlights the settings and checks that can help you avoid common errors.
One of the main reasons people use the Real Time Text protocol is its ease of use. But this is not the only reason. There are many other situations that the Real Time Text can work.
How Use Real Time Text (RTT) on Mac and iPhone Works
If you work in an extremely noisy environment, but still need fast communication, Real Time Text calls can be quite helpful. Real Time Text is also a quick and accurate way to exchange data such as numbers or addresses. Because this protocol allows you to communicate 'silently', RTT calls are also useful in transferring sensitive data in public environments.
You can use the chat application or alternate email in such cases, but the strength of RTT lies in voice calls. This means you can chat as usual, then quickly enter a number without having to switch to another communication method.
RTT started being supported on iOS from version 11.2, but this protocol only appeared on Mac starting from macOS Mojave 10.14.2. If you own a Mac from 2012 onwards, running macOS version Mojave 10.14.2 or higher, you can make calls RTT. Unfortunately, the Mac Pro model is an exception and doesn't work with RTT. Besides, you also need an iPhone to make calls RTT.
Before you start, make sure you have set up the Wi-Fi Calling feature On your iPhone and activate the call making on other devices.
Now, open System Preferences And go to the Accessibility Section . Assuming you have set up the correct Wi-Fi Calling feature , you will see the RTT In the bar below the Hearing Section .
Select the checkbox with the Enable RTT Label . By default, messages will be sent in full. when needed the characters to appear when you type, select Send Immediately. Finally, enter RTT relay number To use.
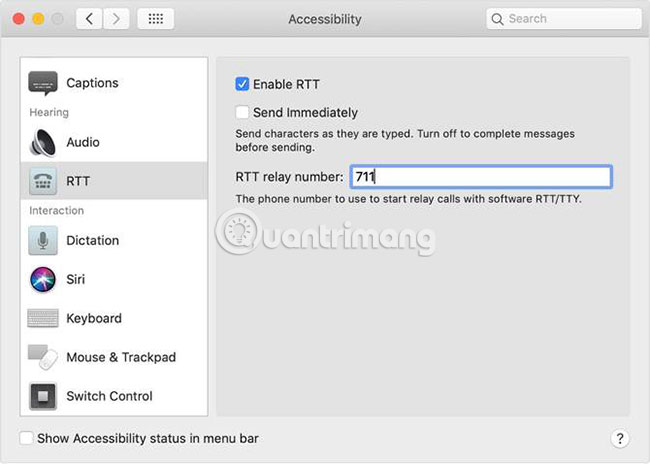
After installing everything, making RTT calls on macOS is quite simple. You will use the FaceTime Feature for calls, but you can also start RTT calls from the Contacts Application .
- To start the RTT call in FaceTime, Click the call button, then select RTT Call or RTT Relay Call From the menu.
- To start the RTT call from the Contacts Application , Hover over a phone number, then select the RTT Icon . You saw this icon earlier while setting up calls RTT (phone image on the keyboard).
When the person on the other end answers, click the RTT icon to start exchanging text messages. You can speak through the microphone when doing this or combining words and text when you see fit. Clicking on the RTT icon again will hide this feature.
To answer RTT calls, apply the same steps above.
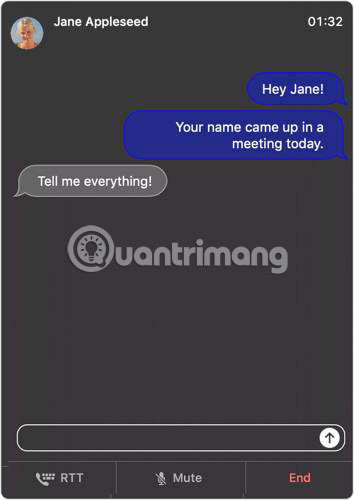
An important note is that some carriers will disconnect RTT calls if you do not exchange any messages. Whether you can make RTT calls will depend on the carrier. The RTT call feature is not supported in all regions, so check the availability of services in your area.
Although the feature called RTT has appeared on the iPhone longer than macOS, but this is not a widely advertised feature. As long as there is an iPhone 6 and above, you can already make an RTT call.
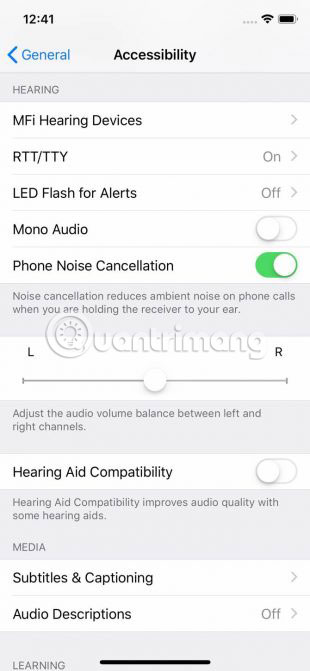
On the iPhone, open the Settings App , Then scroll down to the General Section . In this menu, select Accessibility. Here, scroll down until you find the RTT / TTY option in Hearing.
Activate Software RTT / TTY And you will see some other pop-up options. Relay Number Should be set by default. If this section is empty, enter the number for the area in which you live.
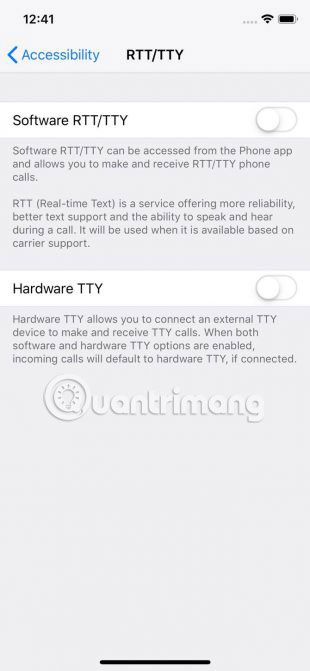
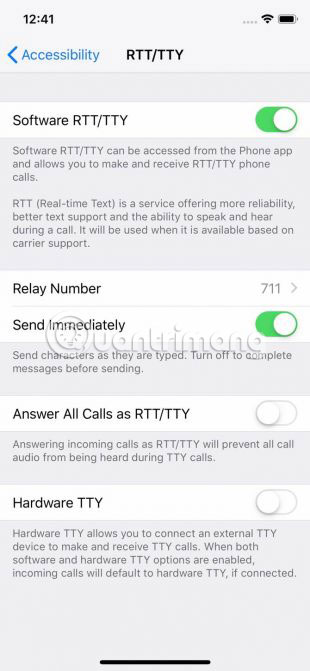
You also have the option to Send Immediately, Displaying the characters as soon as you enter them (as mentioned above). If this option is turned off, you can enter the entire message content before sending. Another option is Answer All Calls as RTT / TTY .
Making a call with RTT is as simple as making any other call. Open the Phone app, select a contact and click the number. Now instead of selecting Call [Name] , click RTT / TTY Call or RTT / TTY Relay Call .
Wait until the call is connected, then select RTT Next to the Keypad Icon . You can also convert a call to RTT at any time. Just press Use RTT Next to the End Call Icon .
By default, calls to RTT will keep the microphone active. If using only text, touch the microphone icon in the upper right corner of the screen. To end the call, touch the Back button, then press the End Call Icon .
You can also make and receive RTT calls on your iPad or iPod Touch. To do this, Simply set up the Wi-Fi Calling feature On your iPhone. Then, make sure that the other device you want to use to call RTT is activated in Allow Calls On .
Are you surprised to know that RTT is integrated into both macOS and iOS? Chances are this is not the only feature you have missed. If you are curious to know more, take a look at the latest posts in macOS Mojave and iOS 12.2.
FAQ
What should I prepare before I use real time text (rtt) on mac and iPhone?
Review the requirements in the guide, confirm that your device or software is compatible, and save important work before changing settings related to use real time text (rtt) on mac and iPhone.
Why might use real time text (rtt) on mac and iPhone not work as expected?
The most common causes are incompatible versions, missing permissions, incorrect settings, or an interrupted internet connection. Recheck each step and restart the app or device when appropriate.
Can beginners follow these use real time text (rtt) on mac and iPhone steps?
Yes. Follow the steps in order, avoid skipping confirmation screens, and compare your interface with the screenshots because labels may differ slightly between versions.
Related Articles
 How to Turn Off the RTT Feature on iPhone3 minutes read
 How to Zoom in on Text When Typing on iPhone3 minutes read
 5 Simple Ways to See Real-Time iPhone Activities8 minutes read
 What Is Text Replacement on IPhone? Why Is It Useful?5 minutes read
 Apple Maps Application Supports Displaying Real-time Traffic Situation in Vietnam3 minutes read
 Skype Provides Real-time Voice Translation3 minutes read
Reader Comments 0
Sign in with email or Google to join the discussion.