Table of Contents
This updated guide explains how to Use Media Lock to Hide Files on Windows 10 through clear steps, practical examples, and important checks that help prevent common errors.
Instructions to Hide Files on Windows 10
Step 1:
Users download Media Lock application for Windows 10 by following the link below and proceed with the installation as usual.
Download the Media Lock Windows 10 application https://www. microsoft. com/en-us/p/app/9n0v973zlpt0
At the interface we click Create Passcode to create a password to open the application with 4 digits.

In addition, the application also has a secret question in case you forget your password.

Step 2:
This is the main interface of the application with 4 file types that Media Lock supports to hide on the computer. click a file type to proceed offline.

Step 3:
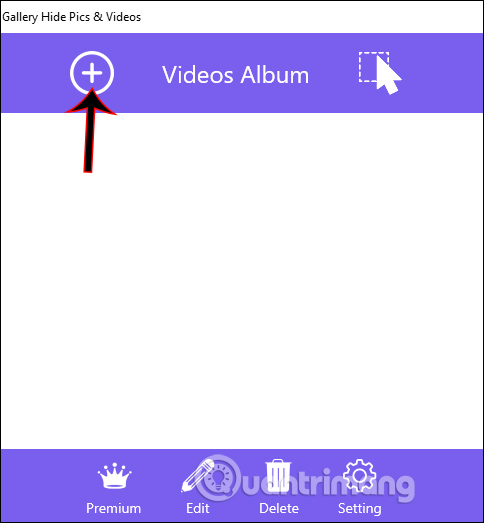
First of all at the user interface click the plus icon to proceed to create albums to save the files you may need to hide. Then click Import to add the files from the computer to the interface to hide. Media Lock will ask if you may need to delete this file in the root directory , click Cancel to hold the file or OK to agree.
Step 4:
You continue to perform the above operation with other file types to hide.

Step 5:
To change the application password or delete the content, click the gear icon to enter the setting interface on the application.

FAQ
What is the easiest way to Use Media Lock to Hide Files on Windows 10?
Start with the requirements in this guide, then follow each step in order. Check the result after every major change so problems are easier to identify.
Can beginners follow these instructions?
Yes. The process is organized into practical steps, and you can repeat any step before moving forward.
What should I check if the method does not work?
Confirm your software or device version, permissions, settings, file format, and internet connection when the task depends on online services.
Related Articles
 How to Hide and Show Files in Windows 11 Without Software3 minutes read
 Tricks to Hide Files or Folders on Windows, Mac OS X and Linux7 minutes read
 How to Hide the Airplay Media Playback Control Key Cluster3 minutes read
 Guide to Lock, Hide and Secure Files and Folders with Hide Folders Software4 minutes read
 Add a Way to Hide Sensitive Content on Android Device Lock Screen5 minutes read
 How to Show and Hide Files in Windows 103 minutes read
Reader Comments 0
Sign in with email or Google to join the discussion.