Table of Contents
This updated guide explains how to Turn on Protection Mode Avatar Image Facebook through clear steps, practical examples, and important checks that help prevent common errors.
To enable Facebook avatar protection we will need to use Chrome browser and install the J2TEAM Security utility on the browser.
Step 1 : Open the browser and visit the following link to install the J2TEAM Security utility into the Chrome browser
Installation link: https://chrome. google. com/webstore/detail/j2team-security/hmlcjjclebjnfohgmgikjfnbmfkigocc? utm_source=browser_action

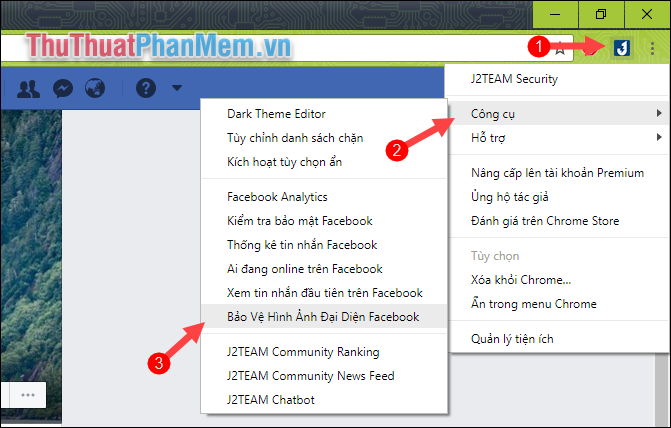
Step 2 : Please log in to your Facebook account, then right-click the icon of the upper-right corner of the browser and select Tools -> Protect Facebook Avatar Image
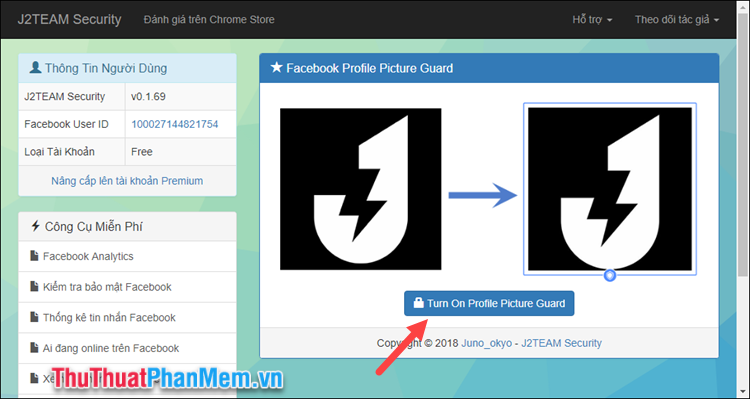
Step 3 : In the new window, click the Turn On Profile Picture Guard button
Step 4 : After turning on the protection feature, you should reload your Facebook page and you will see the shield icon below the avatar:

So, with just a few simple steps, we successfully enabled the FaceBook avatar protection feature, hope you will find the article useful. Good luck!
FAQ
What is the easiest way to Turn on Protection Mode Avatar Image Facebook?
Start with the requirements in this guide, then follow each step in order. Check the result after every major change so problems are easier to identify.
Can beginners follow these instructions?
Yes. The process is organized into practical steps, and you can repeat any step before moving forward.
What should I check if the method does not work?
Confirm your software or device version, permissions, settings, file format, and internet connection when the task depends on online services.
Related Articles
 Protect Your Facebook Avatar - Did You Try It?3 minutes read
 How to Make Facebook Avatars of Black and Yellow Letters Strange4 minutes read
 Create Style for Facebook Avatar with Two Attractive Features6 minutes read
 Manually Create a Facebook Avatar Image with 5 Online Applications5 minutes read
 How Selfie Avatar Facebook with Celebrities4 minutes read
 How to Turn On Facebook Profile Picture Guard Safely10 minutes read
Reader Comments 0
Sign in with email or Google to join the discussion.