How to enable/disable File and Printer Sharing in Windows 10
File and printer sharing is the ability of a Windows computer to share a folder or printer with other computers on a network..
File and Printer Sharing is the ability for a Windows computer to share a folder or printer with other computers on a network.
If you are connecting to a public network (for example, a coffee shop or library), you can turn off File and Printer Sharing until you connect to a private network location (for example, your home or office).
This guide will show you how to enable or disable File and Printer Sharing on a Windows 10 PC.
Note:
You must log in with administrator privileges to enable or disable File and Printer Sharing.
If your networked computers don't show up in File Explorer, make sure that the Function Discovery Provider Host and Function Discovery Resource Publication services are enabled, set to Automatic , and running.
Enable/disable File and Printer Sharing in Network and Sharing Center
1. Open the Control Panel (icon view) and click the Network and Sharing Center icon .
2. Click the Change advanced sharing settings link on the left side.

3. Expand the network profile to Private , Guest, or Public for the configuration where you want to enable or disable File and Printer Sharing.
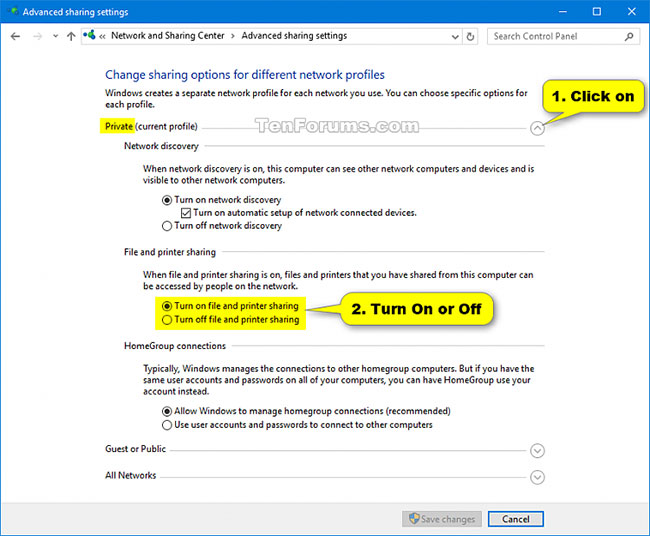
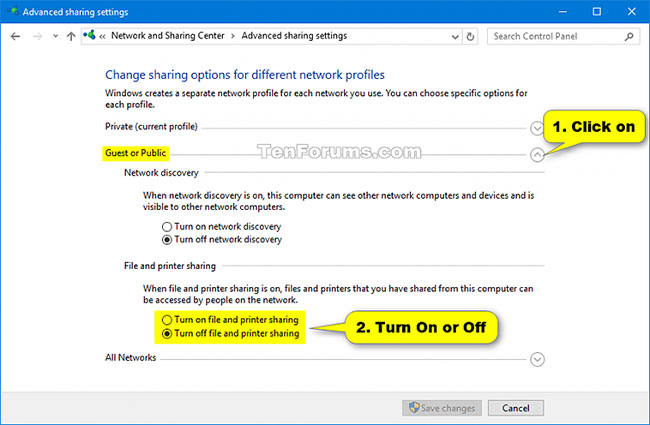
4. Select either "Turn on file and printer sharing" or "Turn off file and printer sharing" depending on what you want to do, and click " Save changes".
5. Once finished, you can close the Network and Sharing Center if you wish.
6. If you have enabled file and printer sharing, you will also need to enable File and Printer Sharing for Microsoft Networks using option 4 below.
Enable/disable File and Printer Sharing for all network profiles in Command Prompt.
1. Open Command Prompt with administrator privileges .
2. Perform step 3 (turn on) or step 4 (turn off) below, depending on what you want to do.
3. To enable File and Printer Sharing for all network profiles, copy and paste the command below into Command Prompt, press Enter , and proceed to step 5 below.
netsh advfirewall firewall set rule group="File and Printer Sharing" new enable=Yes4. To disable File and Printer Sharing for all network profiles, copy and paste the command below into Command Prompt, press Enter , and proceed to step 5 below.
netsh advfirewall firewall set rule group="File and Printer Sharing" new enable=Yes5. Now you can use Command Prompt if you want.
6. If you have enabled file and printer sharing, you will also need to enable File and Printer Sharing for Microsoft Networks using option 4 below.
Enable/disable File and Printer Sharing in PowerShell
1. Open PowerShell with administrator privileges .
2. Perform step 3 (turn on) or step 4 (turn off) depending on what you want to do.
3. To enable File and Printer Sharing, copy and paste the command below that you want to use into PowerShell, press Enter , and proceed to step 5 below.
(Applies to all network profiles)
Set-NetFirewallRule -DisplayGroup "File And Printer Sharing" -Enabled True -Profile AnyOr;
(Applies to the " Domain " network profile)
Set-NetFirewallRule -DisplayGroup "File And Printer Sharing" -Enabled True -Profile DomainOr:
(Applies to " Private " network profiles)
Set-NetFirewallRule -DisplayGroup "File And Printer Sharing" -Enabled True -Profile PrivateOr:
(Applies to " Public " network profiles)
Set-NetFirewallRule -DisplayGroup "File And Printer Sharing" -Enabled True -Profile Public4. To disable File and Printer Sharing, copy and paste the command below into PowerShell, press Enter , and proceed to step 5 below.
(Applies to all network profiles)
Set-NetFirewallRule -DisplayGroup "File And Printer Sharing" -Enabled False -Profile AnyOr:
(Applies to the " Domain " network profile)
Set-NetFirewallRule -DisplayGroup "File And Printer Sharing" -Enabled False -Profile DomainOr;
(Applies to " Private " network profiles)
Set-NetFirewallRule -DisplayGroup "File And Printer Sharing" -Enabled False -Profile PrivateOr:
(Applies to " Public " network profiles)
Set-NetFirewallRule -DisplayGroup "File And Printer Sharing" -Enabled False -Profile Public5. Now you can close PowerShell if you wish.
6. If you have enabled file and printer sharing, you also need to enable File and Printer Sharing for Microsoft Networks using option 4 below.
Turn on/off File and Printer Sharing for Microsoft Networks in Network Properties
1. Open the Control Panel (icon view) and click the Network and Sharing Center icon .
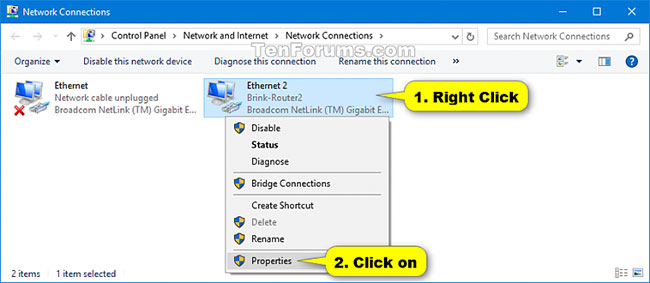
2. Click the Change adapter settings link on the left side.
3. Right-click or press and hold on the network adapter (e.g., Ethernet 2) that you want to enable or disable File and Printer Sharing for Microsoft Networks and click Properties.
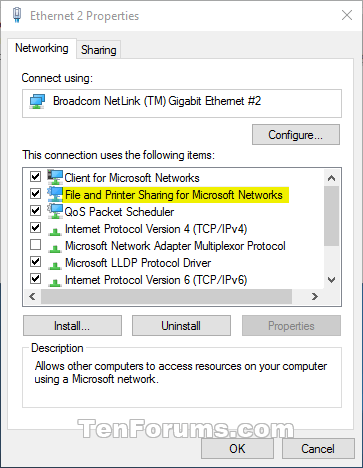
4. Select (enable - default) or deselect (disable) File and Printer Sharing for Microsoft Networks , depending on what you want, and click OK.
5. If you have enabled File and Printer Sharing for Microsoft Networks, you also need to enable File and Printer Sharing using options 1, 2, and 3 above.
Enable/disable File and Printer Sharing for Microsoft Networks in PowerShell
1. Open PowerShell with administrator privileges.
2. Copy and paste the command below into PowerShell , then press Enter. Note the name of the network adapter (e.g., "Ethernet") that you want to enable or disable file and printer sharing for the Microsoft network.
Get-NetAdapter | Format-Table -AutoSize3. Perform step 4 (turn on) or step 5 (turn off) below, depending on what you want to do.
4. To enable File and Printer Sharing for Microsoft Networks, enter one of the two commands below into PowerShell, press Enter , and proceed to step 6.
Enable-NetAdapterBinding -Name "" -ComponentID ms_serverOr:
Enable-NetAdapterBinding -Name "" -DisplayName "File and Printer Sharing for Microsoft Networks"Replace the above command with the actual network adapter name (e.g., "Ethernet") from step 2 that you want to enable File and Printer Sharing for Microsoft Networks.
For example:
Enable-NetAdapterBinding -Name "Ethernet" -ComponentID ms_server5. To disable File and Printer Sharing for Microsoft Networks, enter one of the two commands below into PowerShell, press Enter , and proceed to step 6.
Disable-NetAdapterBinding -Name "" -ComponentID ms_serverOr:
Disable-NetAdapterBinding -Name "" -DisplayName "File and Printer Sharing for Microsoft Networks"Replace the above command with the actual network adapter name (e.g., "Ethernet") from step 2 that you want to disable File and Printer Sharing for Microsoft Networks.
For example:
Disable-NetAdapterBinding -Name "Ethernet" -ComponentID ms_server6. If you have enabled File and Printer Sharing for Microsoft Networks, you also need to enable File and Printer Sharing using options 1, 2, and 3 above.
See more:
- How to enable/disable Bluetooth Absolute Volume in Windows 10