How to Recover Overwritten Files
If you've accidentally overwritten an old file or folder with a new one, you may still be able to retrieve the old version. There is free software available for every operating system that you can use to scan and recover deleted files from...
Table of Contents
Method 1 of 3:
PhotoRec (Windows, Mac, and Linux)
-
 Immediately stop saving to the affected drive. When you notice that you've accidentally delete or overwritten a file, do not save anything else on that hard drive. Avoid running programs as well. Whenever new data is written to the drive, there's a chance that it could be set to override the data from the old file. Not saving anything increases the chances that you'll be able to recover the file.
 -
 Download the free PhotoRec utility on another computer or drive. This is a powerful free file recovery program. It isn't pretty, but it can do a lot of the same things that expensive file recovery programs do. You can download PhotoRec for free from www.cgsecurity.org as part of the TestDisk utility.
- PhotoRec is available for Windows, OS X, and Linux.
- Make sure to do this on another computer to avoid overwriting the file you are trying to recover. You can also download PhotoRec to another drive on your computer, but it's safest to get it on another computer.
-
 Insert a blank USB drive. Ideally, you'll want to use a USB drive that is big enough to hold both PhotoRec and any files that you want to recover. This is because recovering the file to its original drive increases the chances that the recovery will write over the original, corrupting it in the process.
- PhotoRec is only about 5 MB in size, so any size USB drive will be able to hold it.
-
 Extract the downloaded archive. TestDisk comes packaged in a ZIP (Windows) or BZ2 (Mac) file. Extract the TestDisk folder.
 -
 Copy the TestDisk folder onto the USB drive. This will allow you to run PhotoRec from the USB drive.
 -
 Insert the USB drive into the computer that you want to recover the file(s) from. Open the TestDisk folder on the USB drive.
 -
 Run the "photorec" program. This will launch your Command Prompt or Terminal.
- You will use the arrow keys up, down, left, and right to navigate and Enter or Return to confirm selections.
-
 Select the disk you want to recover files from. The disks are just numbered, so you will need to go off the size of the disk.
- If your disk has multiple partitions, such as a C: and D: drive on one physical disk, they won't be listed until you select the disk they are on.
-
 Select the file type you want to search for. By default PhotoRec will try to recover any file that it supports. You can speed up the search by specifying which file types you want to focus on.
- You can change the file types options in the File Opt menu.
- While in the File Opt menu, you deselect everything on the list by pressing S. You can then go through the list and enable each filetype you want to search for.
-
 Select the partition. You will need to judge which one is correct based on the size of the partitions. Some partitions may be labeled.
 -
 Select the filesystem type. If you are using Linux, select ext2/ext3. If you are using Windows or OS X, select Other.
 -
 Choose which space to search. Your choice here depends on how the file was lost:
- Free - Select this option if you manually deleted or copied over your old file.
- Whole - Select this option if disk failure caused you to lose access to the file.
-
 Select the location to recover the files to. Make sure that this isn't on the same partition as the files you are trying to recover.
- Use the .. at the top of the directory list to navigate back to your installed disks. This will allow you to find a location on another partition or USB drive to save the files to.
- Press C when you've located the directory you want to save the files into.
-
 Wait for files to be recovered. PhotoRec will begin trying to recover deleted files from the partition you chose. The remaining time will be displayed on the screen, and the number of files recovered will be shown.
- File recovery can take a really long time, especially if the partition is large and you are searching for a wide variety of file types.
-
 Check your recovered files. Once the scan is finished, you can check your recovery directory to see the files that were recovered. The filenames will likely be destroyed, so you will need to go through each one to see if the file you need was successfully recovered.
Method 2 of 3:
Recuva (Windows)
-
 Immediately stop saving to the affected drive. When you notice that you've accidentally delete or overwritten a file, do not save anything else on that hard drive. Avoid running programs as well. Whenever new data is written to the drive, there's a chance that it could be set to override the data from the old file. Not saving anything increases the chances that you'll be able to recover the file.
 -
 Download Recuva on another drive. Download the installer to another drive on your computer, or on a different computer altogether. Recuva is available for free from www.piriform.com.
 -
 Insert a blank USB drive. This is the drive that you are going to be installing Recuva on to. This will allow you to run Recuva without accidentally overwriting any files on the drive you are recovering files from.
 -
 Start the Recuva installer. Click Next to proceed.
 -
 Click .Advanced to change the installation location. Select either option to proceed.
 -
 Select your USB drive as the installation location. You will need to create a "Recuva" folder.
 -
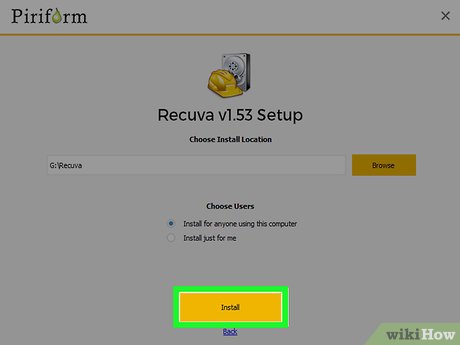 Uncheck all of the additional installation options and click .Install.
 -
 Open the Recuva folder that is created on your USB drive.
 -
 Right-click on the blank space and select "New" → "Text Document".
 -
 Change the filename to .portable.dat. Confirm that you want to change the file extension.
 -
 Insert the USB drive into the computer that you want to recover the file(s) from. Open the Recuva folder on the USB drive.
 -
 Run the "recuva.exe" file. This will begin the recovery wizard.
 -
 Select the file types you want to search for. You can search for all files, or you can search for specific types of files.
 -
 Select a location to search for files. You can search everywhere on your computer or you can specify certain locations.
 -
 Start the scan. Recuva will begin scanning the location you specified for files that match your selection.
 -
 Check each item that you want to recover. After the scan is complete, you will see a list of results. Check the box for each file that you want to recover and then click Recover....
 -
 Select a location to recover the files to. Make sure that it is not the same partition as the files you are recovering, or you could cause errors with the recovered files.
Method 3 of 3:
Recovering Older Versions of a File
-
 Use Windows File History restore a previous version of a file. Both Windows 7 and Windows 8 have file history backup utilities. These need to have been enabled in order to use them to recover older versions of files.
- See this guide for detailed information on using File History for Windows 8.
-
 Use Time Machine in OS X to restore a previous version of a file. You will need to configure Time Machine to store your backups on an external hard drive beforehand, but you will then have access to all the different versions of that file over time.
- See this guide for detailed information on using Time Machine.
Was this article helpful?
Your feedback helps us improve.
Related Articles
 How to recover overwritten files on your computer4 minutes read
 How to recover overwritten Word files? DETAILED ANSWER5 minutes read
 How to Recover Overwritten Data8 minutes read
 How to retrieve an overwritten Word file4 minutes read
 How to restore deleted multimedia files and WhatsApp messages on Android6 minutes read
 How to recover files from a completely corrupted computer7 minutes read
Reader Comments 0
Sign in with email or Google to join the discussion.