Table of Contents
This guide provides a clear overview of prevent changing windows theme, including how to Prevent Others from Changing Desktop Icons, Using Local Group Policy Editor. Use it to understand the topic, compare the available options, and make a more informed decision.
How to Prevent Others from Changing Desktop Icons
Let's explore first how you can disable desktop icon settings using Local Group Policy Editor and Registry Editor.
Using Local Group Policy Editor

You can edit various Windows settings using the Local Group Policy Editor (LGPE). This incredible tool is available on every version of Windows, except Windows Home.
Fortunately, there are some LPGE tricks you can apply on Windows Home. From there, you will have full access to the tool.
However, applying these LGPE tricks can sometimes take too long. So it's best to go straight to the next method if your device doesn't support LGPE.
If not, here's how you can use LGPE to restrict access to desktop icon settings:
1. Press Win + R to open the Run command dialog box.
2. Type gpedit.msc and click OK to open the Local Group Policy Editor.
3. Navigate to User Configuration > Administrative Templates > Control Panel > Personalization.
4. Double-click the Prevent changing desktop icons option on the right side.
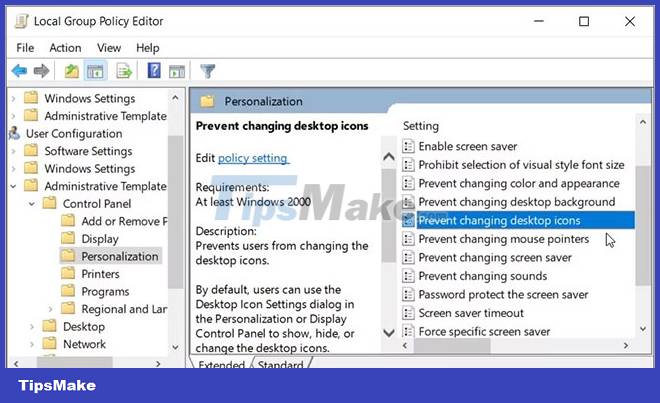
Next, select Enabled from the options. Finally, click Apply > OK, then restart your computer.
If you want to check if these settings have been applied, here's what you can do:
1. Press Win + I to open system settings.
2. Click the Personalization option and then select Themes on the left pane.
3. Next, click on the Desktop icon settings option on the right hand side.
4. The option that appears on the next screen will be grayed out. This shows that the settings are not accessible and no one can edit them.
If you want to re-enable desktop icon settings, here's what you need to do:
1. Follow the previous steps and double-click the Prevent changing desktop icons option.
2. Next, select the Disabled or Not Configured option.
3. Click Apply > OK. Finally, reboot the device to save these changes.
Using Registry Editor

You can also disable desktop icon settings using Registry Editor. However, Windows Registry Editor contains sensitive keys and should be handled with care.
If you edit the wrong Registry keys, your system may crash. So, just to be safe, back up the Registry before proceeding.
Alternatively, you can back up your entire Windows device to the cloud before dealing with Registry Editor. That way, all your system files will be safe in case something goes wrong with the Registry.
Now, here's how you can restrict access to desktop icon settings using Registry Editor:
1. Press Win + R to open the Run command dialog box.
2. Type Regedit and click OK to open the Registry Editor.
3. Navigate to HKEY_CURRENT_USER > Software > Policies > Microsoft > Windows > Personalization.
4. Right-click the empty space on the right-hand side and select New > DWORD (32-bit) Value.
5. Name the value NoDesktopIcons and then press Enter.
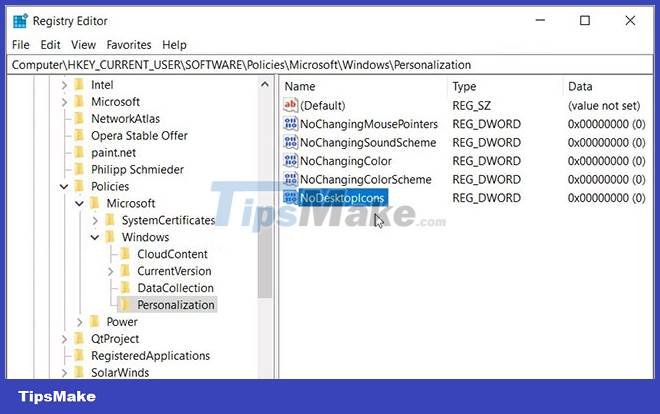
Double-click the NoDesktopIcons value and set the Value data to 1. Click OK and then close the Registry Editor. From there, restart your PC to save these changes.
To re-enable desktop icon settings, here's what you need to do:
1. Follow the previous steps and double-click the NoDesktopIcons value.
2. Set Value data to 0 and then click OK.
3. Finally, close Registry Editor and then restart your device to apply these changes.
How to Prevent Others from Changing Your Desktop Theme
Now, let's discover how you can restrict access to desktop theme settings using LGPE and Registry Editor.
Using Local Group Policy Editor
Here's how you can disable desktop theme settings using Local Group Policy Editor:
1. Press Win + R to open the Run command dialog box.
2. Type gpedit.msc and click OK to open the Local Group Policy Editor.
3. Navigate to User Configuration > Administrative Templates > Control Panel > Personalization.
4. Double-click the Prevent changing theme option.
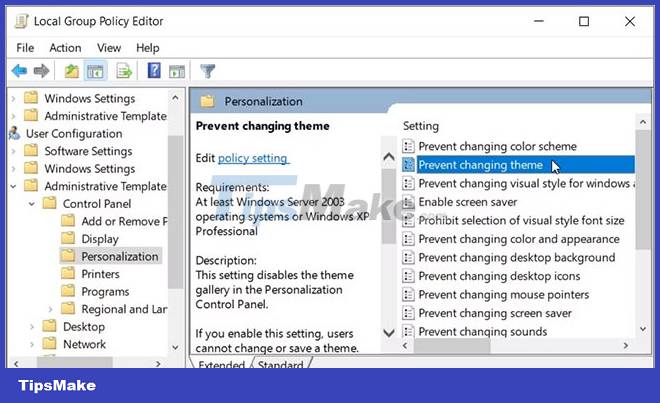
Next, select the Enabled option. From there, click Apply > OK, and then restart the computer.
Now, here's how you can confirm if these settings have been applied:
1. Press Win + I to open System Settings.
2. Click the Personalization option and then select Themes on the left pane. The options that appear on the next screen will be grayed out.
In case you decide to re-enable desktop theme settings, follow these steps:
1. Open the Personalization option according to the previous steps.
2. Double-click the Prevent changing theme option and select the Disabled or Not Configured option.
3. Click Apply > OK, then reboot the device to save these changes.
Using Registry Editor
Alternatively, you can use Registry Editor to restrict access to desktop theme settings. Let's see how you can do this:
1. Press Win + R to open the Run command dialog box.
2. Type Regedit and click OK to open the Registry Editor.
3. Navigate to HKEY_CURRENT_USER > Software > Policies > Microsoft > Windows > Personalization.
4. Right-click the empty space on the right-hand side and select New > DWORD (32-bit) Value.
5. Name the value NoThemes and then press Enter.
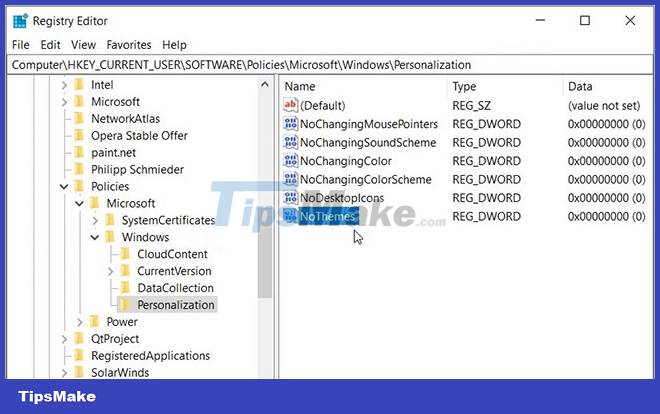
Double-click the NoThemes value and set the Value data to 1. Click OK and then close the Registry Editor. Finally, restart your PC to save these changes.
To re-enable desktop theme settings, follow these steps:
1. Open the Personalization key (folder) according to the previous steps.
2. Double click the NoThemes value and set the Value data to 0.
3. Click OK, close Registry Editor, and then restart the device to save these changes.
Sharing Windows devices with others is pretty cool. However, it can be quite annoying if other users keep changing your system settings.
If you want to restrict access to desktop icons and theme settings, try the solutions mentioned in the article. From there, you can check out other amazing tips like how to customize your icons and themes.
Conclusion
Understanding Prevent Changing Windows Theme makes it easier to compare options, avoid common mistakes, and apply the information in this guide more effectively. Review the relevant requirements before making changes or choosing a solution.
FAQ
What is Prevent Changing Windows Theme?
This incredible tool is available on every version of Windows, except Windows Home.
Why is Prevent Changing Windows Theme important?
Understanding Prevent Changing Windows Theme helps you evaluate features, compatibility, performance, and potential limitations before you choose a product or follow a procedure.
What should you consider when using or choosing Prevent Changing Windows Theme?
Consider your specific goal, compatibility requirements, available features, cost, security, and the practical recommendations described in this guide.
Related Articles
 How to Block Themes from Changing Icons on Windows 11 Screen3 minutes read
 Change the Windows 11 Theme: Complete Guide7 minutes read
 How to Hide and Unhide All Desktop Icons on Windows2 minutes read
 7 Websites to Download Free Desktop Icons for Windows 105 minutes read
 How to Make Desktop Icons Smaller: Step-by-Step Guide6 minutes read
 How to Download Windows 10 Theme for Windows 73 minutes read
Reader Comments 0
Sign in with email or Google to join the discussion.