How to make PIN Pad using HTML CSS & JavaScript
This article will show you how to implement a PIN entry table and check whether it is valid or not with the help of HTML, CSS, and JavaScript.
Table of Contents
The basic working mechanism of a PIN Pad is that when the user enters a PIN and presses OK, this code validates the validity of the PIN, and provides a notification whether the PIN is entered correctly or incorrectly.
Prepare:
- CSS
Use cases
- Create HTML structure using tags
give the project name and main container containing all the components. This container has a maximum width of 100%.
- Create a tag like structure with a width of 30% of the main container and center it on the page by setting the left & right margins to 'auto'.
- Here we use flexbox to format different buttons and cards.
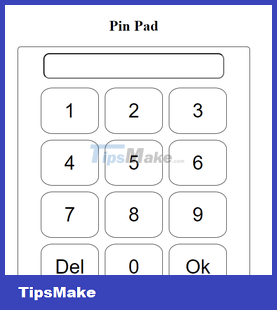
- Create a textbox at the top that will display the entered pin in password format.
- Create multiple rows, where each row contains 3 buttons with the last row containing a Del button to delete the last entered number and an OK button to send the PIN.
- Add appropriate styles to elements using their class and ID value.
- In the JS file, first set the predetermined correct PIN value to the desired numeric value.
- When the current number buttons are clicked, it will add that number to the PIN value shown on the input control button at the top.
- When you click Del, the most recently entered data will be removed from the resulting textbox. When clicking Ok, it will validate the entered PIN based on the previously determined PIN, and notify the user whether the PIN has been entered correctly or not.
- Users cannot enter anything directly into the input box.
- The user can click on that button and it will be shown in the input box at the top.
- All JS click events are processed from JavaScript files.
Project structure

For example, the code below implements a basic PIN card application using HTML, CSS, and JavaScript.
JavaScript
// Script.js // Correct Pin Value let correctPin = "1234"; let btns = document.getElementsByClassName( "pinpad-btn" ); let pinInput = document.getElementById( "pinpad-input" ); for (let i = 0; i < btns.length; i++) { let btn = btns.item(i); if ( btn.id && (btn.id === "submit-btn" || btn.id === "delete-btn") ) continue; // Add onclick event listener to // Every button from 0 - 9 btn.addEventListener( "click", (e) => { pinInput.value += e.target.value; } ); } let submitBtn = document.getElementById( "submit-btn" ); let delBtn = document.getElementById( "delete-btn" ); let modal = document.getElementById("modal"); let result = document.getElementById("result"); let closeBtn = document.getElementById("close"); submitBtn.addEventListener( "click", () => { if ( !pinInput || !pinInput.value || pinInput.value === "" ) { alert( "Please enter a pin first" ); } else if ( pinInput.value === correctPin ) { alert("Correct PIN"); } else { alert("Incorrect PIN"); } // Reset the input pinInput.value = ""; } ); delBtn.addEventListener("click", () => { if (pinInput.value) pinInput.value = pinInput.value.substr( 0, pinInput.value.length - 1 ); }); closeBtn.addEventListener( "click", () => { modal.style.display = "none"; } ); HTML
Pin Pad Battery Pad
×
CSS
/* Style.css */ .text-center { text-align: center; } .container { width: 100%; } .card { border: 1px solid black; border-radius: 5px; width: 30%; margin-right: auto; margin-left: auto; display: flex; flex-direction: column; } .card-header { display: flex; justify-content: center; margin: 10px; text-align: center; } .row { display: flex; flex-direction: row; justify-content: center; } .pinpad-btn { width: 25%; height: 75px; margin: 5px; padding: 5px; border: 1px solid black; border-radius: 20%; font-size: 2em; display: flex; justify-content: center; align-items: center; cursor: pointer; background-color: white; } .pinpad-btn:hover { background-color: lightgray; } #pinpad-input { border-radius: 10px; height: 1.5em; font-size: 1.5em; text-align: center; width: 80%; } Steps to run the application: Open Live Server, then enter the following URL into the link:
http://localhost:5500/Result:
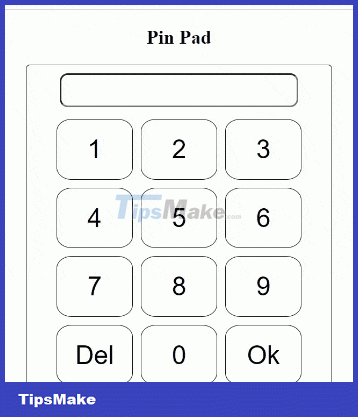
It's done! Hope the article is useful to you.
Was this article helpful?
Your feedback helps us improve.
Related Articles
 JavaScript in HTML2 minutes read
 JavaScript location in HTML File3 minutes read
 Syntax of JavaScript4 minutes read
 5 steps to learn a dynamic HTML web component profile9 minutes read
 What is JavaScript? Can the Internet exist without JavaScript?10 minutes read
 5 free online HTML editing tools that test the best code6 minutes read
Reader Comments 0
Sign in with email or Google to join the discussion.