How to limit the number of failed login attempts on Windows 10
If someone has access to your PC, they might try to sign in to your device by guessing your password. This can pose a serious security threat - especially if they successfully crack your password.
Table of Contents
To protect yourself from this, you can limit the number of failed login attempts on your PC. You can configure these settings through the Local Group Policy Editor or Control Panel. Read on to learn how to limit the number of failed login attempts on Windows 10.
Limit the number of unsuccessful login attempts via Local Group Policy Editor
If your PC is running Windows 10 Home Edition, you need to learn how to access Local Group Policy Editor in Windows Home first. On the other hand, for all other versions of Windows 10, here's how you can limit the number of failed login attempts using Local Group Policy Editor.
Step 1. Press Windows key + R, type gpedit.msc and press Enter to open Local Group Policy Editor.
Step 2. In the navigation pane on the left side, navigate to Computer Configuration> Windows Settings> Security Settings> Account Policies> Account Lockout Policy.
Step 3. Click the Account Lockout Policy key. You will see the following three settings in the right pane: Account lockout duration, Account lockout threshold, and Reset account lockout counter after.

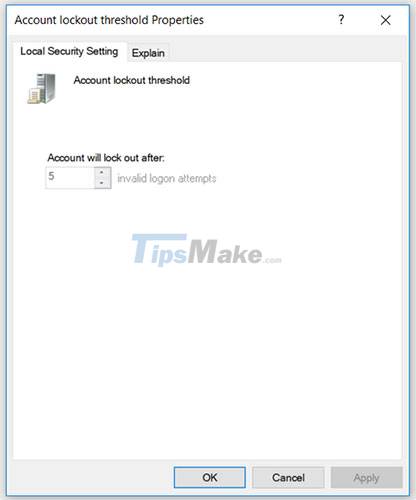
The Account lockout threshold policy setting allows you to limit the number of logins on your PC. Users will not be able to access your locked account until you reset your account or the time you specified in the Account lockout duration policy expires.
To configure the Account lockout threshold, you need to set a value between 1-999. This number determines how many sign-in attempts are allowed on your PC before your account is locked. Setting the value to 0 won't lock your account - no matter how many password attempts someone makes.
Step 1. To configure this setting, double-click the Account lockout threshold policy setting.
Step 2. Specify your desired lock threshold value in the Account will lock out after box.
Step 3. Click Apply> OK.
Setting the Reset account lockout counter after policy helps determine how many minutes pass before your account is locked. This setting requires you to first define the Account lockout threshold policy setting.
For example, you could set the Account lockout threshold to 5 attempts and the Reset account lockout counter after policy to 5 minutes. This will give the user 5 passphrases within 5 minutes before the account is locked. You can specify a number between one and 99,999 minutes when configuring the Reset account lockout counter after policy settings.
Step 1. To configure this setting, double-click the Reset account lockout counter after policy setting.
Step 2. Specify a value in the Reset account lockout counter after box.
Step 3. Click Apply> OK.

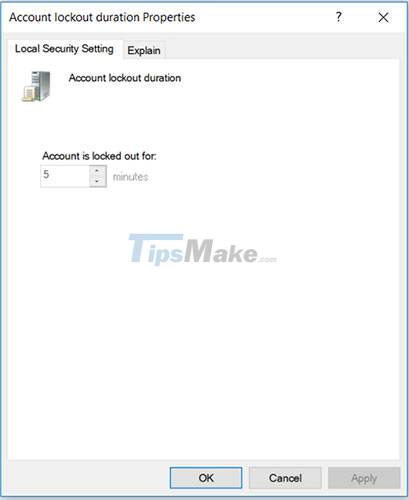
The Account lockout duration policy setting determines how long your account will be locked before automatically unlocking. Like the Reset account lockout counter setting, this setting requires you to specify the Account lockout threshold policy setting.
For example, you could set the Account lockout threshold setting to 5 attempts and Account lockout duration to 5 minutes.
If the user enters the wrong password in all 5 attempts, your account will be locked for 5 minutes before automatically unlocking. Depending on how long you want to lock out your account, you can choose a value from one to 99,999 minutes. Alternatively, you can choose 0 if you want to lock your account until you manually unlock it.
Step 1. To configure this setting, double-click the Account lockout duration policy setting.
Step 2. Specify a value in the Account is locked out for box.
Step 3. Click Apply> OK.
When you're done, close the Local Group Policy Editor and restart your PC to save these changes.
Limit the number of unsuccessful login attempts via Command Prompt
Open Command Prompt as administrator.
To configure the Account lockout threshold, enter the following command at the Command Prompt:
net accounts / lockoutthreshold: 5
You can replace the value in the Command Prompt with anything between 1 and 999. This will determine the number of failed login attempts the PC allows.
Your account will automatically lock if the user enters the wrong password and exceeds the lock threshold value. Alternatively, you can choose 0 if you do not want to lock your account regardless of the number of failed login attempts. Press Enter after selecting a value.
To configure Reset account lockout counter, enter the following command at Command Prompt:
net accounts / lockoutwindow: 5
You can replace the value in the Command Prompt with a number between 1 and 99,999. This will determine the number of minutes that must pass before your account is locked. Press Enter after selecting a value.
To configure the account lockout period, enter the following command at the Command Prompt:
net accounts / lockoutduration: 5
You can replace the value in the Command Prompt with a number between 1 and 99,999. This will determine how long your account will be locked before automatically unlocking. If you set the value to 0, your account will be locked until you manually unlock it. Press Enter after selecting a value.
When you're done, close the Command Prompt and restart your PC to save the changes.
Hope you are succesful.
Was this article helpful?
Your feedback helps us improve.
Related Articles
 How to limit the number of failed login attempts on Windows3 minutes read
 How to limit the number of wrong login attempts on a Windows computer4 minutes read
 How to Restore a Disabled iPhone3 minutes read
 How to fix the error The User Profile Service failed the logon. Không thể nạp được người dùng profile8 minutes read
 How to fix 'LoadLibrary Failed With Error 87: The Parameter Is Incorrect' error on Windows7 minutes read
 How to enable the Login Login hidden on Windows 103 minutes read
Reader Comments 0
Sign in with email or Google to join the discussion.