Instructions for installing and using Kodi on computers
Kodi is an open-source, multi-platform software program, friendly interface and easy to use. It can be used as a viewer and player for music, videos from hard drives outside or with installed add-ons. This article will show you how to set up Kodi and install Kodi add-ons on your computer, this installation will be quite similar to other platforms as it is cross-platform compatible.
- Discover free software
How to install and use Kodi
- Install Kodi
- Install add on Kodi
- Install new repositories on Kodi
- Change Kodi skin
Install Kodi
First you need to download Kodi and install it. The process is simple, just go to the website, scroll down to the " Choose your weapon" section and choose a platform. Select the " Release " version instead of " Nightly " because it is more stable.
In the installer, you should install " Full " to not miss anything, then select the installation directory and let the installation process complete.

Install add on Kodi
After installation is complete, open Kodi and click on "Add-on ' , select the utility you want to see, then click ' Enter add-on browser '. Here, you will find hundreds of channels. To see, although many channels may be locked because of regional restrictions, but this can be done by turning on the VPN and changing the country to one of the places where the utility is used. You should turn on VPN when using Kodi.

Once you have installed the add-ons browser option, you will see the 'add-ons browser' option disappear for that category, replaced by thumbnails of the utilities you have installed. For more utilities for that type, click 'Install from repository' in ' Categories ' at the top right.

Install new repositories on Kodi
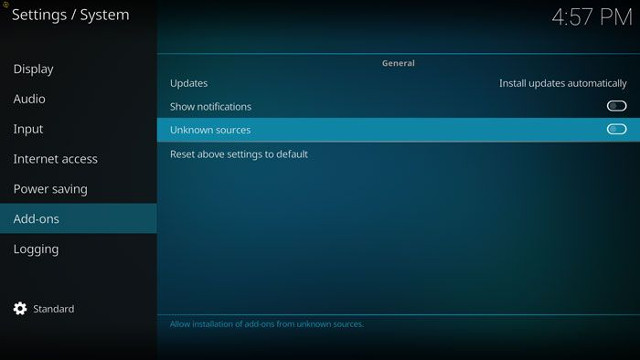
Kodi's add-on repository is not the only one. There are many archives created by various Kodi users, including add-on collections, TV channels and other products. First, you need to turn on 'Unknown sources ' in Kodi settings. Go to 'Settings> Add-ons', and then turn on 'Unknown sources.'

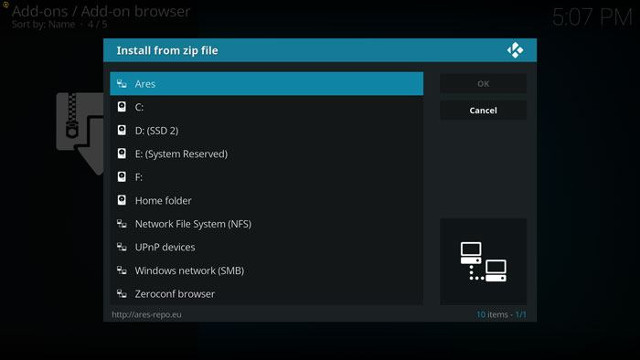
Next, go to 'Settings> File Manager> Add source' , where you can type the URL of a third-party repository (or repo) in the box. For example you can use Ares's prestigious repo: "http://ares-repo.eu/."
From the main menu click on 'Add-ons' and then click on the package download icon. Click 'Install from ZIP file' and select Ares to install.

You will now have access to Ares' add-on repository. Just go to the Add-on from the main menu and select 'Install from repository> Ares Project> Video add-ons ' to browse through the available channels.
This process is similar for most Kodi Repos, you just need to go out there and find the best add on.
Change Kodi skin
If you don't like Kodi's default blue skin, you can change it. There is a large repository of skins provided by Kodi. To change your skin to 'Add-ons-> Download -> Look and feel' . Here you will find a list of alternative skins, each with a thumbnail so you can visualize the skin you want to choose.

I wish you all success!