How to install and use PhotoPrism on Raspberry Pi
In the world of self-hosted photo managers that can run on Raspberry Pi, PhotoPrism is one of the most powerful tools.
Table of Contents
In the world of self-hosted photo managers that can run on Raspberry Pi, PhotoPrism is one of the most powerful tools. It boasts an impressive search function, facial recognition capabilities, and even offers a world map showing the locations where your photos were taken! PhotoPrism is also easy to install on Raspberry Pi.
How to install PhotoPrism on Raspberry Pi
The first step to getting PhotoPrism up and running on the Raspberry Pi is to install Docker Compose, a tool designed to identify and run multi-container Docker applications.
To get started, add Docker's official GPG key and repository to the Raspberry Pi software source:
# Update your package lists sudo apt-get update # Install packages to allow apt to use a repository over HTTPS sudo apt-get install ca-certificates curl # Create a directory for Docker's keyring sudo install -m 0755 -d /etc/apt/keyrings # Download Docker's official GPG key sudo curl -fsSL https://download.docker.com/linux/debian/gpg -o /etc/apt/keyrings/docker.asc # Add the Docker repository echo "deb [arch=$(dpkg --print-architecture) signed-by=/etc/apt/keyrings/docker.asc] https://download.docker.com/linux/debian $(. /etc/os-release && echo "$VERSION_CODENAME") stable" | sudo tee /etc/apt/sources.list.d/docker.list > /dev/null # Update your package lists again after adding the Docker repository sudo apt-get updateOnce the Docker repository is added, you can proceed to install Docker along with other essential components, including Docker Compose:
sudo apt-get install docker-ce docker-ce-cli containerd.io docker-buildx-plugin docker-compose-pluginAfter installing Docker, you should add your user to the Docker group so you can execute Docker commands without using sudo:
sudo usermod -aG docker $USERFinally, verify that Docker is installed correctly. You can then run containers as a regular user:
docker run hello-world

Now that Docker Compose is installed, it's time to install PhotoPrism. The process is very simple and involves downloading the docker-compose.yml file, making some changes to the file, and running a command to start the application and database service.
Download the docker-compose.yml file to any directory you want with the following command:
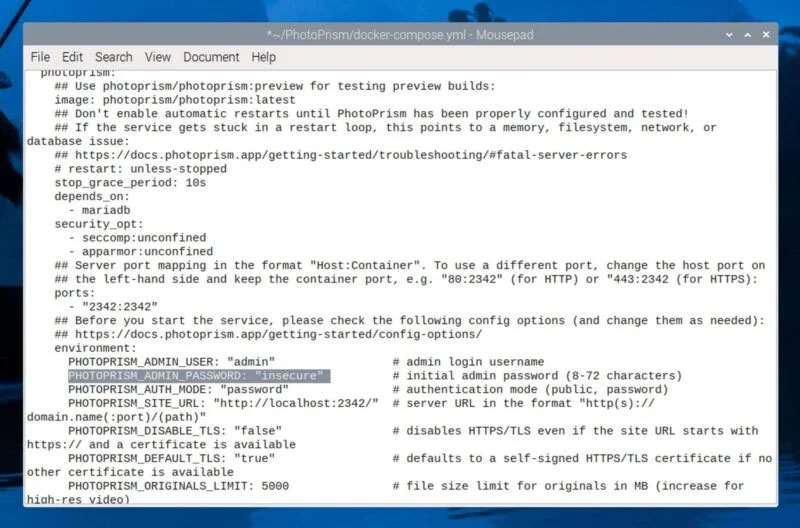
wget https://dl.photoprism.app/docker/docker-compose.ymlOpen the file in your favorite text editor (you can use nano if you are accessing your Raspberry Pi remotely via SSH) and change all default placeholder passwords ('insecure') to secure passwords, especially PHOTOPRISM_ADMIN_PASSWORD.
Adjust the volume mount path to point to the location where you want to store PhotoPrism images and data. For example, if you have an external hard drive mounted, such as /media/david/extdrive , you can configure it as follows:
services: photoprism: volumes: - "/media/david/extdrive/Photos:/photoprism/originals" # Where PhotoPrism will store original media files - "/media/david/extdrive/PhotoPrismStorage:/photoprism/storage" # Used for PhotoPrism's cache, database, and sidecar files mariadb: volumes: - "/media//extdrive/PhotoPrismDatabase:/var/lib/mysql" # Database storage for MariaDBWith the docker-compose.yml file configured, you are ready to launch PhotoPrism. Navigate to the directory containing the docker-compose.yml file and run the following command:
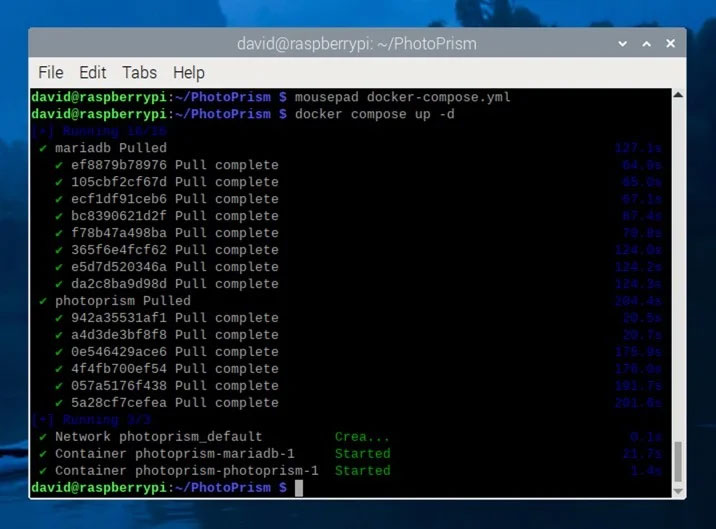
docker compose up -d
Use PhotoPrism on Raspberry Pi
Once Docker and PhotoPrism are up and running on your Raspberry Pi, you can start managing and viewing your photos through PhotoPrism's web interface. Open your favorite web browser and navigate to http://:2342/ to access the PhotoPrism user interface. Replace with the actual IP address of the Raspberry Pi or if working directly from the Pi itself, use http://localhost:2342/.
At the login screen, enter the admin username and the password you set for PHOTOPRISM_ADMIN_PASSWORD during setup. After logging in, you will be greeted by the PhotoPrism dashboard.
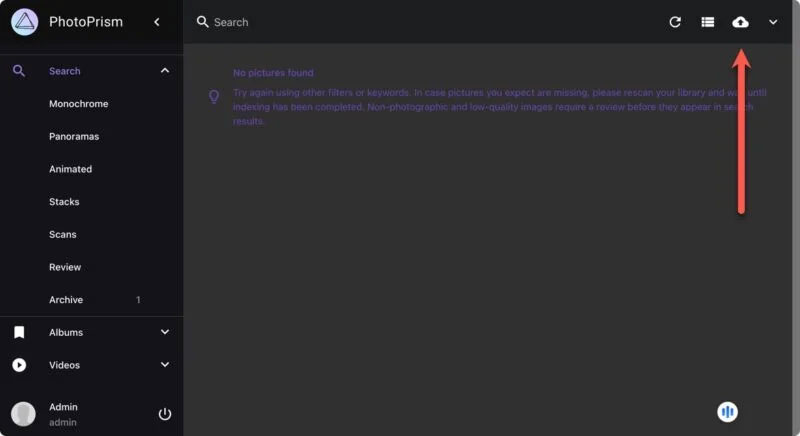
To start adding photos to your library, click the upload button located in the upper right corner of the interface. This allows selecting photos from your computer and uploading them directly to the Raspberry Pi's PhotoPrism library.
Since there may be a lot of photos to upload, you should set up an import folder on the Raspberry Pi. To do that, stop running PhotoPrism containers to modify the docker-compose.yml file:
docker compose stopNow, edit the docker-compose.yml file to include the volume mount for the import directory:
services: photoprism: volumes: - "/media/david/extdrive/Import:/photoprism/import"This folder will act as a storage area for photos before you import them into your main library. After making these changes, save the file and restart PhotoPrism:
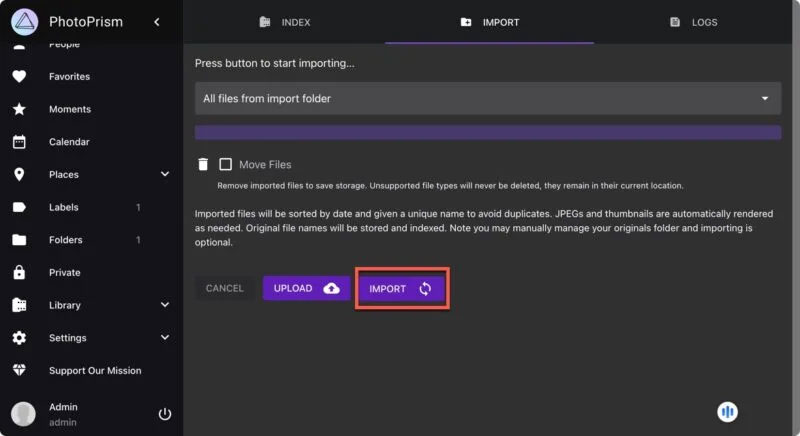
docker compose up -dYou can now move the photos into the import folder, navigate to Library -> Import in the PhotoPrism web UI and start the import process.
To protect precious photos, it is essential to regularly back up PhotoPrism storage devices. That way, you can easily recover in case of any unexpected problems or hardware failures.
Was this article helpful?
Your feedback helps us improve.
Related Articles
 How to use Raspberry Pi Imager to install Raspberry Pi OS9 minutes read
 How to install Android on a Raspberry Pi4 minutes read
 How to start Raspberry Pi 3 from USB8 minutes read
 Learn Pi Imager, How to Use Raspberry Pi Imager4 minutes read
 How to install an operating system for Raspberry Pi9 minutes read
 How to install NordVPN on Raspberry Pi4 minutes read
Reader Comments 0
Sign in with email or Google to join the discussion.