Table of Contents
SPSS Statistics can import data directly from an Excel workbook. The cleanest results come from preparing one rectangular table in Excel, using the first row for variable names, and checking data types after import.
Prepare the Excel workbook first
- Put one variable in each column and one case or observation in each row.
- Use a single header row with short, unique variable names.
- Remove merged cells, blank title rows, subtotals, notes, and decorative formatting from the data range.
- Keep each column consistent: do not mix text such as “N/A” with numeric values unless you intend the variable to be text.
- Store dates consistently and check that Excel recognizes them as dates.
- Save the workbook and close it before importing.
If the sheet is messy, these Excel cleanup functions and Power Query data-cleaning steps can help before you move the data into SPSS.
Import an Excel file into SPSS
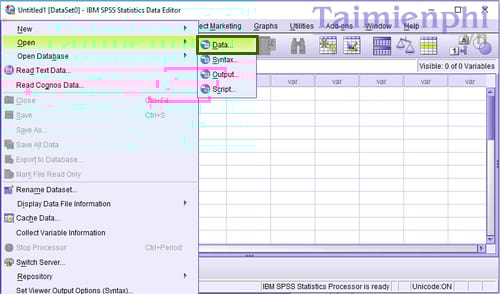
Launch SPSS Statistics and select File > Open > Data.
In the Open Data dialog, change the file type to an Excel format such as Excel (*.xls, *.xlsx, *.xlsm), then browse to the workbook.
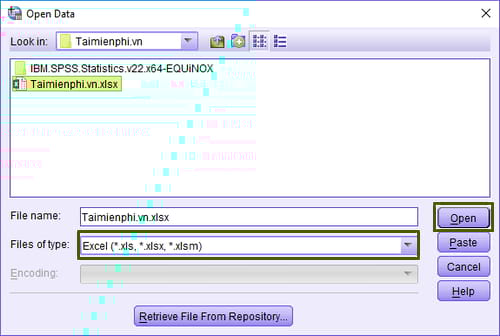
Select the file and choose Open. SPSS displays an import dialog for the workbook.
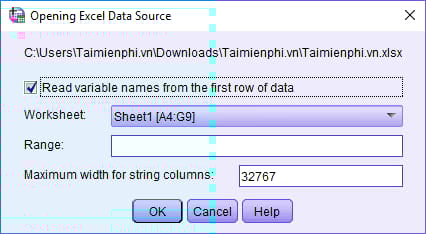
Enable Read variable names from the first row of data if the first row of the selected range contains column headings. With this option enabled, SPSS uses the header cells as variable names and begins importing cases from the next row.
If the first row contains actual data rather than headings, leave the option disabled. SPSS will generate variable names and import the first row as a case.
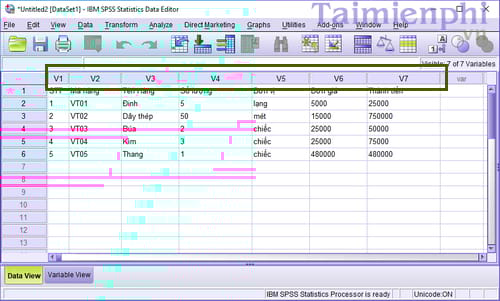
Choose the correct worksheet. If needed, specify a cell range such as
A4:G9to import only that rectangle. Ensure the range includes the header row when the variable-name option is enabled.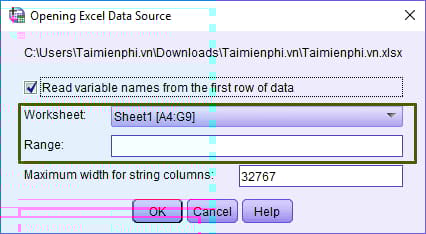
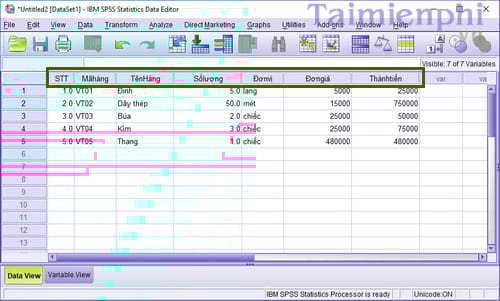
Confirm the import and review the resulting Data View and Variable View.
Check variables immediately after import
Do not begin analysis until you verify the imported structure. In Variable View, inspect each variable's name, type, width, decimals, label, missing values, and measurement level. In Data View, scan the first and last cases for shifted columns or missing rows.
- Numbers imported as strings: look for stray symbols, spaces, or text values in that Excel column.
- Dates appear as numbers or wrong dates: set the appropriate SPSS date format and verify the source cells were genuine Excel dates.
- Headers were changed: SPSS variable names must follow its naming rules; use clear labels to retain longer descriptions.
- Blank values changed: distinguish system-missing numeric values from user-defined missing codes such as 99 or -1.
- Leading zeros disappeared: identifiers such as postal codes should usually be stored as text in Excel before import.
Save the imported dataset
After checking the data, select File > Save As and save an SPSS .sav file. Keep the original Excel workbook unchanged as a source file, and document any cleaning or recoding performed in SPSS. For repeat imports, save the generated syntax or write an import command so the process can be reproduced.
Related Articles
 How to Import Data from Photos into Excel3 minutes read
 What Is SPSS? What Is SPSS Software Used For?4 minutes read
 How to Import Excel Data into Python Scripts with Pandas9 minutes read
 Tricks to Import Data in Excel Fastest6 minutes read
 3 Ways to Calculate Sum in Excel Quickly and Accurately5 minutes read
 Variable: How to Enter Data in Spss6 minutes read
Reader Comments 0
Sign in with email or Google to join the discussion.