Table of Contents
This guide explains how to resolve Connection Failure Garena Quickly, starting with the most likely causes and moving through practical troubleshooting steps.
If you have ensured a stable network connection and still use the network on other services or devices, it is likely that the error is caused by the DNS configuration. The fix is very simple with the following steps:
Step 1: Right-click on the network icon and select Open Network & Internet Settings .

Step 2: In the Settings window, find Change adapter options .

Step 3: Click open Ethernet (may change to Wi-fi name based on the network connection type of the computer).

In the next window named Ethernet Status, select Properties .

Next, navigate to Internet Procol Version 4 (TCP / Ipv4) and click Properties .
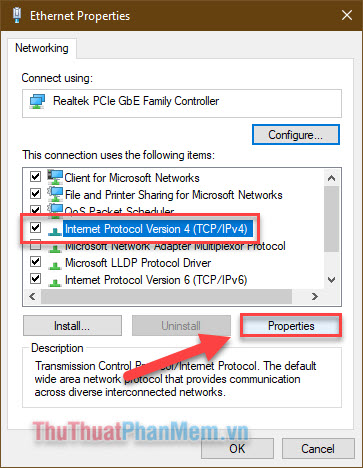
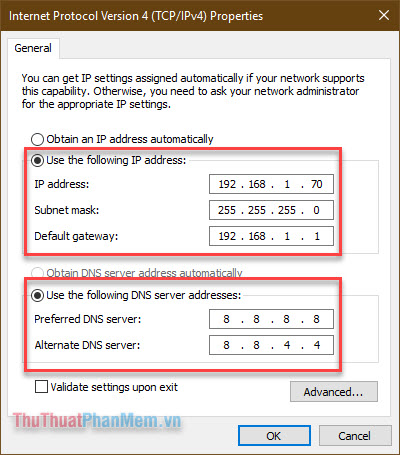
Step 4: Check the box Use the following IP address and set the parameters as follows:
- IP adress: 192.168.1.70
- Subnet mask: 255.255.255.0
- Default gateway: 192.168.1.1
Continue with the Use the following DNS server addresses section:
- Preferred DNS server: 8.8.8.8
- Alternate DNS server: 8.8.4.4
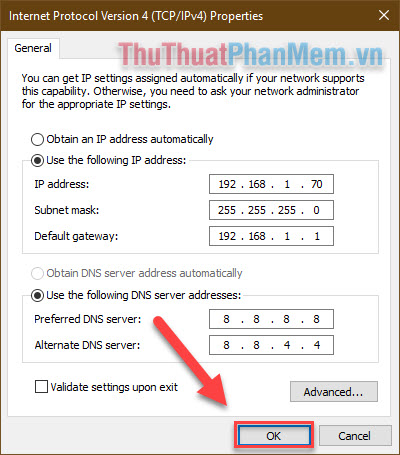
Finally click OK to save the process.
At this point, you have successfully practiced the process of fixing failed Garena connection errors and can return to login as usual. Wish you have moments of fun gaming!
FAQ
What usually causes Connection Failure Garena Quickly?
The cause may involve incorrect settings, outdated software, damaged files, permission problems, device compatibility, or a temporary system issue.
What should I try first to resolve Connection Failure Garena Quickly?
Restart the affected app or device, install pending updates, verify settings and connections, and follow the troubleshooting steps in order.
How can I prevent the issue from returning?
Keep software updated, maintain backups, avoid interrupted installations, and review system or device settings after major changes.
Related Articles
 How to Change Garena Password Quickly and Easily9 minutes read
 How to Change Your Garena Password Quickly - Change MK Garena3 minutes read
 How to Spin Gas Garena to Receive Items: Gold4 minutes read
 How to Retrieve a Garena Password3 minutes read
 How to Installing and Playing the Empire Game on Garena6 minutes read
 Instructions to Change Garena Password on the Phone6 minutes read
Reader Comments 0
Sign in with email or Google to join the discussion.