Table of Contents
This practical guide walks through how to enable hardware accelerated GPU scheduling in Windows, explains the main requirements, and highlights common issues that may appear along the way.
What is Hardware Accelerated GPU Scheduling?
Normally, a computer's processor (CPU) will be responsible for loading some graphic and image-intensive data into the GPU for processing, so that games, multimedia, and applications speak for themselves. can run smoothly as well as display more beautifully. The CPU collects frame data, assigns commands, and prioritizes each specific process so that the GPU can process and display them efficiently.
With Hardware Accelerated GPU Scheduling, the GPU's processor and scheduling memory (VRAM) do the same job to render high-quality frames. In this way, the GPU can share less work with the CPU, or in other words 'offload' the CPU, thereby helping to reduce latency and improve the overall performance of the PC.
Requirements to use Hardware Accelerated GPU Scheduling
Hardware Accelerated GPU Scheduling was first released with the Windows 10 May 2020 Update, but is not enabled by default on Windows 11, but requires users to enable it manually. In addition, to take advantage of this feature, your computer needs an NVIDIA (GTX 1000 or later) or AMD (5600 series or higher) graphics card, with the latest graphics drivers.
In addition, there is still no 'general formula' on how to combine specific hardware (CPU and GPU) to create the best performance when used with Hardware Accelerated GPU Scheduling. So things may change depending on your PC's CPU, GPU and graphics drivers.
Enable Hardware Accelerated GPU Scheduling in Windows 11
Before you start, you should update the graphics driver on your PC.
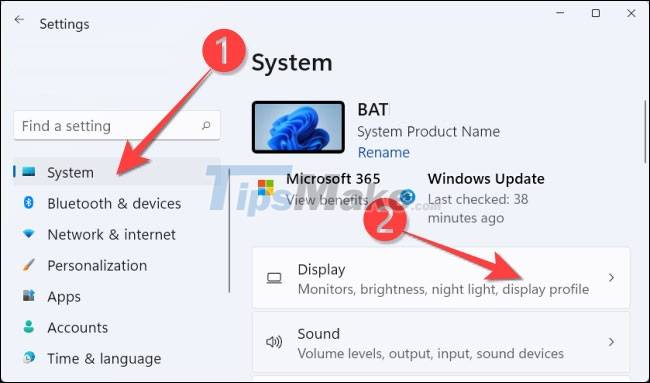
Start by pressing Windows + i to open the 'Settings' app. From the "System" section, select the "Display" option on the right screen.
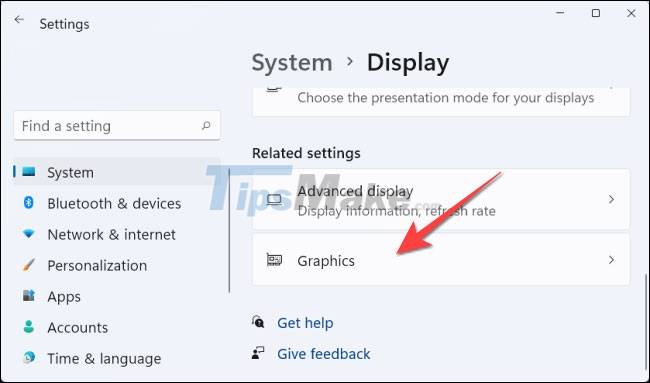
In the 'Related Settings' section, select 'Graphics'.
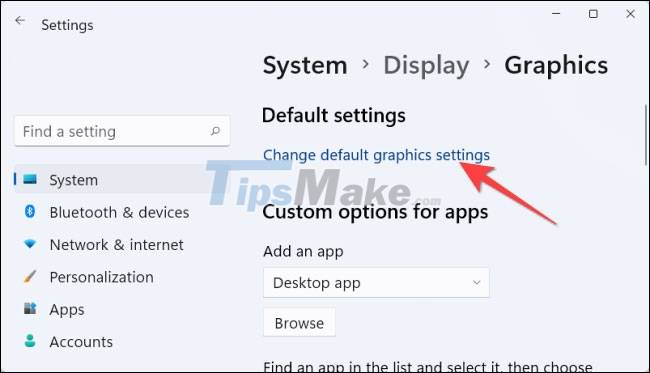
Next, click on 'Change Default Graphics Settings'.
Then, click the toggle switch in the 'Hardware-Accelerated GPU Scheduling' section, and select 'Yes' from the User Access Control prompt that appears.
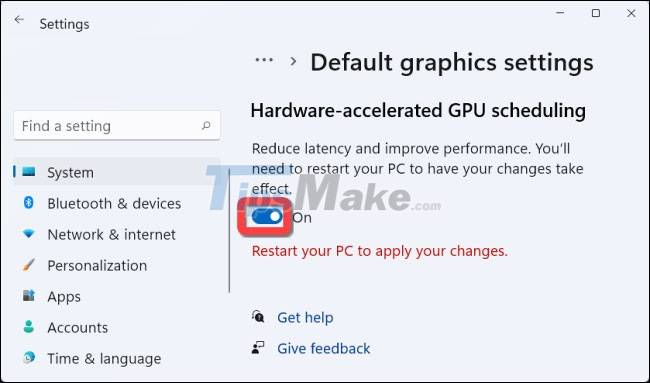
You can now close the 'Settings' app and restart your PC for the changes to apply.
Microsoft says you may not see any major changes right away, but overall performance should improve during real-world use.
However, if this feature is hindering your PC's performance instead of improving it, you can turn it off.
Key Takeaways
Use the information above as a practical reference for how to enable hardware accelerated GPU scheduling in Windows. Review each step carefully, confirm any requirements, and choose the option that best fits your situation.
FAQ
What does this guide explain about Enable Hardware Accelerated GPU Scheduling in Windows?
It explains the main concepts, practical considerations, and useful steps related to enable hardware accelerated GPU scheduling in Windows without requiring advanced knowledge.
Who can benefit from learning about Enable Hardware Accelerated GPU Scheduling in Windows?
This information is useful for readers who want a clear overview, practical guidance, and reliable steps related to enable hardware accelerated GPU scheduling in Windows.
What should I check before applying this information?
Review the requirements, confirm that your device, software, or situation matches the instructions, and back up important data before making major changes.
Related Articles
 Disable // Enable Hardware Accelerated GPU Scheduling in Windows3 minutes read
 How to Enable Hardware Accelerated GPU Scheduling Windows 112 minutes read
 Windows 10 2004 Has a New Feature That Makes Gaming Smoother3 minutes read
 If You Want VLC to Consume Less Battery, Just Enable Hardware5 minutes read
 What Is Amp (Accelerated Mobile Pages)?8 minutes read
 What Is APU (Accelerated Processing Unit)? Explained5 minutes read
Reader Comments 0
Sign in with email or Google to join the discussion.