How to download and install Android apps on Windows 11
How to download Android on windows 11 without emulator. Instructions on how to install Android applications on Windows 11 are most detailed..
If you have Windows 11 installed, one interesting thing is the compatibility with apps from Android. This means that later you will be able to use Android apps properly without an emulator.
But how to install and use Android apps on Windows 11 when it's only available to internal users in the US? There's still a way. We can completely install and use Android applications without an Insider build.
Why should you get Android apps on Windows 11?
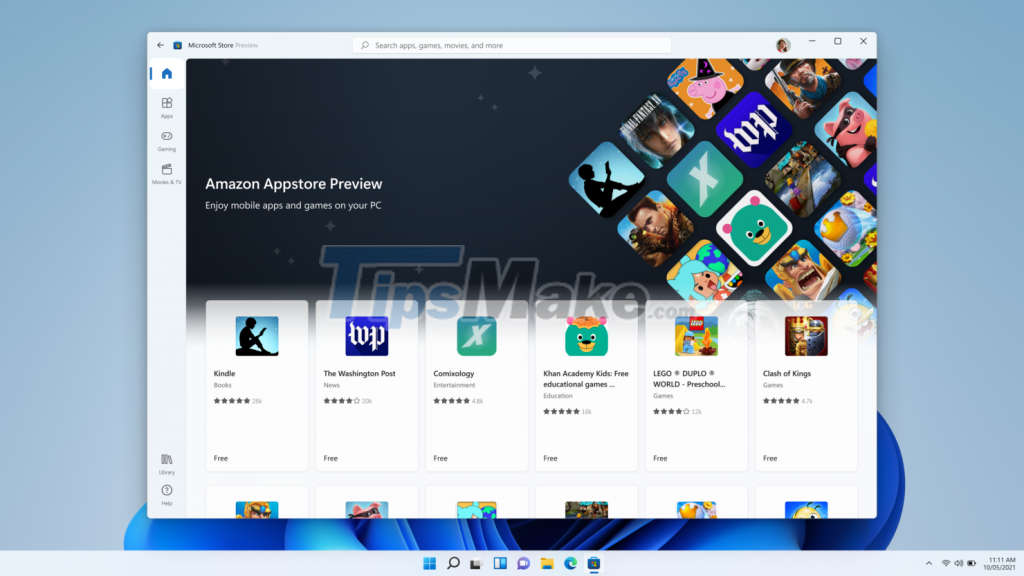
Microsoft has partnered with Amazon to serve as an Android app store for Windows. However, Amazon's Appstore catalog is much more limited compared to Google's PlayStore.
So even if Android app compatibility is included in the public release of Windows 11, you won't be able to install all the add-ons from the PlayStore. This is where Android's open source and sideloading feature comes in handy.
Sideloading allows you to install Android apps from third-party sources. These sources can be official or unofficial. For security reasons, Android blocks the installation of apps from outside the Google Play Store. This is true even if you are installing the APK package directly from the app developer's website.
Fortunately, Android includes an optional feature to install apps from unknown sources. Similarly, with the Windows Subsystem for Android in Windows 11, you can get Android apps from third-party sources.
How to download Android apps on Windows 11 without Win 11 Insider
To successfully download Android apps to Windows 11. you need a few more things if you are not on the US insider list. The list includes setting up the Windows Subsystem for Android, setting up the Android Debug Bridge (ADB) and of course, the APK file for the app you want to install.
Step 1: Install Windows Subsystem for Android
The Windows Subsystem for Android gives you access to the apps available in the Amazon AppStore. However, it also limits the user as mentioned above, but we still have a way.
Here's how to install the Windows Subsystem for Android on the Windows 11 public release.

Step 1: Install Windows Subsystem for Android
- Go to the online link generator for the Microsoft Store.
- Click the drop-down menu and select the link.
- Next, click the drop-down menu for RP and select Slow.
- Next, visit URL here and click the Generate temporary link button
- The link builder will display several options on the screen. Scroll to the bottom of the page and click the MicrosoftCorporationII.WindowsSubsystemForAndroid_1.8.32828.0_neutral_ ~ _8wekyb3d8bbwe.msixbundle file
- You may have to allow the file to download because your browser may flag the file as unsafe. Wait for the download to complete.
- Next, press Win + S and type powershell .
- Click Run as Administrator from the search results.
- To install the Windows Subsystem for Android, enter the command Add-AppxPackage -Path, followed by the location of the downloaded file in quotes.
- For example, if you downloaded the Windows Subsystem package into the C: Users UserName Downloads folder, the full command would look like this: Add-AppxPackage -Path 'C:UsersTashreefDownloadsMicrosoftCorporationII.WindowsSubsystemForAndroid_1.8.32828.0_neutral___8wekyb3d8bbwe.Msixbundle '
Wait for the installation to complete. Once installed, open Start and you'll see Windows Subsystem for Android, among other apps. That said, you must restart your PC to access the Amazon AppStore, which is part of the package.
Step 2: Activate the Virtual Machine Platform
How to get Android apps on Windows 11 without Win11 Insider
You must enable the Virtual Machine Platform in Windows 11 to set up the Windows Subsystem for Android. It enables platform support for virtual machines and is required for the Windows Subsystem for Linux (WSL2). WSL2 is an optional Windows 11 feature, and you can enable it from the classic Windows Features window.
To enable Virtual Machine Platform, follow these 6 steps:
- Press Win + I to open Settings .
- In the left pane, open the Apps tab.
- Click Optional Features.
- Scroll down to the Related settings section and then click More Windows features.
- In the Windows Features window that opens, locate and select Virtual Machine Platform.
- Click OK to apply the changes.
Restart your PC to save the changes. After the reboot, we will install the minimal ADB setup required to load Android apps on Windows 11.
Step 3: Install Minimal ADB Setup in Windows 11
The Android Debug Bridge (ADB) is a command-line generator that helps you communicate with a compatible device. Since it supports various commands, you can use it to download and install Android apps using Command Prompt.
- Go to the ABD and Fastboot site and download the Installer.
- Run the installer and follow the on-screen instructions to complete the installation.
- After installing the setup, you can proceed to install Android apps in Windows 11 using the app APK.
Step 4: Download Android Apps on Windows 11
To get Android apps, you need the app's APK file. You can download clean APKs from third-party sources such as APKMirror.
Step 4: Download Android Apps on Windows 11
- Go to APKMirror, then search and download the APK files for the app you want to install.
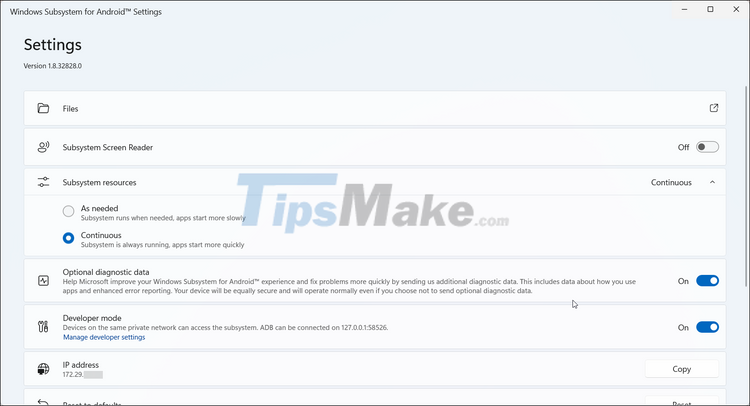
- Launch Windows Subsystem for Android.
- Under Subsystem resources, select Continuous.
- Next, toggle the switch to set Developer Mode to On.
- Next, copy the IP address. If the IP address is not visible, click the Refresh button. If that doesn't work, click the File Explorer icon in the Files section to restart the system. Click the Refresh button again and you should see the IP address.
- Press Win + R , type cmd and press OK to open Command Prompt.
- In the Command Prompt window, type the following command and press Enter to execute, replacing YourIPAddress with the following copied IP address: Adb connect YourIPAddress
- Next, type adb device to see if the connection is established.
- To install the app, type adb install and then drag and drop the apk file into your Command Prompt to add the file path. Once done, the command should look like this: adb install C:UsersTashreefDownloadscom.rovio.dream_1.37.1-25240_minAPI21(arm64-v8a,armeabi-v7a)(nodpi)_apkmirror.com.apk
- Press Enter and wait for the success message.
After a successful installation, the app will appear in the Start menu and search results. You don't need to configure the input device at this point, so go ahead and launch the app.