Table of Contents
This practical guide walks through how to divide a Hard Drive on Windows 10 Is Extremely Easy. It organizes the required steps, settings, and checks so you can complete the task with fewer mistakes.
Please read this guide to see the steps!
What Is a Hard Drive Split?
Parting a hard drive in Windows means separating a part of the hard drive and allocating that part of memory to the operating system.
In other words, the hard drive is not useful to the operating system until it is divided or partitioned. Additionally, you cannot store files until you format the drive (this is another process, also straightforward).
In most cases, this part of the hard drive is all usable space, but you can also create multiple partitions on a hard drive so that you can store backup files in one partition, movies in another partition, etc.
Manually partitioning (as well as formatting) your hard drive is unnecessary if your ultimate goal is a clean Windows installation. Both of those procedures are included as part of the installation process.
Steps to Divide Hard Drive in Windows 10
How to Split Hard Drive from Unallocated Space in Windows
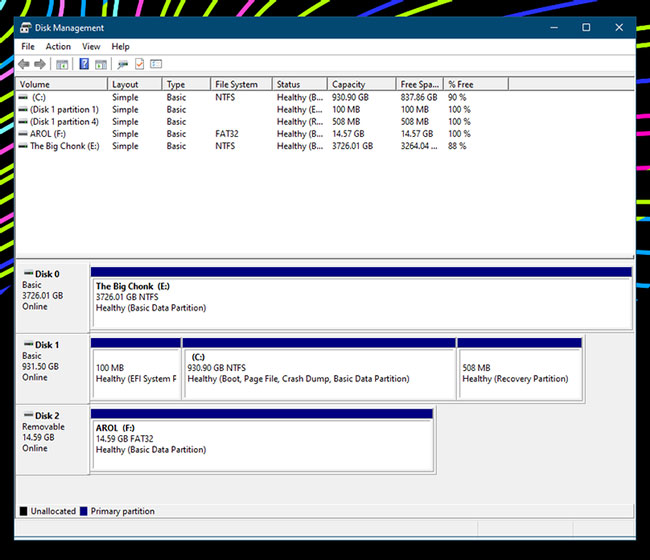
First, we will use Windows' Disk Management tool to create a completely new partition from unallocated space. This mostly only needs to be done after you buy a new hard drive or SSD because you can't use it until you manually partition it.
First, you need to open the Disk Management tool. On Windows 10, you can find Disk Management On Windows Search and Control Panel as the "Create and format hard disk partitions" Option.
When you open the program, you can see it in the list of drives, where you will see the drive with capacity listed as "unallocated space". Edit this capacity by right-clicking on the drive and selecting New Simple Volume To set up the drive. then, The New Simple Volume Wizard Opens, guiding you through the process of creating a volume on the drive.

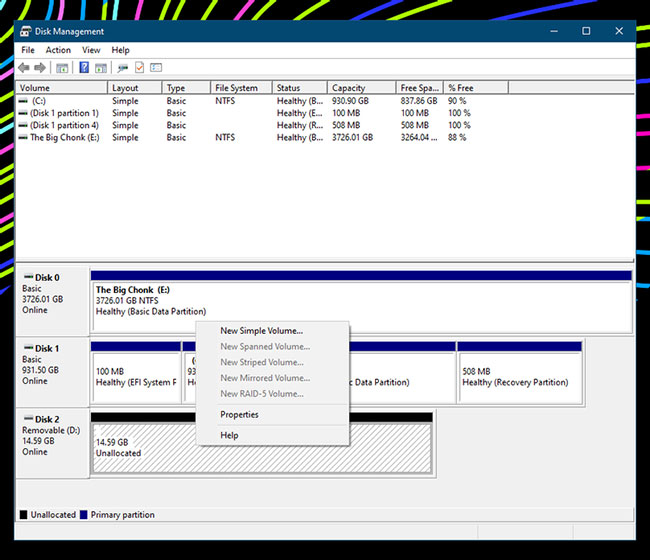

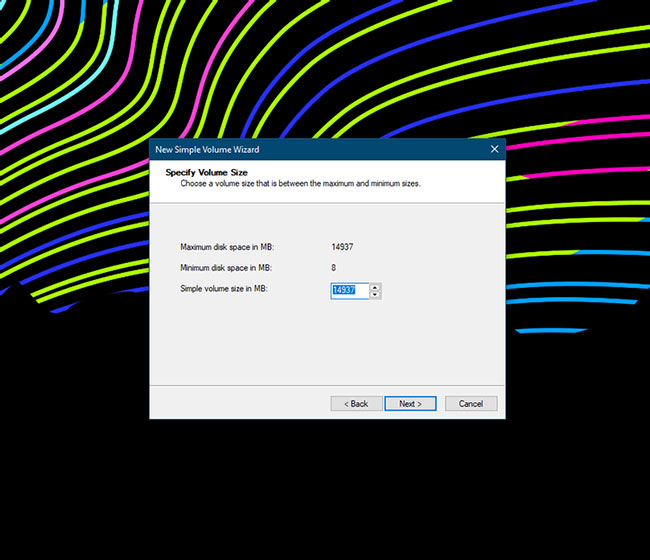
If you want to use it as a normal drive, you probably don't have to change anything. Set simple volume size to maximum (it should be maximum by default), assign it a drive letter (this really doesn't matter much, so just assign it whatever you want or leave the default option), then choose whether you want to format the drive first (recommended).
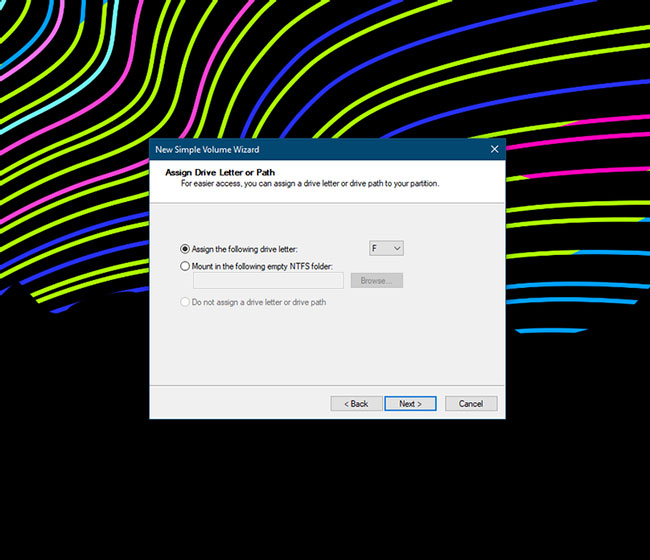

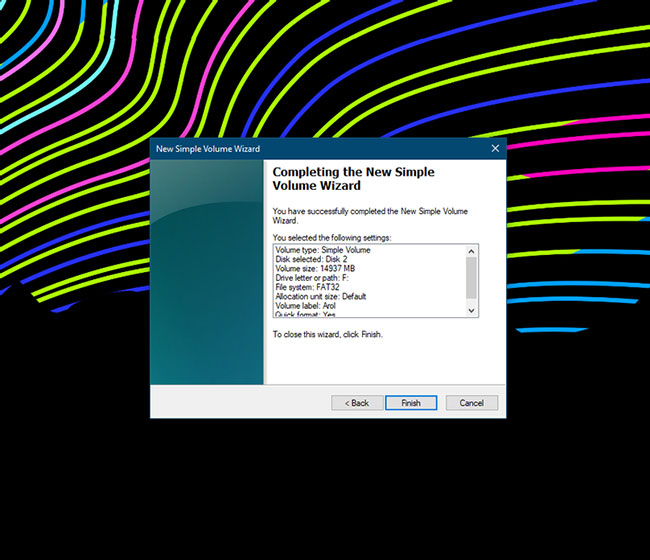
Select the file system and drive letter, select Next , and now you're done. The drive will now show up as a partition instead of unallocated space. Windows can see it and write files to it like other drives in the PC.
How to Split a Hard Drive from Existing Allocated Memory in Windows
If you want to split your hard drive in half and have two different partitions in it, you can do this too, even if you have previously allocated that space on your drive. However, the implementation process will be a bit more complicated.
First of all, you must shrink the allocated partition. This will make the current hard drive partition smaller and not allocate some space to another partition in the process.
To do this, simply open the trusty Disk Management tool, right-select the drive, then choose Shrink Volume . Then you will have to shrink the volume depending on the desired size for the second partition.
For example, if you have a 4TB hard drive and I want to split it into two different 2TB volumes, Simply shrink the current volume to 2TB.
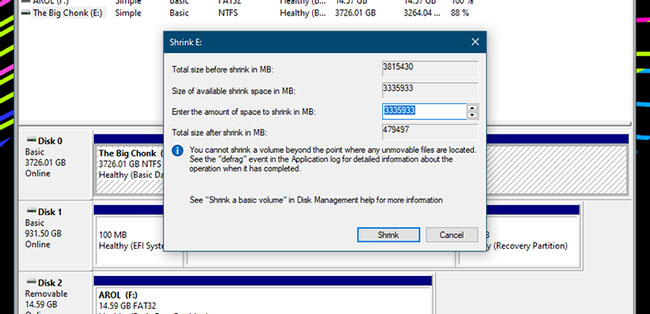
The dialog gives you the numbers in megabytes, not gigabytes, so be sure to keep that in mind when calculating. 1GB is 1000MB, while 1TB is 1,000,000MB. Once you have a rough number, you can proceed to shrink the volume to whatever size you need by adding the amount of space you want to remove from the volume.
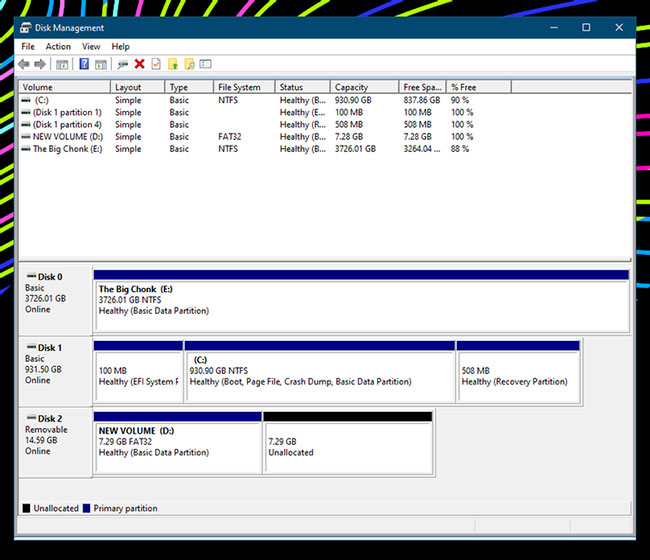
Once you have formatted the drive, you will now see an "unallocated space" section right next to the drive. This is the space you will use for your new partition. Follow the steps mentioned in the article above to partition the drive from unallocated memory to create a new partition from that new space.
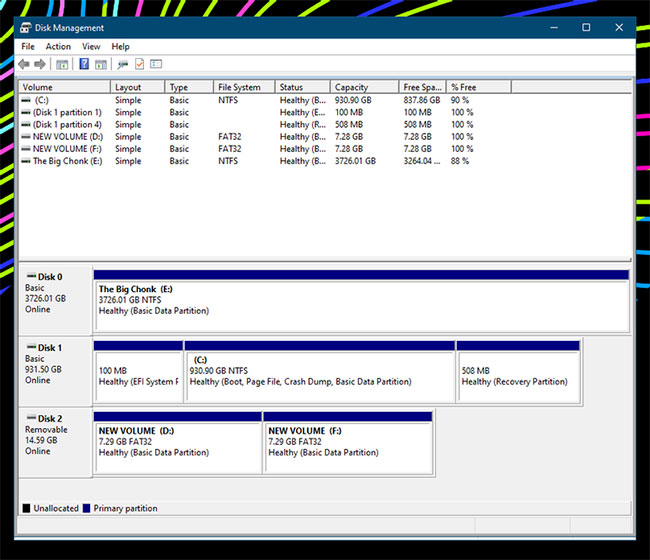
You know that the drive where Windows is installed will have all its data erased every time Windows fails and you have to reinstall Windows 10. If you combine all the data into one drive, the risk will be very high. Therefore, if you have important data, you should save it on a drive other than the drive where Windows is installed. While installing Windows, if you haven't partitioned your hard drive yet, you can use the Shrink Volume feature to repartition the drive.
Why Must Partition the Hard Drive?
Several situations where knowing how to partition a drive can be useful. This also has its get advantages and disadvantages. As mentioned above, installing a new hard drive or SSD and setting it up on your computer requires you to partition the drive before actually using it.
This is because all of these drives have unallocated memory space, rather than pre-partitioned, because the manufacturer wants you to set up your drives yourself (though you still need to install them inside your computer).) or install the operating system on it (the Windows installer may perform this process during setup).
Thumb drives, on the other hand, usually come pre-partitioned, so you just take them out of the box, plug them into your PC, and transfer files immediately.
Another reason why you might want to partition your drive is that you may have two or more partitions in a single drive. Several reasons to do this. Multiple partitions let you run multiple operating systems: You can dual-boot Windows 10 and a Linux distribution to use two operating systems in parallel at the same time, or dual-boot different Windows installations.
Another reason could be for better data organization. Partitioning effectively gives you multiple logical volumes, and as a result you'll be able to organize your data on each partition in a much cleaner way. You can select to use one partition for essential operating system files, one partition for personal data, and one partition for work, etc. You can also choose to use one partition for backups. save data (but it's best to set aside a separate drive to do this instead).
Windows doesn't allow very basic partition management after you create it, but several free partition management software programs are available that can help if you need it.
FAQ
How to Delete Hard Drive Partition?
In Disk Management , select the partition you want to delete. Right select that partition and select Delete Volume. Select Yes To confirm that all data will be lost.
How to Delete Hard Drive Partition on Mac?
Open Applications > Utilities > Disk Utility . Select the partition to delete and select Erase. Confirm deletion by selecting Erase , then clicking Done.
Related Articles
 10 Best Free and Easy-to-use Hard Drive Dividers and Formats7 minutes read
 Instructions to Divide and Merge Drives Right in Windows 75 minutes read
 How to Split the Hard Drive, Merge the Partition on Windows XP8 minutes read
 How to Divide Hard Drive in Windows 10 Is Very Easy, Anyone Can Do It: Practical6 minutes read
 How to Split Hard Drive, Set Active, Fix MBR Before GHOST7 minutes read
 How to Create a Partition7 minutes read
Reader Comments 0
Sign in with email or Google to join the discussion.