Table of Contents
This practical guide explains how to Delete Instagram Story Very Fast through clear, ordered steps. It also covers useful settings, common mistakes, and checks that can improve the final result.
When posting a Story on Instagram, the Story automatically disappears after 24 hours from the time we post it. And those Story videos on Instagram are all stored for users to review when needed, or can delete the Story if needed. Deleting old Stories on Instagram will help you manage Story videos faster, find the Story you need faster when the number of old Story videos has been deleted. The article below will guide you to delete Stories on Instagram.
How to Delete Story on Instagram
Step 1:
On the Instagram app interface, you will click on The person icon Below. In the personal Instagram interface, users will click on The 3-dash icon .

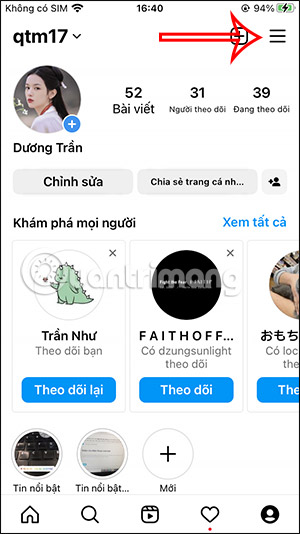
Next, click on Your Archive To see all the content that we have stored in our account.
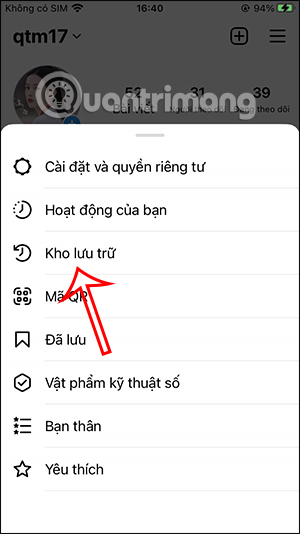
Step 2:
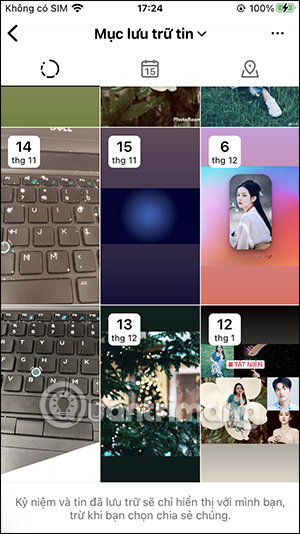
Immediately we will see all the Instagram Stories that have been stored in a separate section as shown. Here you will Click on the Instagram Story videos that you want to delete .
Step 3:
In the Story video, click on The 3-dot icon In the interface and select Delete In the list of displayed options. At this time, the Instagram application asks if you are sure you want to delete this Story, Click Delete .
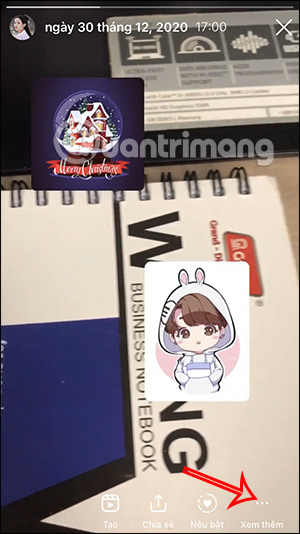
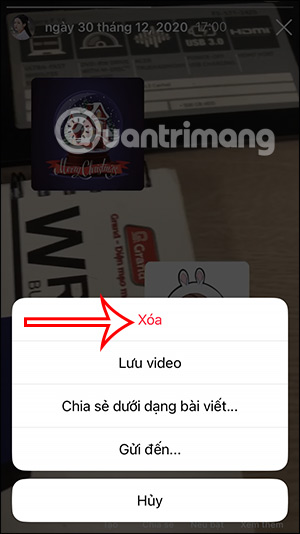
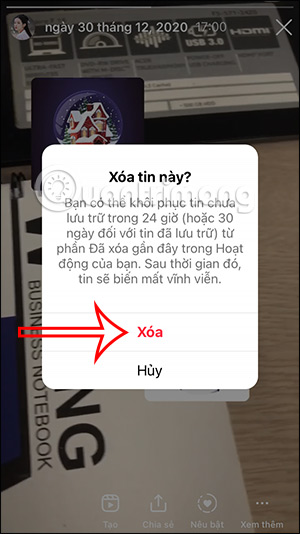
Immediately after that, the Instagram Story will be removed from the Stories archive interface and moved to the Deleted section for users to restore when needed.


Video Tutorial on How to Delete Instagram Story Efficiently
FAQ
How do I Delete Instagram Story Very Fast?
Follow the steps in this guide in order, verify each setting before continuing, and check the result after every major change.
What should I prepare before I Delete Instagram Story Very Fast?
Confirm compatibility, install current updates, save important work, and back up data before changing system or application settings.
What can I do if delete Instagram Story Very Fast does not work?
Review permissions and requirements, restart the relevant device or app, repeat the steps carefully, and use official support resources when the issue continues.
Related Articles
 Instagram Allows Sharing Posts to Stories3 minutes read
 How to Post a Quiz on Instagram Story4 minutes read
 How to Download Instagram Story Posts to PC9 minutes read
 How to Post Questions on Story Instagram5 minutes read
 How to View Story Memories on Instagram3 minutes read
 How to Fix the Error Can Not Post Story on Instagram4 minutes read
Reader Comments 0
Sign in with email or Google to join the discussion.