How to copy, delete, move, rename files/folders using PowerShell on Windows PC
Although simpler and quicker methods exist - such as using a GUI - using PowerShell has its own benefits.
For example, with PowerShell, you can automate many of your tasks by writing scripts, manage other computers remotely, and have more administrative control than you would otherwise. So, if you're someone who likes to have more control over your work, then using PowerShell is the obvious choice.
Let's go through all the individual commands, starting with copying.
How to copy files or folders using PowerShell
PowerShell is an all-in-one utility for Windows administrators and enthusiasts alike. You can easily copy your files or folders using PowerShell. To get started, first launch PowerShell, then use the copy-item command to copy your files from PowerShell. Here's how:
- Go to the search bar in the Start menu, type 'powershell' and press Enter.
- Now, use the 'Set-Location' cmdlet to change the directory of your files. For example, to go to the Downloads folder on your computer, enter the following command and press Enter :
Set-Location -Path "C:Users[Username]Downloads" - Once you are in the correct path, enter the following command and press Enter:
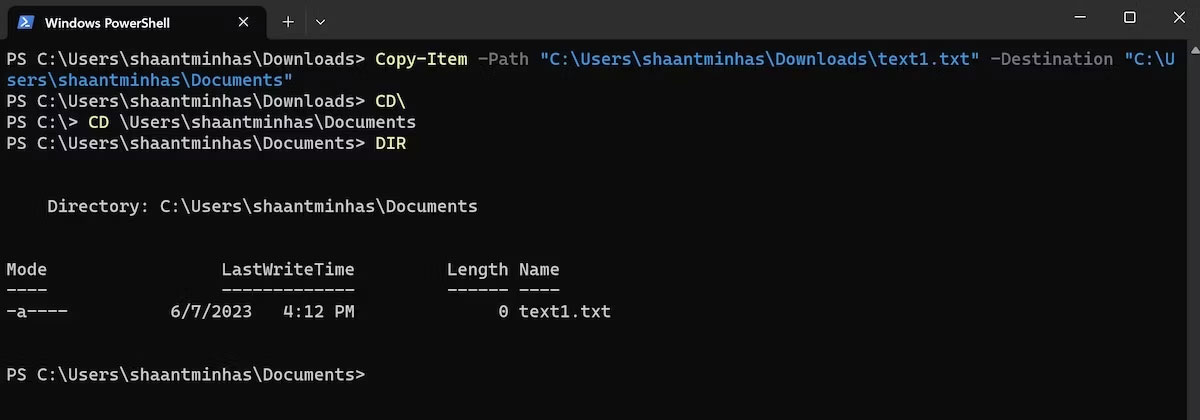
Copy-Item -Path "text1.txt" -Destination "C:DestinationFolder"
Replace text1.txt with the path of the file you want to copy and replace C:DestinationFolder with the path of the folder you want to paste your copied files into. Enter the command and your files will be instantly copied from one place to another.

You can check if your files were copied successfully by using the DIR cmdlet to list the files in the specified directory.

How to copy folders using PowerShell
In the case of directories, you just need to slightly adjust the last command. This is the way:
Copy-Item -Path ".exampleFolder" -Destination 'C:DestinationFolder" ~RecursePowerShell will copy the selected folder and its contents.
How to move files or folders using PowerShell
Similar to copying, you can use a simple command to move your files or folders on PowerShell. Here's how:
Once you have launched PowerShell, enter the following command and press Enter :
Move-Item -Path "filename.txt" -Destination "C:DestinationFolder"Again, replace filename.txt with the full path of the file and DestinationFolder with the path of the folder you want to move your files to.

After that, you can check if your file has been moved using the DIR command. If you don't see your file in the old folder, you can rest assured that the file has been moved to the specified destination.
To move multiple files at once, use the following command and press Enter :
Move-Item -Path "file1.txt", "file2.txt" -Destination "C:DestinationFolder"How to move folders using PowerShell
Again, similar to the copy command above, you can also move folders. Here is the command to execute:
Move-Item -Path "FolderName" -Destination "C:DestinationFolder"How to delete files or folders using PowerShell
Follow the steps below and you will be able to delete your files or folders using PowerShell in no time:
- Enter cmdlet Remove-Item followed by the file path and press Enter :
Remove-Item -Path "filename.txt"- Now, replace "filename.txt" with the name of the file you want to delete.
To delete multiple files, adjust the cmdlet by adding different file names to the path parameters (separated by commas) and pressing Enter :
Remove-Item -Path "file1.txt", "file2.txt", "file3.txt"How to delete folders using PowerShell
Once you have launched PowerShell, enter the Remove-Item cmdlet, along with the Recurse parameter , and press Enter :
Remove-Item -Path "Folder" -RecurseReplace "Folder" with the path of the folder you want to delete. In general, when you are trying to delete a file or folder, you will receive a confirmation prompt. You can bypass this prompt and delete your files immediately by adding the -Force parameter at the end of the command.
Rename files using PowerShell
Again, right-clicking on the file in question, then selecting Rename works best in most cases, but not always. In cases where there are problems, PowerShell can help.
After you have launched PowerShell, enter the following command to rename your file and press Enter :
Rename-Item -Path "C:pathtooldfilename.txt" -NewName "newfilename.txt"Rename folders using PowerShell
To rename a folder, use the same Rename-Item cmdlet; Type it into PowerShell and press Enter :
Rename-Item -Path "C:Downloadsoldfoldername" -NewName "newfoldername"