How to Completely Erase a Hard Drive on Windows
If you plan to sell or donate your hard drive, you'll need to completely erase it to remove any personal data. You may also need to do this if you want to reuse your old hard drive or remove malware. Here are two easy ways to permanently erase a hard drive in Windows.
The Easy Way to Erase a Hard Drive in Windows
Before trying third-party tools, you can use the Format command in Windows to permanently erase your hard drive. This method is useful if you want to erase a secondary storage drive (one that doesn't have Windows installed on it) or an external hard drive.
This method will not help you completely erase the system drive (C drive) because it contains core files. DBAN and other third-party tools can help you (the article will explain after this method).
Warning : Before proceeding, find the correct letter for the drive you want to delete using Windows File Explorer or Disk Management. Otherwise, you will delete something you don't want to delete.
You'll need to launch and use Windows PowerShell, a command-line tool for entering text instructions. You can search for PowerShell using Windows Search. The command you'll use has the following syntax:
Format volume /P:passesIn the above command, replace volume with the drive letter and the number of times you want Windows to overwrite each sector of the drive.
So if your drive letter is X: and you want to format 5 times, you will need to enter the following command:
Format X: /P:5 
It's as simple as that. This process will take a while (even hours) to complete, depending on the size of the drive.
How to completely erase a hard drive using DBAN
What if you want to wipe the data on your C: drive? Windows' built-in format tool can't help you do that. While there are a number of third-party tools, I recommend Darik's Boot and Nuke (DBAN).
DBAN is great for wiping all your data at once. It runs in your computer's memory, like a recovery drive or Linux live disk, and erases every trace of your data.
The free version of DBAN is capable of completely erasing your hard drive, so you can skip the premium version on its website and follow the instructions below.
Warning : If you have some personal data, now is the time to back it up on an external hard drive or a cloud backup service like OneDrive.
1. Identify the hard drive
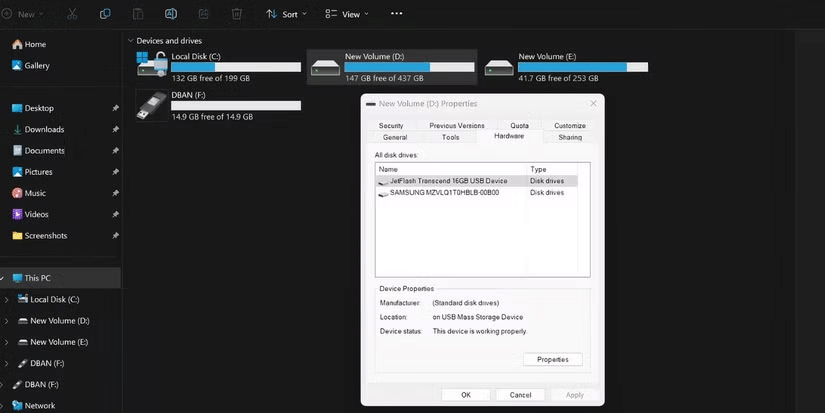
To avoid accidental deletion, start by making sure you can identify your hard drive. An easy way to do this is to open File Explorer and check your C: drive. As long as it's labeled Local Disk (C:) or Windows (C:), you're in the right place.
However, problems can arise if the C: drive is one of multiple drives and they are all partitions on the same physical drive. This can result in accidentally overwriting data on all partitions, not just the C: drive.
Right-click the drive letter and select Properties > Hardware to find the device's hardware name. Make a note of the device name as you will need it when using DBAN.

2. Download DBAN and create USB boot
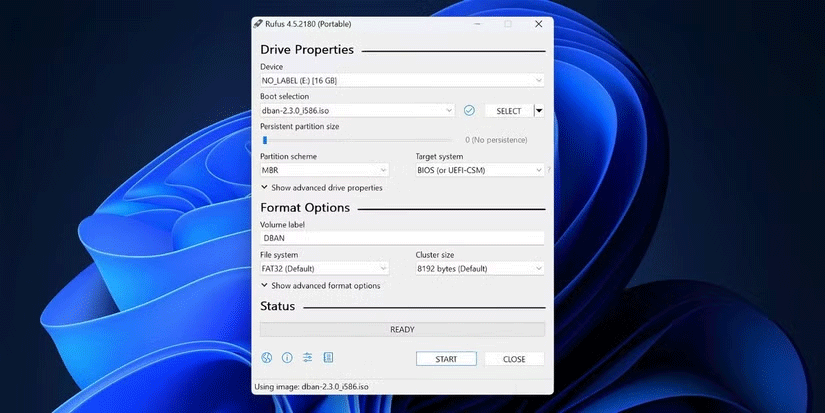
DBAN is available as an ISO file for download. So you will need to create a bootable USB from the ISO using a tool like Rufus. Follow these steps:
- . Then download .
- Connect the USB to your PC and launch Rufus. It will automatically select the drive.
- Click Select . Browse your PC for the DBAN ISO file and double-click it to select it.
- Click Start and follow the on-screen instructions to create the boot drive.

3. Boot into DBAN
The free version of DBAN only works with older BIOSes and is not compatible with Secure Boot. So you have to enable legacy support in your BIOS settings and disable Secure Boot.
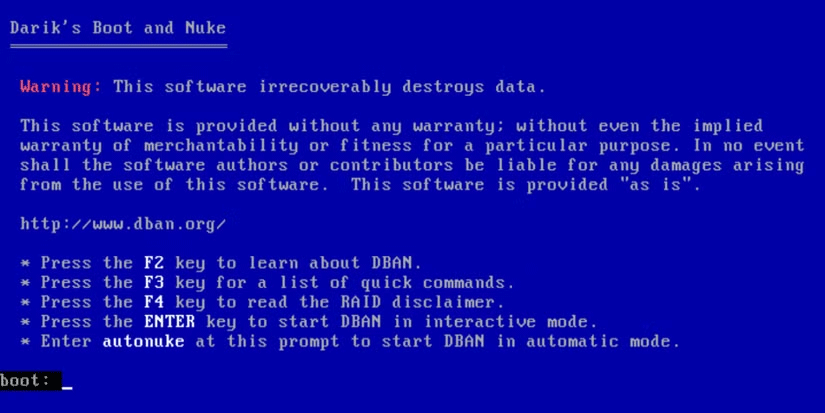
Then, restart your PC and press the designated F key or Esc key to open the boot device selection menu. Select the DBAN USB drive and press Enter .
4. Erase hard drive with DBAN

You'll see a few options on the DBAN screen, but just follow these steps to erase the drive:
- Press Enter to start tutorial mode.
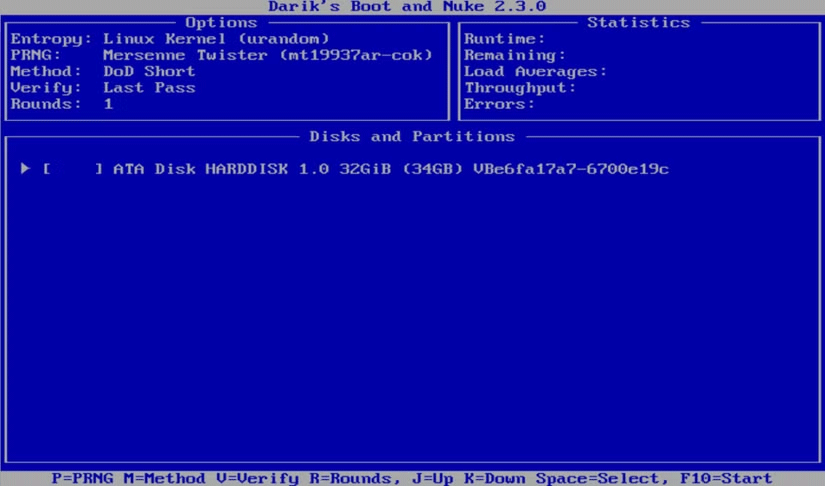
- Use the arrow keys to select the device you want to erase.
- Press Space to mark the drive with the [wipe] flag.
- When ready, press F10 to start the deletion process.
You'll see some shortcuts at the bottom of the screen that allow you to make changes to the deletion process.

- Use P to change the random number generator used to delete your data.
- R changes the number of erase passes per disk sector. This multiplies the default erase passes for each available erase method. For example, DoD Short defaults to 3 passes by default, so using R allows you to change it to 9 passes by specifying a value of 3.
- Meanwhile, M gives you 6 wiping methods, including DoD Short, DoD 5220.22-M , and Gutmann Wipe .
- Verification mode ( V ) can also be enabled, although this will prolong the deletion process.
A timer in the top right pane of the DBAN tool will display the duration of the wipe process. Eventually, a new screen will appear with 'pass' highlighted in green next to the drive name. At this point, you can use the drive again.
If the word "fail" appears instead, try using DBAN again. If this happens repeatedly, consider physical destruction.
While other tools (including some built-in options like Windows Reset) can erase data on a hard drive, the safest option is to wipe it with DBAN or a similar tool. Note that the free version of DBAN only works on hard drives; use the manufacturer's official tool or a free utility if you want to wipe an SSD.