How to change Visual Effects settings in Windows 10
Visual effects are an interesting visual feature of Windows, but they can affect Windows performance on a PC.
- These factors determine the speed of the computer
If Windows is slow, you can speed it up by disabling some visual effects. Do you want Windows to run faster or need to look better? If your computer is fast, you don't need to turn it off, but if your PC is only strong enough for Windows 10, you can make some visual effects settings changes.
In Windows 10, there are 17 visual effects. You can choose the visual effects you want to turn off, one by one or let Windows choose for you.
This article will show you how to change the visual effect settings you want to use for 'appearance' and performance of Windows 10.
- Speed up Windows 10 from start up to shutdown
- On Windows 10 you should disable these features
- Summary of tips to fix slow computer errors on Windows 10/8 / 8.1 / 7 and Windows XP
Note: If you make changes in Ease of Access Center, your visual effects settings will automatically be reset to their defaults.
If you disable the Animate controls and elements inside windows setting , you will never see dot animation on restart and shutdown.
The picture effect settings below are often turned off to help improve performance.
- Animate controls and elements inside windows
- Animate windows when minimizing and maximizing
- Animations in the taskbar
- Fade or slide menus into view
- Fade or slide ToolTips into view
- Fade out menu items after clicking
- Show shadows under windows
- Slide open combo boxes
1. Change picture performance settings in Advanced System settings
Step 1 . Follow Step 2 or Step 3 to open System Properties .
Step 2 . Press Win + R to open Run, type SystemPropertiesPerformance.exe , click OK to open Performance Options and go to Step 7 .
Note: This is the only step in this option that standard users can use.
Step 3 . Open Control Panel, click on the System icon and go to Step 4 .
Note: You must be logged in as an administrator to perform this step.
Step 4 . In the left pane, click the Advanced system settings link .

Step 5 . If you see a UAC message, click Yes and close the System window if you like.
Step 6 . On the Advanced tab, click the Settings button under Performance.
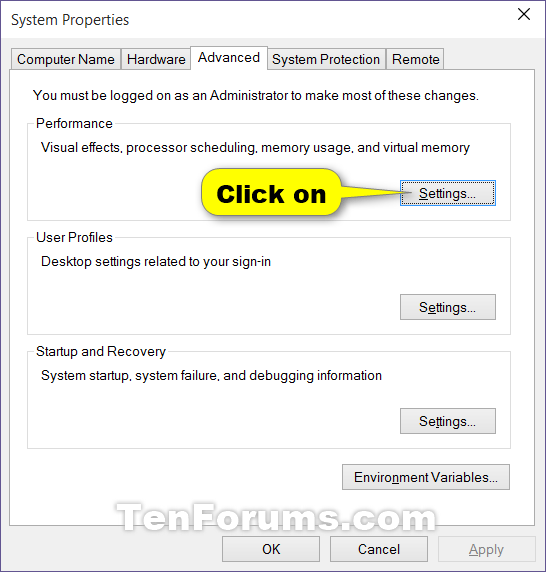
Step 7 . Select the desired image effect settings, adjust and apply the settings as you like, then click Apply .
- Let Windows choose what's best for my computer : Windows will automatically turn on and off visual effects that it determines will run well based on system parameters.
- Adjust for best appearance: This option will turn on all visual effects.
- Adjust for best performance: This option will turn off all visual effects.
- Custom : Allows users to enable and disable any visual effect setting. It will be selected by default if you manually enable and disable any visual effects.

Step 8 . Once completed, click on OK .
Step 9. If done Step 3 above, click on OK to close System Properties.
2. Change the visual effects settings in Registry Editor
Note: This option is only for the visual effects below in Registry Editor.
- Fade or slide menus into view
- Fade or slide ToolTips into view
- Fade out menu items after clicking
- Show shadows under mouse pointer
- Show shadows under windows
- Slide open combo boxes
- Smooth-scroll list boxes
Step 1. Type regdit in the search box ( Win + S ) on Start or Taskbar and press Enter to open Registry Editor.
Step 2 . If you see the UAC message, click Yes .
Step 3 . In Registry Editor, navigate to the following location.
HKEY_CURRENT_USERSoftwareMicrosoftWindowsCurrentVersionExplorerVisualEffects 
- Type 0 for Let Windows choose what's best for my computer .
- Type 1 for the Adjust for best appearance setting .
- Type 2 for the Adjust for best Performance setting .
- Type 3 for Custom installation.
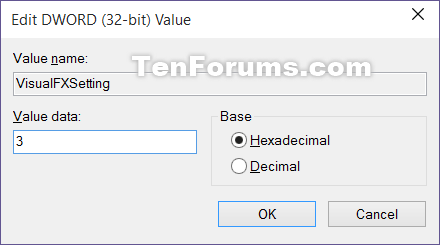
Step 6 . In Registry Editor, navigate to the following location.
HKEY_CURRENT_USERControl PanelDesktop 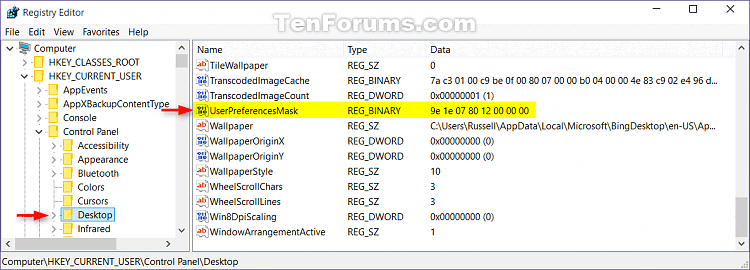
Step 7 . In the right pane of Desktop , double click DWORD UserPreferencesMask to edit it.
Step 8. Perform Step 9, Step 10 , Step 11 or Step 12 below to follow the settings you choose in Step 5 .
Step 9 . Select the Let Windows choose what's best for my computer setting.
Change the value to the same as the highlighted one below, click on OK and go to Step 13 .
9E 1E 07 80 12 00 00 00 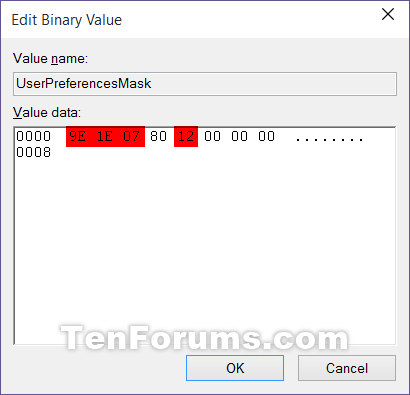
Step 10 . Choose the Adjust for best appearance setting.
Change the value to the value highlighted in red below, click OK and go to Step 13 .
9E 3E 07 80 12 00 00 00 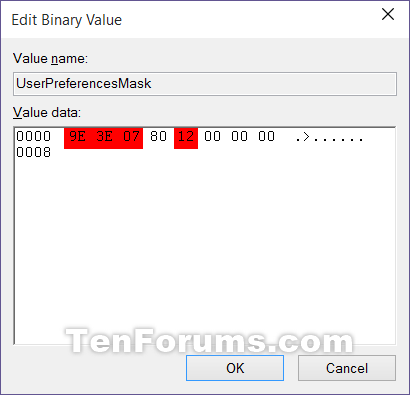
Step 11 . Select the Adjust for best Performance setting
Change the value to the value highlighted in red below, click OK and go to Step 13 .
9E 12 03 80 10 00 00 00 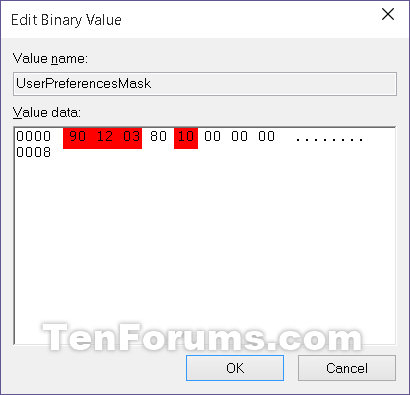
Step 12 . Select Custom installation.
Using the binary sets below, change the letters in it to turn on (1) or off (0) for each respective visual effect.
Note: The image effects below will require more work to change them in Registry Editor.
We need to use the 3 sets of binary values below for the letters in the visual effects you want to turn on or off, and then convert each binary set into hex for 3 hex entries in the registry.
Binary set (3)
1001ABC0 00D1EF10 00000G11 - 0 = Off
- 1 = On
Visual effects and their specified letters.
- (A) Smooth-scroll list boxes
- (B) Slide open combo boxes
- (C) Fade or slide menus into view
- (D) Show shadows under mouse pointer
- (E) Fade or slide ToolTips into view
- (F) Fade out menu items after clicking
- (G) Show shadows under windows
Example: To turn off all the visual effects above, change all the letters in the binary to 0.
10010000 00010010 00000011 For example: To turn on the (C) Fade or slide menus into view only, change the letters in the binary:
10010010 00010010 00000011 Use the binary to hex converter (follow the link below) to convert each individual binary into hex. Press Enter after entering the binary value for each set to convert.
http://easycalculation.com/binary-converter.php 


Example: To turn off all visual effects, convert 3 separate binary sets into hex.
Binary:
10010000 00010010 00000011 Convert to hex:
90 12 3
For example: From the example above, only the C setting is turned on, converting 3 separate binary sets into hex.
Binary:
10010010 00010010 00000011 Convert to hex:
92 12 3
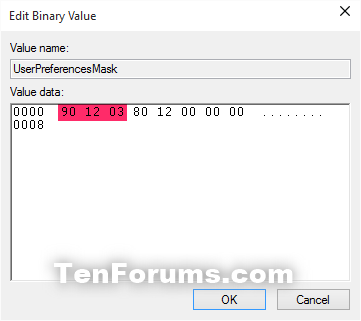
Change the first 3 values (e.g. 90 12 03) underlined in red below with the hex values you get above, click on OK and go to Step 13 below.
Step 13 . Close Registry Editor.
Step 14 . Log out and log in or restart the computer to apply the changes.
I wish you successful implementation!
You should read it
- ★ Microsoft Visual C++ Redistributable 2015, download Microsoft Visual C++ Redistributable 2015 here
- ★ Microsoft launches Visual Studio 2022
- ★ You will be dizzy and dizzy when viewing these 9 images
- ★ How to create a file to install Visual Studio offline
- ★ 5 best Visual Voicemail applications for Android