How to Burn a DVD on a Mac
Apple computers are installed with a utility that helps you to burn CDs and DVDs. DVDs hold larger amounts of data than CDs. You can create a customized DVD within a few minutes. Follow these steps to burn a DVD on a Mac computer.....
Part 1 of 3:
Check System Specifications
-
 Determine if your computer can write DVDs before you attempt to burn a DVD on your Mac.
- MacBook Air computers without disk drives do not have the Mac SuperDrive required to burn DVDs.
- Some older Mac laptops and computers do not have a SuperDrive; however, they are usually installed in newer Macs.
-
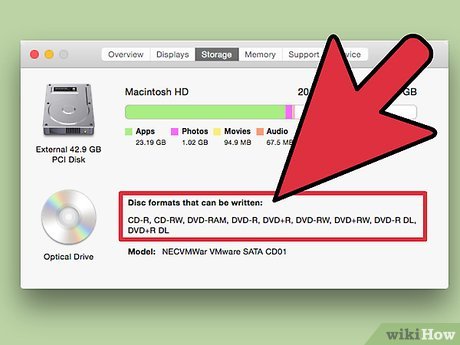 Check system specifications to be sure that you can write DVDs.
- Go to your desktop. Click on the Apple icon in the upper left hand corner of the page.
- Select "About This Mac." Wait for the dialog box to pop up. Click on "More Info..."
- Choose "Disc burning" in the list of topics in the left hand column. Look for "DVD-Write:" on the list in the right hand column.
- If it reads " -R" and "-RW" in the list, you can burn DVDs.
Part 2 of 3:
Gather Mac Files
-
 Return to your desktop.
 -
 Right click your mouse on some empty space. You can also press "Control" and "Enter" below your track pad.
 -
 Select "New Folder" from the list of options. You may also be able to select "New Burn Folder" on some computers.
 -
 Name the new folder while it is highlighted. Drag movies, files and other data into the new folder.
- If you want to rip a movie from a DVD and burn it onto a new DVD, you will need a DVD ripping program. Although these are not available in licensed Mac software, you can download free programs like Mac the Ripper, to duplicate content.
Part 3 of 3:
Burn a DVD
-
 Double click on your new folder. You should see your files listed inside the folder.
 -
 Click on the gear icon at the top of your folder dialog box. It may say "Action" underneath the gear icon.
 -
 Select "Burn Folder Name to Disc..."
 -
 Insert a blank writable DVD into your disc drive.
 -
 Wait for the disc to start burning automatically or click "Burn."
 -
 Allow the Mac to burn and finalize the DVD before trying to access it. Click on it to attempt playing it, or eject it and play in a DVD player.