Table of Contents
Learning how to adjust video audio on camtasia studio is easier when the steps are completed in the correct order. Use this guide to prepare, make the changes, and verify the result.
If you regularly edit videos, or record video screens, you will know Camtasia Studio's name, the app possesses many useful and professional features.
How Adjust Video Audio on Camtasia Studio Works
The app provides editing tools, video capture from basic to advanced, suitable for amateurs in the field of video making or skilled people. Actions done on Camtasia Studio are not too complicated, making it easy to edit your videos. Previously, the Network Administrator has introduced many features of Camtasia Studio such as video splitting, 360-degree logo rotation, etc., in this article, we will then bring more users. a trick to use Camtasia Studio, which is customizing video audio according to users.
- Top online video editing websites
- Karaoke software on quality computers
- How to cut videos on Windows 10 without software?
With Camtasia Studio, you can increase or decrease video audio, or increase or decrease the sound of any video. Even when needed, you can completely turn off the video audio just for each picture.
Step 1:
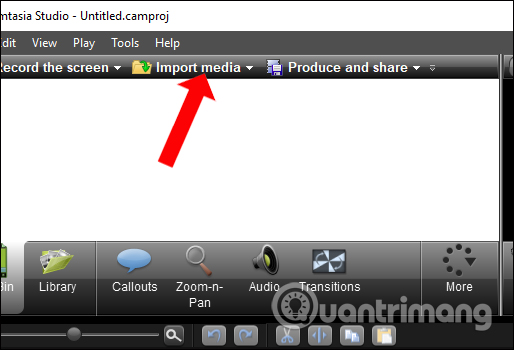
At the Camtasia Studio software interface, click the Import media Item and then select the video you want to edit the audio on the computer folder.
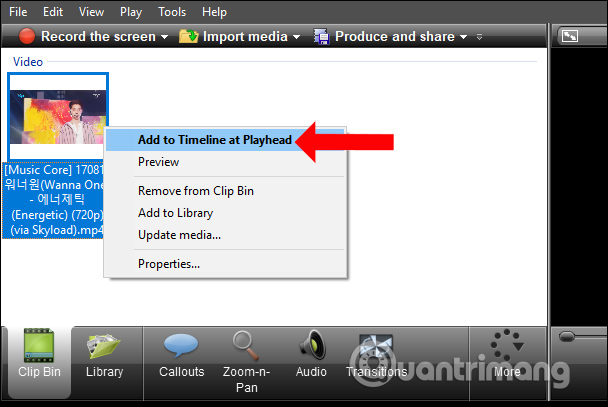
Then right-click the video and select Add to Timline at Playhead To bring it down to the Timeline bar below.
Step 2:
Click the video you want to adjust the sound and then click On the Audio Below.

Step 3:
Here you will find the app provides many audio editing options for users. We will guide you to edit the video with each of these optional items.
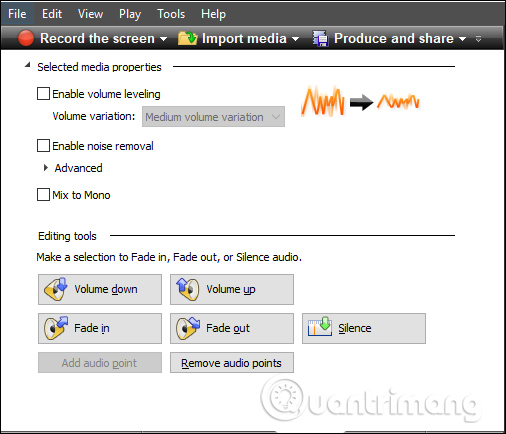
Start by click the video below Track 1 Of Timeline, then in The Audio section There will be options including:
- To increase the volume: Select Volume up.
- To reduce the volume: Select Volume down.
- To turn off the sound: Select Silence.
For example, I choose to decrease the volume and will press the Volume down. Here you will see 100% milestone meaning the current fixed audio of the video. When the sound is reduced, the audio part will fall from 100%.
Just press Volumne down to reduce the sound to the level you want. The video can be previewed at the interface above to check if the sound level is wanted or not. Increasing the sound is similar when pressing the Volume up button.

If you do not want to edit the sound of the entire video, you can select a video to increase, decrease, or even turn off the audio of the video.
Step 1:
First click the video Track 1 bar under Timeline, bring The time bar To the video you want to cut to adjust the sound, by clicking the gray bar in the middle and dragging. This will be the first paragraph of the video you want to edit.
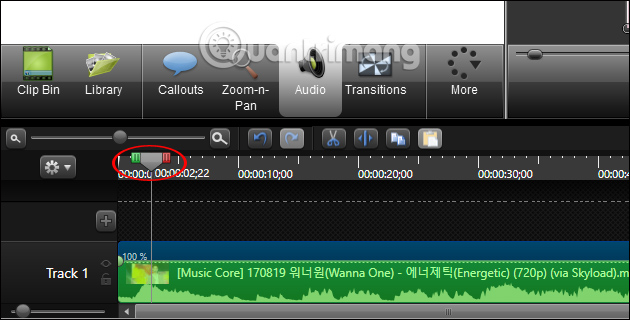
Hold down the left mouse button on The red Bar to the right of the time bar and drag to The end of the video Where you need to change the sound.
We will see the time bar separated into 2 parts as shown below. The beginning of the video will be the blue bar, and the end of the video will be the red bar.

Step 2:
Then click The Audio section And edit the audio with the options below:
- To increase the volume: Select Volume up.
- To reduce the volume: Select Volume down.
- To turn off the sound: Select Silence.
For example, if I choose Silence to turn off the Selected Video sound , you will see that video will no longer display the audio.
When needed to return the deleted audio, or put the sound back to the original sound without editing, click Remove audio points.
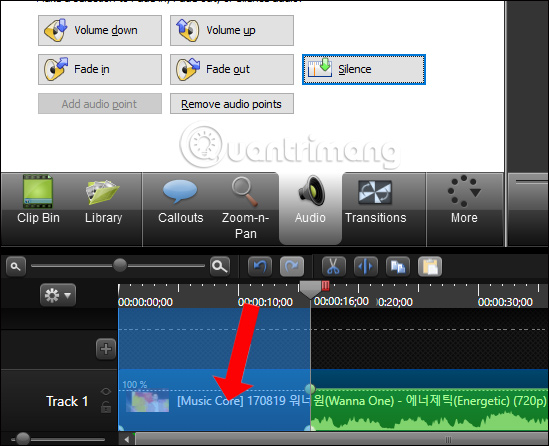
If you increase or decrease the sound of the video, pay attention to The circular milestone Of the video with 100% fixed sound.

If you do not want to select a video to increase or decrease the sound, you can also select the points in the video to create different loud and small sounds.
Step 1:
Also at Track 1 video In Timeline, Take the time bar To the section you want to Set the first point To change the sound. Then click Add audio point Above. You will immediately see a circle like the image.
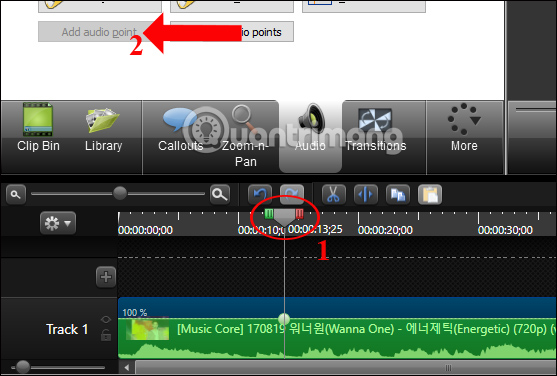
Step 2:
Drag The time bar To the section you want to Set the second point to adjust the sound , then click Add audio point . You will see the second round button appear in the video under Track 1.
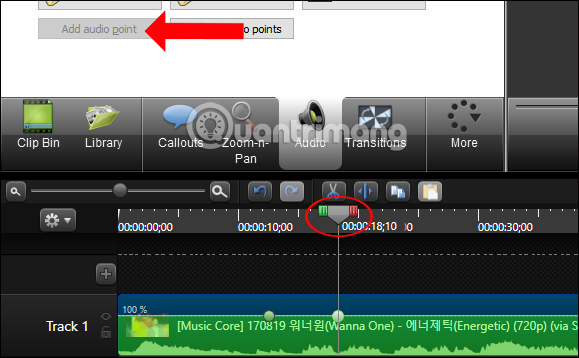
Step 3:
Drag The time bar to The 3rd point to Adjust the sound , then press Add audio point To set the 3rd point. The 3rd round dot appears. So I have 3 audio adjustment points in the video.
Do the same with the rest of the video when needed. The general rule is that you drag the time bar to any sound point you want to select and click Add audio point to set that point.
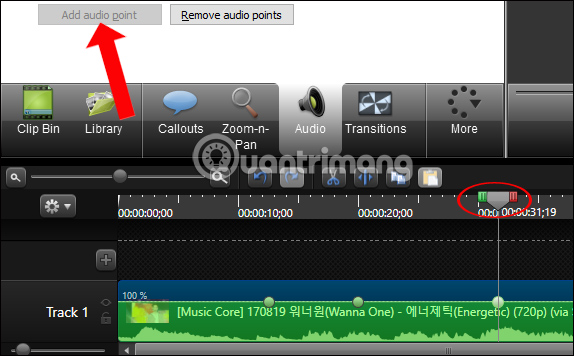
Step 4:
When needed to Reduce the amount of video points , press and Hold the round button Of that section to Scroll below The 100% mark as shown. Pay attention to the audio percentage for each pull point.
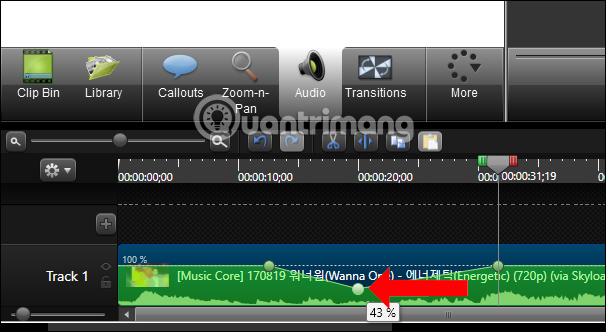
When needed to Increase the sound Score, Drag the circle button at that point to the top .
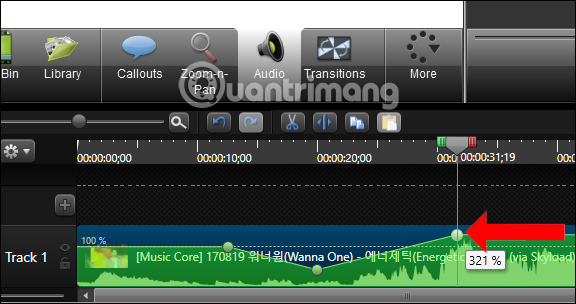
Note to readers , the option of Add audio point differs from selecting a video because it will create sounds from small to large and then gradually shrink or vice versa in the form of triangles. There must be 3 points on the video to use this way. If 2 points will become the sound adjustment for a sound clip like part 2.
Finally when you play the video, the sound will sound up and down according to the sound created for the video point.
While recording if the audio file is small even if you have increased the volume mode, you can adjust it on Camtasia Studio.
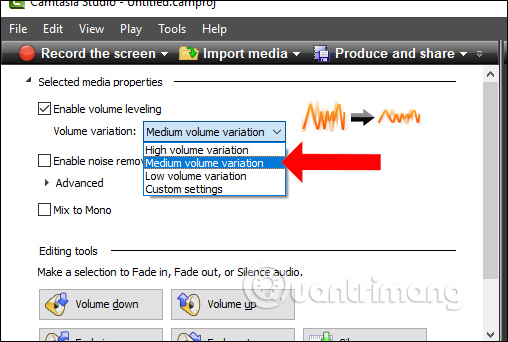
Select an audio or video file and then click Audio . Next click Enable volume leveling . At the Volume variation list there will be 3 choices:
- High volume variation: Increases sound to the highest.
- Medium volume variation: Increases sound at medium level.
- Low volume variation: Increases sound slightly.
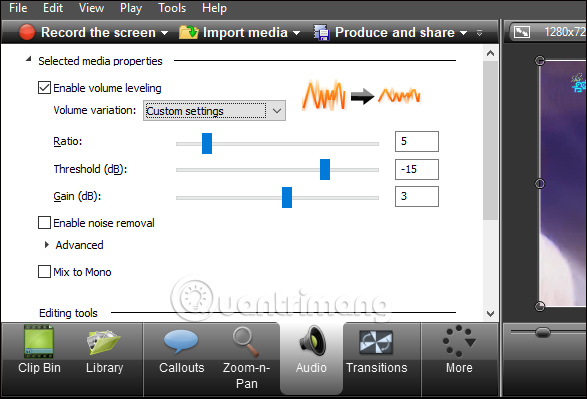
- Custom setting: This option is for manual adjustment.
When you adjust the sound, the audio bar below the video in the Timeline section also changes.
Manual audio customization will be suitable for those who have some audio editing techniques.
Step 4:
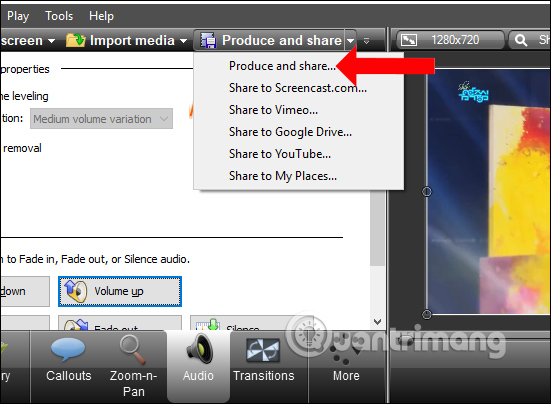
After you've finished editing the videos, click ProduceAnd share and Then select Produce and share… The list appears to save the video.
With Camtasia Studio software you can easily customize the audio in the video, when needed to increase, decrease or turn off the sound of the entire video. In addition, the app also allows users to edit the sound of a video, or specifically create different audio points in the video.
I wish you all success!
FAQ
What should I prepare before I adjust video audio on camtasia studio?
Review the requirements in the guide, confirm that your device or software is compatible, and save important work before changing settings related to adjust video audio on camtasia studio.
Why might adjust video audio on camtasia studio not work as expected?
The most common causes are incompatible versions, missing permissions, incorrect settings, or an interrupted internet connection. Recheck each step and restart the app or device when appropriate.
Can beginners follow these adjust video audio on camtasia studio steps?
Yes. Follow the steps in order, avoid skipping confirmation screens, and compare your interface with the screenshots because labels may differ slightly between versions.
Related Articles
 How to Separate Audio, Split Video by Camtasia Studio7 minutes read
 Shortcuts in Camtasia Studio6 minutes read
 How to Change Video Speed on Camtasia Studio5 minutes read
 How to Pair 2 Videos into 1 Using Camtasia Studio9 minutes read
 How to Change Hair by Video on Camtasia Studio3 minutes read
 How to Cut Video by Camtasia Studio4 minutes read
Reader Comments 0
Sign in with email or Google to join the discussion.