Table of Contents
Learning how to change video speed on camtasia studio is easier when the steps are completed in the correct order. Use this guide to prepare, make the changes, and verify the result.
Camtasia Studio is an effective video capture and video editing software. This tool will help you change video content, insert effects, insert 360-degree logos, etc. Users can also change the video playback speed such as fast forward, or slow the video while changing the voice multiplier. objects in video, right on Camtasia. The steps below explain how to change the video speed, as well as change the voice in the video on Camtasia Studio.
- How to pair 2 videos into 1 using Camtasia Studio
- How to adjust video audio on Camtasia Studio
- How to separate audio, split video by Camtasia Studio
How to change video speed on Camtasia Studio
Step 1:
Users open Camtasia Studio software then click Import Media To import videos that need to change playback speed on Camtasia.

Step 2:
Drag and drop the video file into Track 1 In the Timeline bar below.

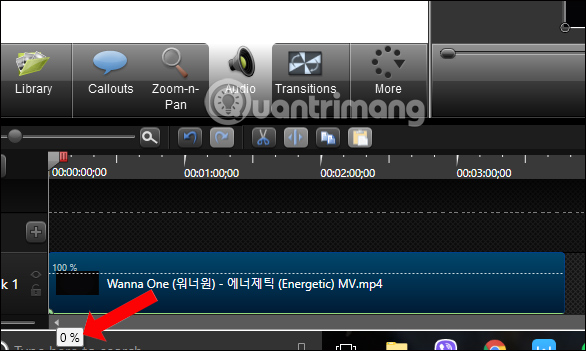
Then click The Audio section In the tool group above and will see below Track 1 shows the blue guys with 100% volume.

Drag the blue line to the bottom to 0% To remove all the audio of the video.
Step 3:
Then right-click the video and select Clip Speed.

Step 4:
Display the Clip Speed dialog box for users to change the speed of the video. The video's default speed is 100% of original clip speed, meaning the audio and video playback speed are normal
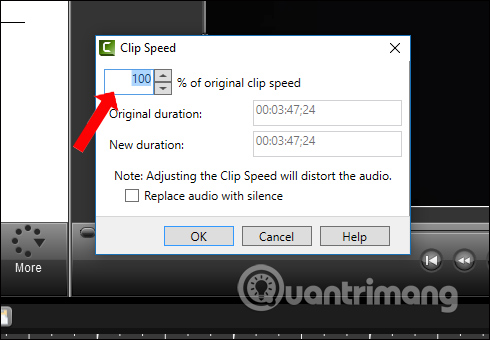
To Fast-forward Video speed you just need to Increase the% parameter To the level you want. New time to play video (New duration) will decrease compared to the original time of the video (Original duration).

When needed To slow down the video speed , Reduce the level to% . New time of video (New duration) will increase compared to the original time of video (Original duration). Click OK to save the new video speed.

The video in the Track 1 bar below will display the % increase or decrease in video speed That users has applied. You can then watch videos that have increased or decreased in speed and saved as usual.

Changing the video speed on Camtasia Studio is very simple, just change the speed of video playback, increase or decrease compared to the normal 100% level. Changing the video playback speed means that you have changed the character voice in the video.
Instructions to change the speed of video playback on Camtasia
- How to rip music from video on computer with AV video Converter
- How to edit videos with Photos Windows 10 Fall Creators application
- How to record a screen with VLC Media Player?
I wish you all success!
FAQ
What should I prepare before I change video speed on camtasia studio?
Review the requirements in the guide, confirm that your device or software is compatible, and save important work before changing settings related to change video speed on camtasia studio.
Why might change video speed on camtasia studio not work as expected?
The most common causes are incompatible versions, missing permissions, incorrect settings, or an interrupted internet connection. Recheck each step and restart the app or device when appropriate.
Can beginners follow these change video speed on camtasia studio steps?
Yes. Follow the steps in order, avoid skipping confirmation screens, and compare your interface with the screenshots because labels may differ slightly between versions.
Related Articles
 How to Change Hair by Video on Camtasia Studio3 minutes read
 How to Adjust Video Audio on Camtasia Studio10 minutes read
 Shortcuts in Camtasia Studio6 minutes read
 How to Pair 2 Videos into 1 Using Camtasia Studio9 minutes read
 How to Separate Audio, Split Video by Camtasia Studio7 minutes read
 How to Cut Video by Camtasia Studio4 minutes read
Reader Comments 0
Sign in with email or Google to join the discussion.