Table of Contents
Windows does not provide one universal fan-speed setting. On most desktop PCs, the safest method is to configure a fan curve in the motherboard's UEFI/BIOS. Manufacturer utilities and third-party software can work when the hardware exposes fan controls, but many laptops and proprietary desktops only support the vendor's own thermal modes.
Do not slow a fan until you know which component it cools and have checked temperatures under load. A quiet PC that overheats, throttles, or shuts down is not a successful result.
First identify the source of the noise
- Open Task Manager and check whether a process is keeping the CPU or GPU busy.
- Monitor CPU and GPU temperatures and fan RPM with the motherboard or computer manufacturer's utility.
- Shut down and unplug the PC before inspecting it. Remove dust from filters and vents, keep cables clear of fan blades, and confirm that every fan spins freely.
- Listen carefully: coil whine, a hard-drive vibration, an AIO pump, and a worn fan bearing can sound like high fan speed but require a different fix.
A fan that grinds, clicks, wobbles, or repeatedly fails to start should be replaced rather than hidden with a slower curve. For baseline checks, see TipsMake's guide to monitoring computer temperatures.
Method 1: Set a fan curve in UEFI/BIOS
Firmware control works before Windows starts and remains active if a Windows utility crashes. Menu names vary by manufacturer: look for Q-Fan, Smart Fan, Hardware Monitor, Fan Tuning, or PC Health.
- Restart the PC and enter UEFI/BIOS using the key shown at startup, commonly Delete or F2. Windows also provides an Advanced startup path to UEFI on supported systems.
- Open the hardware-monitor or fan-control menu.
- Match each header to the correct fan: CPU_FAN, CPU_OPT, SYS_FAN, CHA_FAN, or PUMP. Do not change a pump header unless the cooling system's manual says it is safe.
- Select the correct control mode. Four-pin fans normally use PWM; three-pin fans normally use DC. Auto detection is preferable when it works.
- Choose a preset such as Standard or Silent, or create a gradual curve tied to CPU or motherboard temperature.
- Keep a reliable minimum speed, especially for the CPU cooler. Save the settings, restart, and test temperatures under a sustained workload.
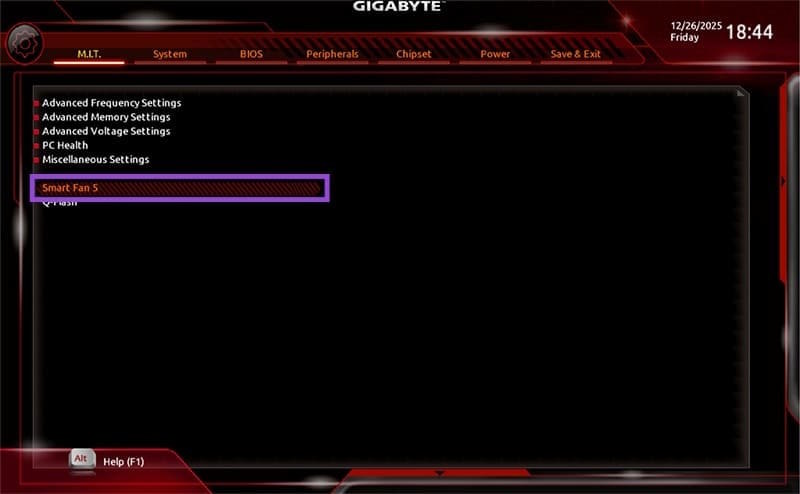
If a fan repeatedly starts and stops near one temperature, add hysteresis or a response delay if the firmware offers it. This prevents brief temperature spikes from constantly changing the noise level.
Do not update the BIOS solely to make the menu look different. If a firmware update specifically fixes fan behavior or hardware compatibility, follow the motherboard vendor's instructions and read these BIOS update precautions.
Method 2: Use the PC or motherboard manufacturer's utility
For a prebuilt desktop or laptop, start with the support page for the exact model. Vendors may provide thermal profiles such as Quiet, Balanced, Performance, or Full Speed. Gaming laptops often expose these modes through a control-center app or a keyboard shortcut.
To identify a desktop motherboard in Windows:
- Press Windows + R, enter
msinfo32, and press Enter. - Check BaseBoard Manufacturer and BaseBoard Product.
- Search the manufacturer's official support site for that exact model.
Do not download an OEM utility from a third-party driver site. A utility intended for another motherboard can fail to detect sensors or write unsuitable settings.
Method 3: Configure Fan Control on a supported desktop
Fan Control is a current Windows utility that can combine CPU, GPU, and case-fan sensors and create custom curves. Hardware support depends on the motherboard, fan controller, AIO, and GPU. If a control or sensor is not detected, do not force it with an unrelated plug-in.
- Download Fan Control from its official release repository.
- Run the setup assistant and let it identify controllable fans and RPM sensors.
- Pair each speed sensor with the correct control before calibration.
- Calibrate one fan at a time while watching the physical fan and temperature readings. Calibration may briefly sweep through low and high speeds.
- Create a conservative linear or graph curve. Case fans can use the higher of CPU and GPU temperature through a mixed curve.
- Set a minimum speed above the fan's reliable starting point and use a response delay or hysteresis to avoid rapid changes.
- Save the configuration, enable automatic startup only after testing, and confirm that firmware resumes safe control if the application closes.
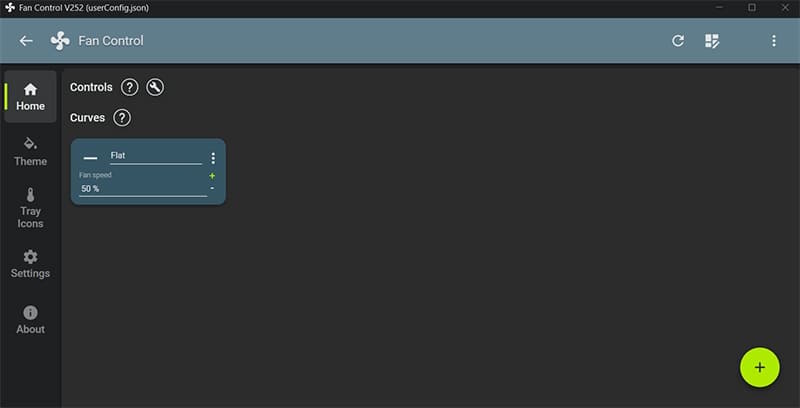
Fan Control's official documentation explains calibration, sensor pairing, minimum speed, start percentage, hysteresis, and curve types.
Special cases
GPU fans
Use the graphics-card manufacturer's supported software or a well-established GPU utility. Many cards deliberately stop their fans at idle. A zero-RPM state is normal only when the card is designed for it; confirm temperatures and fan behavior under load.
Laptops
Laptop fans are commonly managed by the embedded controller. Generic fan software may show temperatures without controlling the fan, or it may conflict with the vendor utility. Use the laptop's official thermal profiles, clean blocked vents, and service dried thermal material or a failing fan when appropriate.
AIO liquid coolers
Keep the pump at the speed range recommended by the cooler manufacturer. Connect radiator fans and the pump to their specified headers. Treat an unusual gurgle, pump RPM loss, or rapid temperature rise as a cooling problem, not merely a curve-tuning issue.
Test every change
- Record idle temperatures and fan RPM before changing anything.
- Run a sustained workload representative of your use, not only a short benchmark.
- Watch for thermal throttling, crashes, sudden shutdowns, or a fan failing to restart.
- Revert to the UEFI default or a standard preset if temperatures rise unexpectedly.
- Test again after room-temperature changes, dust cleaning, or hardware upgrades.
A good curve is quiet at light load, responds smoothly as heat rises, and keeps every component within the limits specified by its manufacturer.
Related Articles
 Steps to Adjust Mouse Speed on Windows 115 minutes read
 How to Adjust the Mouse Speed in Windows 102 minutes read
 Adjust the Speed of the Mouse on the Computer Screen2 minutes read
 How to Adjust Mouse Speed on Windows 10, 8, and 7 Computers4 minutes read
 How to Use SpeedFan to Check and Adjust CPU Fan Speed4 minutes read
 Speed Up Windows 7 Computers, This Is All You Need to Do16 minutes read
Reader Comments 0
Sign in with email or Google to join the discussion.