Table of Contents
To scan a Windows PC with Avast Antivirus, open Protection > Virus Scans, choose the scan that matches the problem, and review the results before resolving detections. Use a Smart Scan for an initial check, a Full Virus Scan for a thorough examination, a Targeted Scan for a specific file or folder, and a Boot-Time Scan when persistent malware may be loading with Windows.
The screenshots in this article come from an older Avast release. Current Avast Antivirus and Avast One interfaces use different menus, so follow the current labels in your installed product.
Update Avast before scanning
- Open Avast and confirm that the application and virus definitions are current.
- Install pending Windows updates and restart if required.
- Back up important files to storage that malware cannot modify.
- Keep only one full real-time antivirus product active.
If files are being encrypted, ransom notes are appearing, or several networked devices show the same problem, isolate the affected computer before starting routine cleanup.
Choose an Avast scan type
- Smart Scan: Checks for malware and may also report vulnerable software, browser issues, or other product recommendations.
- Full Virus Scan or Deep Scan: Examines the local system more thoroughly and normally takes longer.
- Targeted Scan: Scans a drive, folder, or file that you select.
- External Storage Scan: Checks connected USB or external drives when this option is available.
- Boot-Time Scan: Runs before normal Windows startup so that malware has less opportunity to hide or defend itself.
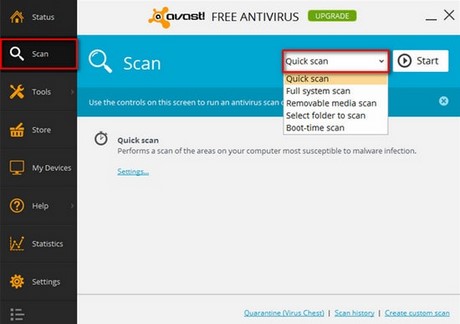
Run a normal Avast scan
- Open Avast Antivirus.
- Select Protection > Virus Scans. In Avast One, open the Scan Center from the Explore area.
- Choose Smart, Full, Deep, Targeted, or External Storage scan.
- For a targeted scan, select the exact drive, folder, or file to examine.
- Start the scan and leave the PC powered on until it finishes.
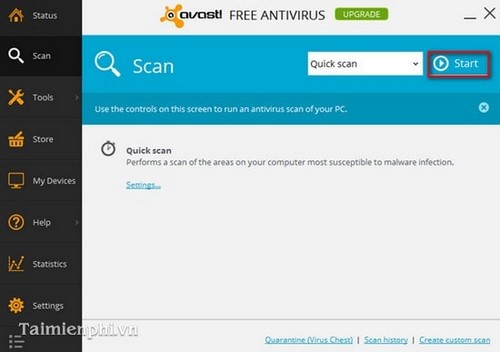
Scan duration depends on the selected scope, file count, drive speed, archives, and other settings. A Full or Deep scan can take considerably longer than a Smart Scan.
Review detections safely
Avast may repair, quarantine, or delete detected items according to the product and scan settings. Quarantine is usually the safest first response because it isolates the item while retaining a recovery path if the detection is a false positive.
- Check the detection name, file path, publisher, digital signature, and original download source.
- Do not restore an item merely because an application stops working.
- Do not create broad exclusions for an entire drive, user profile, or Downloads folder.
- Delete an item permanently only when you understand what it is or have verified guidance.
- Restart Windows if Avast needs to remove a component that was in use.
After cleanup, update Avast again and repeat a scan. If the same threat returns, investigate the source: a scheduled task, browser extension, synchronized folder, infected USB drive, cracked installer, or another device may be reintroducing it.
Use Boot-Time Scan for persistent threats
A Boot-Time Scan is an advanced option for malware that is difficult to inspect after Windows starts.
- Open Protection > Virus Scans.
- Select Boot-Time Scan.
- Review its settings before scheduling the scan. Automatic deletion carries a false-positive risk, especially for system files.
- Select Prepare scan, then restart the PC when ready.
- Allow the scan to finish and review every reported action after Windows loads.
Avast's current Boot-Time Scan instructions explain the available automatic actions and scan settings. Do not schedule this scan immediately before work that cannot be interrupted.
Scan one file from File Explorer
For a single downloaded file or folder, right-click it in File Explorer and choose the Avast scan command if the context-menu integration is enabled. A clean result reduces suspicion but does not prove that an unknown program is safe. Verify the publisher, digital signature, download source, and checksum when the developer provides one.
For a second opinion on a non-confidential file or link, compare TipsMake's online virus scanners. Uploading a file sends it to another service, so never submit private, personal, or proprietary data.
Legacy Avast features shown in older screenshots
Older Avast versions exposed features such as DeepScreen, Browser Cleanup, Rescue Disk, and remote-access controls in locations that may no longer exist. The following images are retained to document the old interface, not to provide current menu paths.
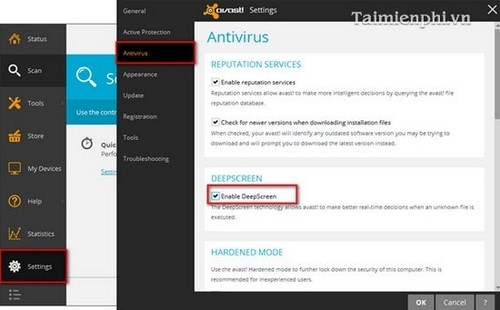
DeepScreen was an older name and interface for analyzing unknown applications. Use the current Avast protection settings and leave behavior-based protection enabled unless verified support guidance requires a change.
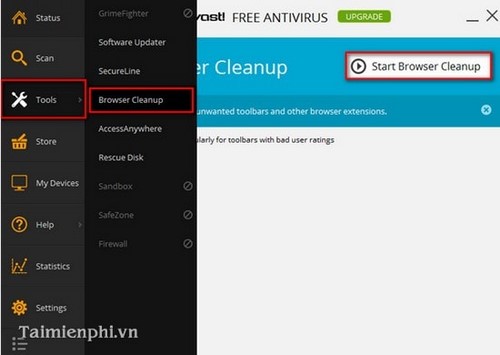
Removing an unwanted browser extension is different from deleting malware. Review the extension in the browser's own extension manager and reset affected settings only after recording any information needed for diagnosis.
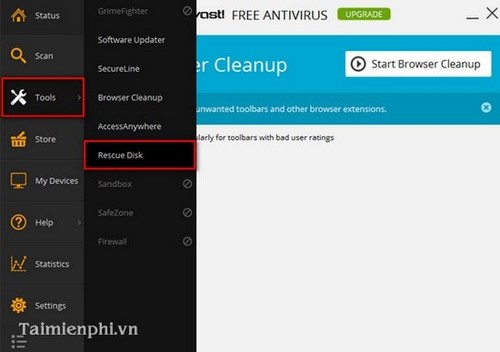
A Rescue Disk can scan a PC from trusted bootable media when Windows cannot start safely. Create it on a known-clean computer with the current Avast tool and verify the target drive carefully because preparing boot media can erase its existing contents.
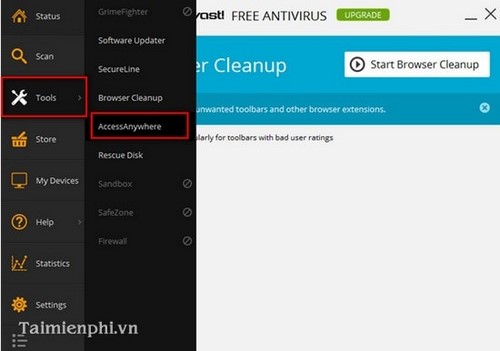
Do not enable remote access merely for routine scanning. Remote-control software expands the attack surface and should be used only when necessary, authenticated strongly, updated, and disabled when the support session is over.
If Avast cannot remove the malware
Disconnect the PC from untrusted networks, preserve important evidence, and run a reputable second-opinion scanner. If security settings immediately turn off, credentials may have been stolen, or the system handles sensitive data, rebuild Windows from trusted media or seek qualified incident-response help. Change important passwords from a separate known-clean device and enable multi-factor authentication.
If you temporarily disabled Avast for troubleshooting, use the steps in this guide to re-enable every Avast shield and confirm that the dashboard reports active protection.
Related Articles
 How to Install and Using Avast Free Antivirus to Effectively8 minutes read
 Avast Free Antivirus 20.10.24427 minutes read
 Troubleshoot Problems with Avast Free Antivirus in Windows 106 minutes read
 How to Turn on // Off Self-defense in Avast Antivirus2 minutes read
 How to Remove Avast Safezone Browser?3 minutes read
 Fix 'Setup Is Already Running. Hãy Thử Khởi độNg Sau Khi Sau Khi3 minutes read
Reader Comments 0
Sign in with email or Google to join the discussion.