8 ways to connect laptop computer to TV
A television will be connected to a lot of ports, this will not only help you be able to connect the TV to a laptop but also can connect with other devices.
Method 1: Connect Computer - Laptop to TV via Wifi Direct
Wifi Direct is a connection standard that allows direct data transfer between devices without the need for an internet connection. Thanks to Wifi Direct, you can use the features that connect a laptop to a TV like DLNA, Google Cast (used on Android Sony TVs) .
One of the TVs with Wifi Direct is the Samsung UA43J5500 - 43 inches Full HD Led TV equipped with Wide Color Enhancer Plus technology so you can enjoy exquisite and vivid colors with Samsung UA43J5500 TV.

Features a powerful Quad Core processor that provides enhanced performance for faster multitasking and easier web browsing of content.
Steps to connect Computer - Laptop to TV via Wifi
Step 1: Check if your computer supports Intel WIDI
Requirements for computer hardware
- CPU: As I see it, Intel WIDI is only supported on some 2nd generation CPUs or more, most laptops now meet this standard.
- VGA: requires Intel HD 3000 or higher most laptops also support
- WIFI card: Use wifi with 6205N card or more depending on the device, not all are supported.
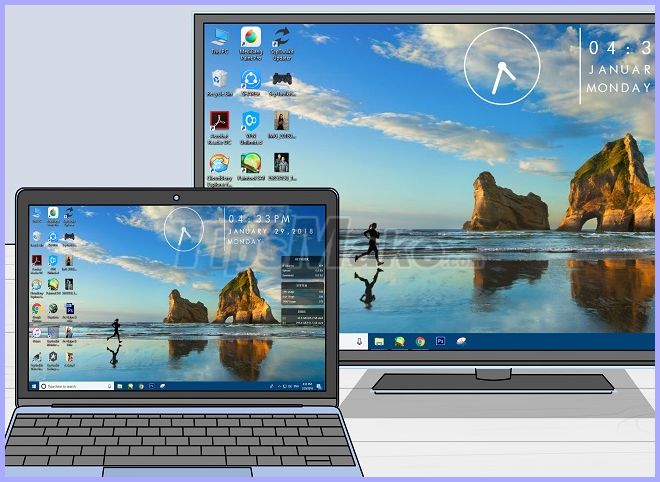
Software requirements on the computer
- Laptop with Windows 7 and above operating systems.
- Install 'Intel WIDI update tool' software on Laptop to update the latest drives and Intel WIDI software support for streaming media.
- After installing the above tool, if your computer has finished installing all the latest drivers for VGA, WIFI card and 'Intel ® WIDI' software (there are 3 icons on the desktop as shown above), you have succeeded in the preparation step. .
Step 2: Connect the Laptop to the TV via WIFI Direct.
Connect Laptop to TV via WIFI Direct to create and remember a connection from Laptop to TV via WIFI Direct. This is also the connection used to transfer data directly to the TV later. Follow the steps to connect Laptop to TV via Wifi Direct as follows:
- Turn on Wifi Direct and set the settings.
- Turn on Wifi Direct => Go to Settings => Network => WIFI Direct Settings. Then select Options => Documentation => Other methods. Here you will see connection information to the TV.
- Make a connection to the TV.
- Select the instruction manual to receive the connection information to the TV.
Step 3: Make connection and mirror content from Laptop to TV.
After connecting Laptop to TV via WIFI Direct successfully, disconnect this connection and connect both Laptop and TV to the general WIFI transmitter. That way you can surf the web, watch SopCast on a Laptop, and transfer and play that data on the TV screen.
- Run Intel WIDI software from off-screen shortcut.
- If the computer informs that the TV cannot be found, Click the Scan button again a few times.
- Then click the 'Connect' button to make the connection.
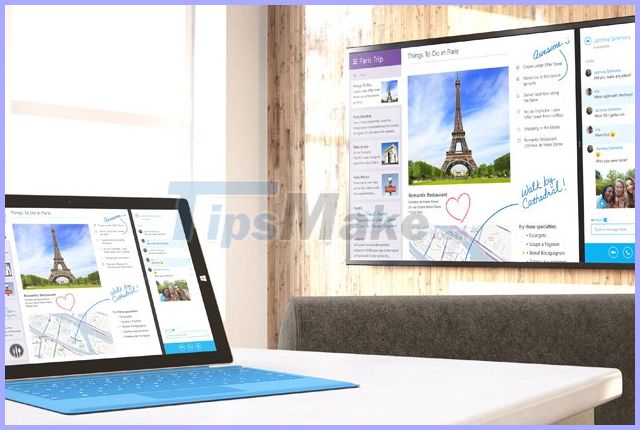
In case the TV set WIFI Direct in always-on mode, you can perform mirror content via Intel WIDI anytime even when you are watching TV, there is no need to turn on the WIFI Direct screen on the TV to wait for the link. concatenate as the operations performed above. If the connection is successful, the TV automatically initiates the connection and displays the mirror image and sound from the Laptop as a projector.
Step 4: Complete the connection from Laptop to TV via Wifi.
After successfully completing steps 1,2,3, you have completed the process of connecting from Laptop to TV via wifi. You can set the mirror mode to Duplicate, which means the content on the Laptop and TV is identical. If you set the mirror mode to Extend, the applications that run on the Laptop and the TV are different, allowing you to both work with the Laptop and watch videos in the TV image.
Method 2: Connect Computer - Laptop to TV via HDMI
What is an HDMI port ? The HDMI port has the English name High Definition Multimedia Interface which means the device connects the source. The main feature is the source device that connects the phone, installs well, the internet device to the transmitter is a television, a projector. The quality of sound and picture content through HDMI retains the original content and transmits quickly.
Before starting to connect, equip yourself with a laptop and television that supports HDMI ports. With the source and playback devices attached, the HDMI cable is also important for this connection. HDMI cables can be purchased at electronics components stores or centers specializing in electronics technology. Then proceed to make the connection according to the specific steps as follows:
Step 1: Find the HDMI port connector on the TV, usually sony, samsung, samsung TVs or integrated on the back. Connect the two ends of the cable to the two HDMI ports on the TV.
Step 2: Plug the cable into the HDMI port on the computer and plug the other end into the TV
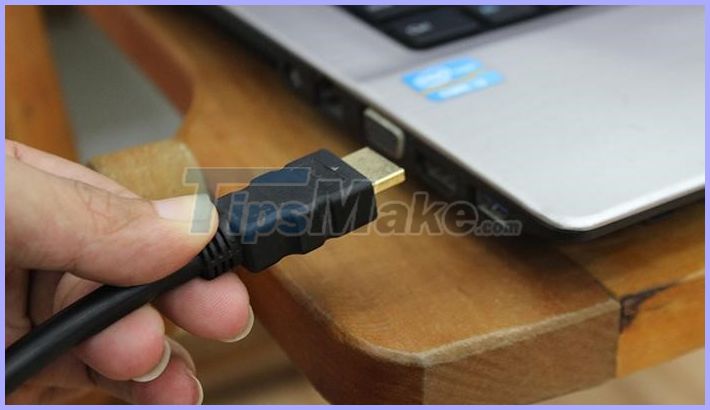
Plug the HDMI connector into a computer
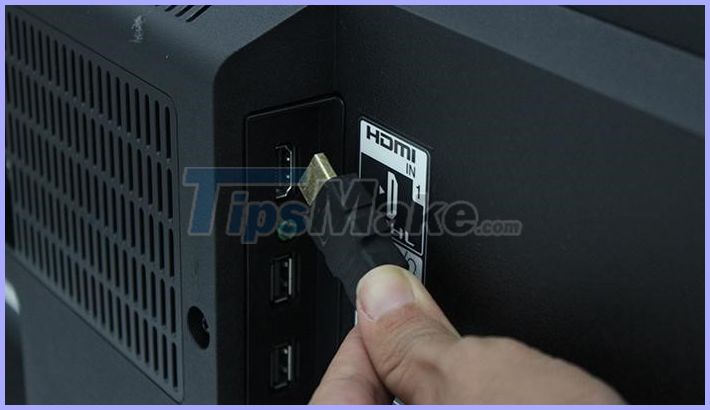 Plug HDMI In To TV
Note: In order for the cable to have a certain overlap, avoid the tension of the rope so that it affects the transmission process. Gently plug into the ports to prevent the drive from breaking the inside leg.
Step 3: After connecting the cable, proceed to turn on the two transmission and transmitter devices (computer and television), then use the remote (control) to press the power button. The screen will display as follows:
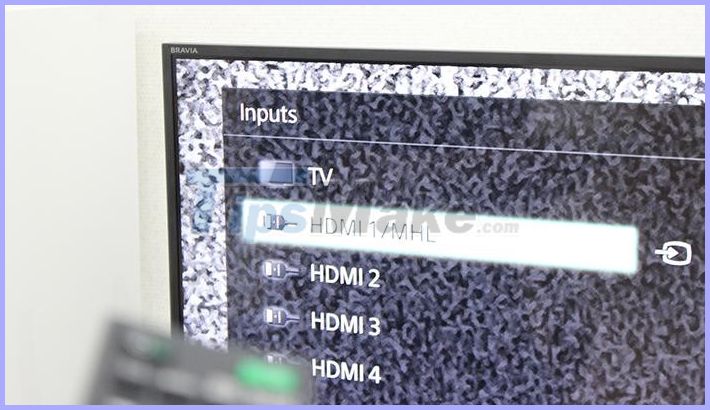 Click on the HIDM connection, proceed with the required text on the screen.
Step 4: Now it's time for the two devices to connect to each other, any operation when you want to play or want to stream videos or images, you control on the computer. Photos and videos will be shown on TV.
Note: If you see when plugging in the wire but do not see a signal to receive the cable, press the Windows + P key combination on the laptop and select Duplicate to pair
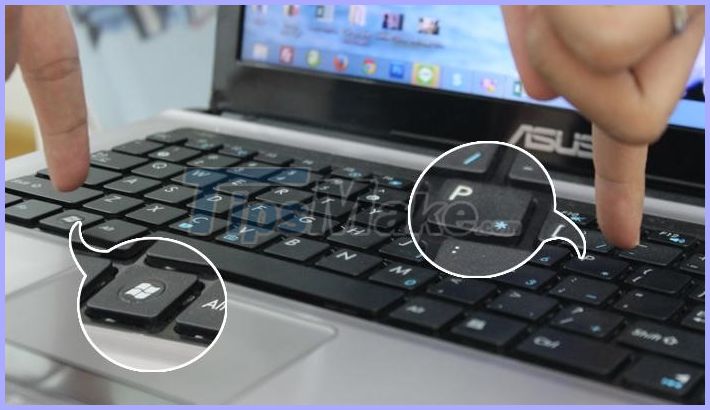 Windows Key + P
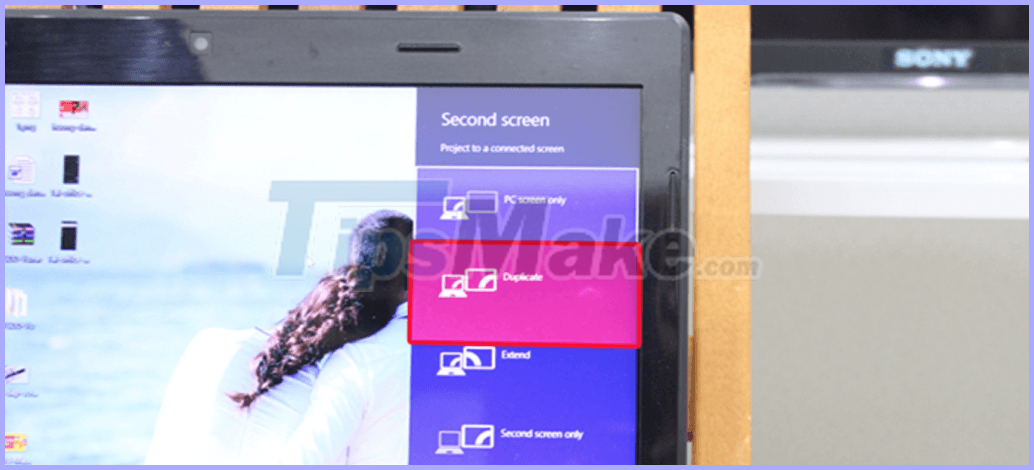 Choose Dulicate
If the connection has not been made, disconnect and start over.
A few questions when using an HDMI connection:
Where is the HDMI cable purchased? How much?
- HDMI cable, you buy at electronics stores or electronics stores, its prices are many types, rusty, genuine from 50,000 VND to 1,000,000 VND
Laptop without HDMI port, how to do?
- Then you buy an adapter to convert from USB to HDMI is ok
What should I do if the HDMI connection on the TV screen is narrowed or overflowed?
- You use the remote to adjust the image ratio on the TV to 16: 9 standard is okay
When connecting HDMI, is an additional audio cable needed?
- No need
Which TV has an HDMI connection?
- All new generation flat-screen TVs have HDMI connection
Method 3: Connect Computer - Laptop to TV by Bluetooth
Check the connection and installation with the following steps:
Step 1: Perform the following operation on your Bluetooth device:
- Position the Bluetooth device about 1 meter from the player.
- Put the Bluetooth device in pairing mode.
- NOTE: For details on how to put Bluetooth devices in pairing mode, refer to the instruction manual supplied with the device.
Step 2: Do any of the following when connecting to the device for the first time:
- Press the BLUETOOTH button on the remote control.
- Select Bluetooth Device on the playback screen.
- Select Device List in Bluetooth Settings .
- Press Up / Down repeatedly to select the device you need and press ENTER .
- When a Bluetooth connection is established, the device name will appear on the TV screen .
Step 3: Perform the following operation if the Blu-ray player is paired:
- Select Setup.
- Select Bluetooth settings.
- Check the Device list .
- Scan from this player and choose a Bluetooth device .

Method 4: Connect Laptop - Computer to TV with Wifi Display
Wifi Display (also known as Wireless Display, abbreviated as Widi) is a standard of wireless connection via wifi developed by Intel. In terms of operation, WiDi is similar to Miracast or Air Play.
When WiDi is built-in, the TV can be connected wirelessly to other WiDi-enabled devices such as laptops, phones, and tablets to project the screen from these devices onto the TV. Therefore, all content from images, videos, music played on widescreen TVs will be more attractive, while retaining the original image and sound quality.
How to project a laptop screen on the TV with Wifi Display
In order to use this method, the laptop must have Windows 7 or higher, use Intel Core i 3, 5, 7 and 2 chips and use Intel wifi card. To check if your laptop is using an Intel wifi card, right-click the My Computer icon ==> Manage ==> Device Manager ==> Network Adapter ==> here if you see the information Intel Wireless means Your laptop uses an Intel wifi card.
After checking, you proceed with the following steps:
Step 1: You turn on Wifi Display on TV (depending on the TV, it can be named Widi, Wifi Display, Wireless Display, Screen Share). This feature can be immediately available TV home, or in the settings of the TV. At this point, you will see the TV name and password
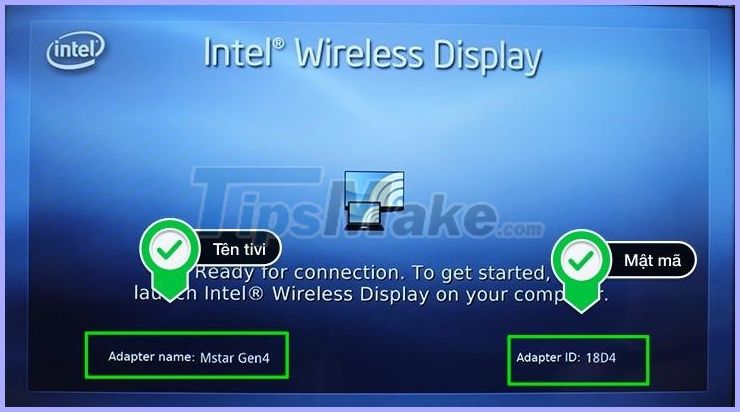
Step 2: Open the Wifi Display feature on the Laptop
- For Windows 7 laptop: Download the Widi software, then install and open it. Then the TV will scan for connected TVs, select the TV, enter the password (if required) and the two devices will connect.
- For Windows 8 and Windows 8.1 laptops: drag the mouse to the right of the screen, then at the Devices menu ==> select Project ==> Select Add a Wireless Display ==> select the TV you want to connect, enter the password ( if required) and 2 devices will be connected.
- For Windows 10 laptop: select the notification icon (notifications) ==> select Connect, select the TV you want to connect, enter the password (if required) and 2 devices will be connected.
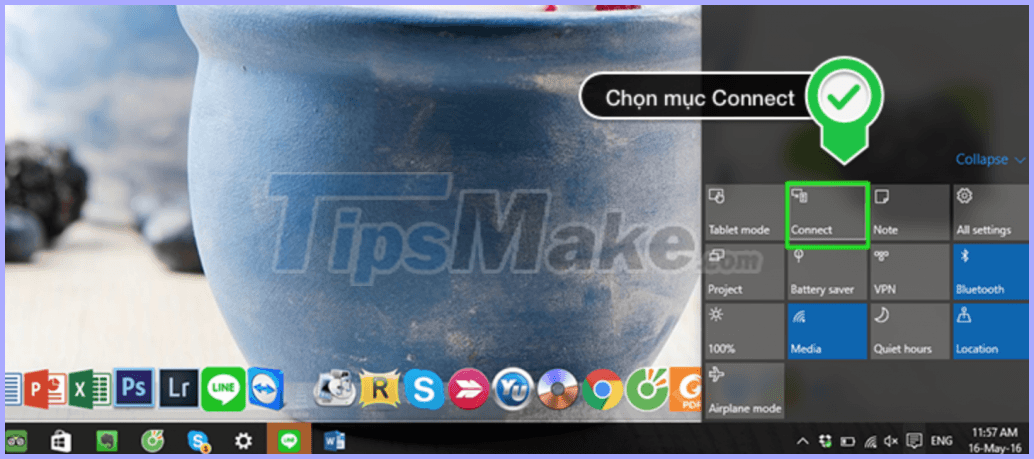
On Win 10, select conect
After connecting, all images and sounds from the computer will be shown on the TV. If you cannot connect, you may not have enabled screen mirroring. If so, then you do the same way 1 is to press Windows + P and select Dulicate
Hopefully, with the sharing on how to connect your computer to the TV via HDMI and Bluetooth, you can successfully connect and use according to your wishes. Thank you for your interest in this information sharing, wish you a new day full of energy.
Method 5: Connect PC - Laptop to TV with DLNA
DLNA; stands (Digital Living Network Alliance) is a shared network solutions, enables sharing high quality pictures between the phone, a laptop with TV. Devices that support DLNA must connect to the same internet network and the Laptop must use Windows operating system.
Which device has DLNA? Most smartphones, Android tablets support DLNA. On iPhone, this feature is not available. You can go to test settings:
- For Samsung: AllShare, Smart View or 'detect device nearby'
- For LG: LG Smartshare
- For Sony: Set up a media server or share the square icon.
- For Oppo: When opening any image, there will be DLNA icon for you to choose and Share.
- For Windows Phone Phones: Lumia Play To
- For HTC: HTC Connect
Which TV has DLNA? TVs today also have quite a lot of devices that support DLNA, including prominent LG Smart TV, Android Sony TV or Samsung Smart TV .
Steps to transfer images from a laptop computer to TV via DLNA
Step 1: Open up Windows Media Player of laptop ==> select Turn on media streaming to enable sharing feature.
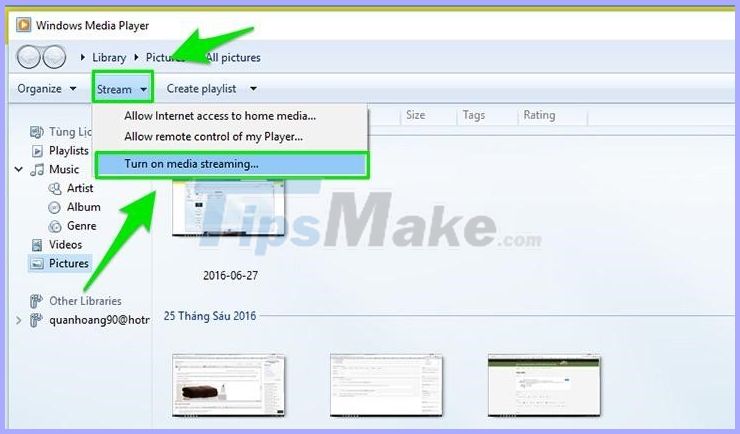
Step 2: To transfer the image, select Pictures ==> right-click the image you want to transfer ==> select Cast to Device ==> select your TV ==> on the TV displays a message, select Agree / Accept / OK (depending on the TV) ==> pictures will be transferred to the TV.
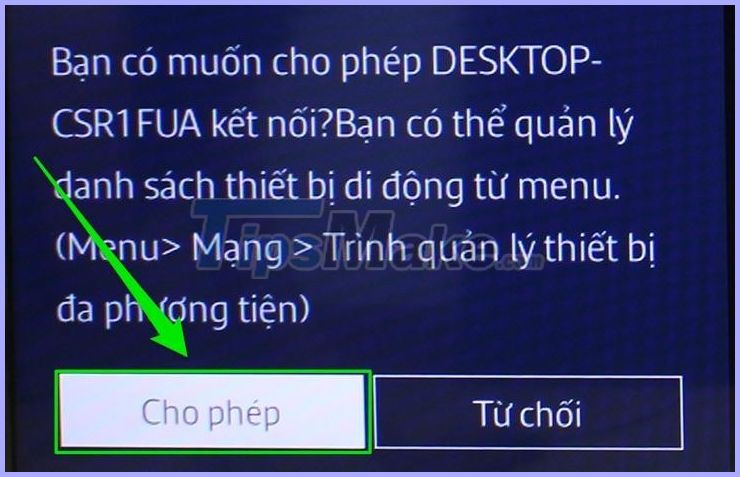
After you give permission, all images from your computer will be shown on the television.
Method 6: Connect Laptop - Computer to TV with Tizen
This connection method is only for Samsung TVs. In Samsung TVs with Samsung Smart View application, this is an application developed by Samsung that makes it easy to transfer photos, music, movies from latop to Samsung Smart TVs without using cables.
Requirements required to connect: Samsung Smart TV
- Laptop running Windows 7 and above (Macbook cannot transfer images this way)
- TV needs to be connected to a wifi network with laptop
- Steps to connect a laptop to a samsung TV using Samsung Smart View application:
Step 1 : You download the Samsung Smart View app and install it on your laptop (choose to download the version for Windows)
Download the app here

Step 2: Open the Samsung Smart View app on your laptop ==> select Connect to TV ==> select your TV ==> the TV and laptop will be connected.

Step 3: Select Add Content ==> select Add File if you want to transfer only one specific content to the TV, select Add Folder if you want to play a folder on TV ==> select the content you want to play on TV (picture, music or video).
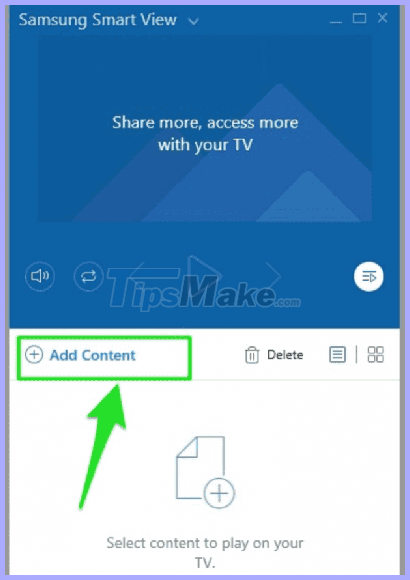
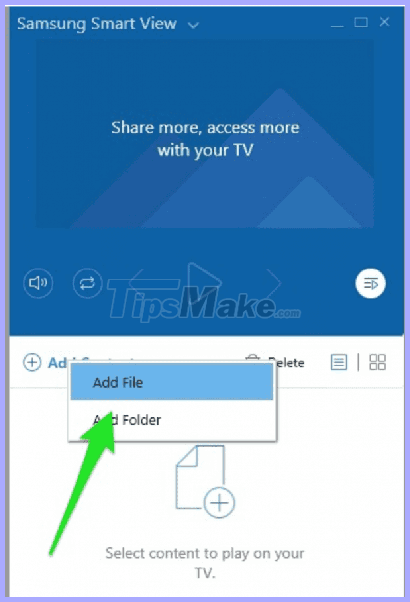
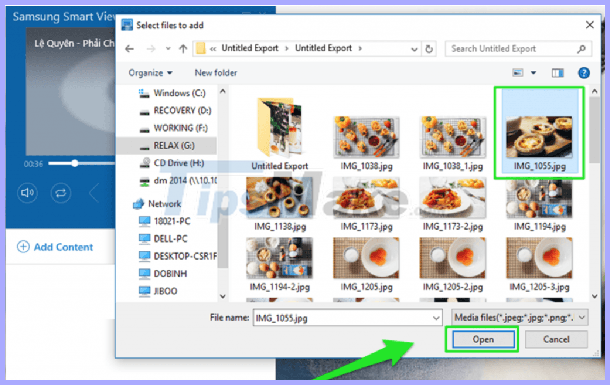
Some points to note:
- In step 3, if you select Add Folder, a folder of music, movies or photos will be transferred to the TV and the TV will play the contents of that folder respectively.
- The TV allows to connect multiple laptops at the same time, but to ensure a stable connection, fast and does not freeze the machine, it is best to connect only one laptop at a time.
- If you did the above steps without connecting successfully, try turning off the TV, then turning it back on and operating from the beginning.
Method 7: Connect the TV to the laptop with VGA port
With the growing technology trend, teaching via projectors, watching content from computers on TV is quite a lot. So you need to know how to connect a laptop to a TV so that there is no problem during watching and teaching. The following article will guide you to connect a laptop to a television, a computer and a projector via HDMI, VGA in a simple way.
Note: Before starting to connect a laptop to a TV, equip yourself a laptop and projector or television that supports HDMI, VGA ports. With the source device and the transmitter, the HDMI cable is also extremely important. HDMI cables can be purchased at electronics components stores or centers specializing in electronics technology.
Step 1: Connect 1 VGA to the HDMI port on the laptop. Then, connect the remaining HDMI connector to the HDMI port of the TV or projector. You should pay attention to the distance between laptop and TV depends on the length of the HDMI cable.
Step 2: Use the remote to press the power button on the television or projector. Then select the HDMI command line (this command line will appear an additional command input).
Step 3: Wait for the TV or projector to connect to the laptop. If you wait for about 15 seconds, there is no signal to receive the cable. Click the Windows-P key combination on the laptop, then select Duplicate to pair the laptop with the TV.
When pressing Windows + P key combination , there will be some different display modes depending on the needs of each person:
- PC Screen Only: Only the output screen is displayed
- Duplicate: Display content on both screens with the same content
- Extend: This is a 2-screen parallel display mode. Unlike Duplicate mode, users can drag and drop objects and windows from one screen to the other and display multiple objects in parallel.
- Second screen Only: Only the 2nd screen is displayed.
Step 4: After connecting the laptop to the TV successfully, the computer screen will appear on the projector screen or television. From here you can easily display all content from the laptop for everyone to see. Very convenient for teaching or watching soccer, big screen movies .
Method 8: Connect Laptop to TV by USB
In principle, connecting USB to USB from Laptop to TV does not work. However, there are some companies that have developed adapters that will convert your USB port to an HDMI port. The only catch here is that you need to add software for your Laptop to turn the USB port into a Video out port, so we suggest that you check the USB to HDMI adapter you want to be compatible with your Laptop before. buy.
If the adapter is compatible, then setting up this method is largely straightforward. First you need to install the adapter's software / driver, then simply the case of running the software and connecting the Laptop to your TV.
Connect the Laptop to the TV using a USB stick / external hard drive
If you have a reasonably new TV, there's a good chance it will have a USB port. Depending on the capabilities of the TV, you can watch video content stored on your Laptop just by turning it into a USB stick / external hard drive and plugging it into the TV.
Provide video format supported by TV (almost universal support is MP4), watching content must be as easy as plugging in USB memory / external hard drive into your TV, selecting USB input and selecting video. You want to watch via TV File Explorer.
Make sure the video file format is compatible with your TV (you can check it by searching for the TV model on the manufacturer's website and checking its specifications).
- Copy the video file to your USB drive.
- Insert USB into TV.
- Select the USB channel on your TV.
- Use the TV file explorer to locate and play the desired video.
Hopefully with this article, you will get the fastest way to connect a laptop computer to a TV .
Above is a share of TipsMake about steps to make the connection from Laptop to TV via Wifi. Hopefully the instructions in this article are somewhat helpful for you in setting up a connection from TV to Laptop easier .