3 ways to customize menus and toolbars in LibreOffice
One of the great things about OpenOffice software like LibreOffice is its customizability. You can choose the position of buttons, create custom menus, rename tools, and even replace icons..
Keep reading to learn 3 ways to customize LibreOffice menus and toolbars.
1. Customize content
By default, LibreOffice organizes tools between three places. The first are the toolbars, which can be attached to the edges or left in a free position. The second is the sidebar, which can be attached to the left or right side of the window or float. Finally, the menu bar, which is always at the top of the window.
You can edit menus and toolbars by going to Tools > Customize. From here, you can change many different types of menus. Each has its own tab:
- Menus has options to change the drop-down options in the Menu Bar.
- Toolbars are where you change the tools in the toolbar. These changes apply whether the toolbars are free-standing or docked.
- The NotebookBar allows you to change the toolbar options in the Tabbed User Interface preferences. This option is more similar to the Microsoft Office Ribbon menus.
- Context Menus are menus that appear when you right-click specific targets.

After selecting the part you want to change, you need to select the subsection. For example, if you are editing the Menu Bar, you need to select the menu or submenu from the Target drop-down menu.
Next, select a tool from the menu on the left and click the arrow pointing to the right to add it to your target menu. The tool will appear directly below any selected item in the target menu. You can add sectioning panes using the Insert option below the target menu. You can move a tool in the menu by selecting it and using the up/down arrows to the right.
2. Create a new menu or toolbar
Creating a whole new menu can be a good idea if you have a bunch of tools you use together. For example, you can create a toolbar to take notes or edit PDF files in LibreOffice Writer.
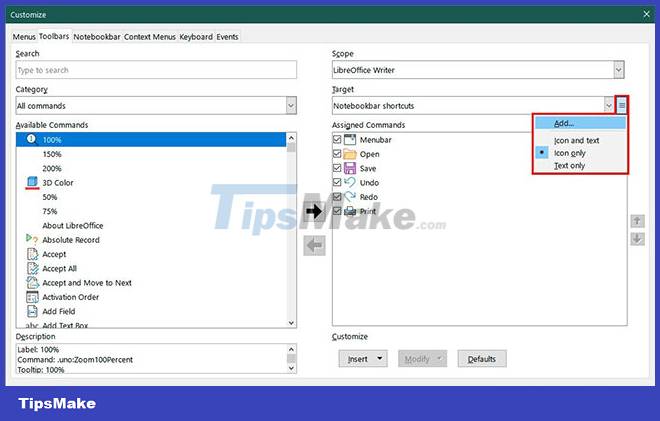
Open Tools > Customize and select the tab for the type of menu or toolbar you want to add. Once selected, click the hamburger icon (three horizontal lines). You'll see it next to the Target drop-down menu. Select Add from the options.
Name your new menu or toolbar, then reopen the hamburger menu. Choose whether your menu will show icons and text, icons only, or text only. The text option will display the name of the tool.
Then you can start adding options. Your new menu or toolbar will appear immediately when you're done.
3. Change tool name and icon
 Change tool name and icon
Changing names and icons can help you make your interface more visible. For example, if you find a tool name confusing, you can change it to be more specific.
To rename an option:
Step 1: Find it in the Tools > Customize menu on any tab.
Step 2: Select it, then click Modify > Rename from under the Target menu.
Step 3: When the dialog box appears, enter your new name.
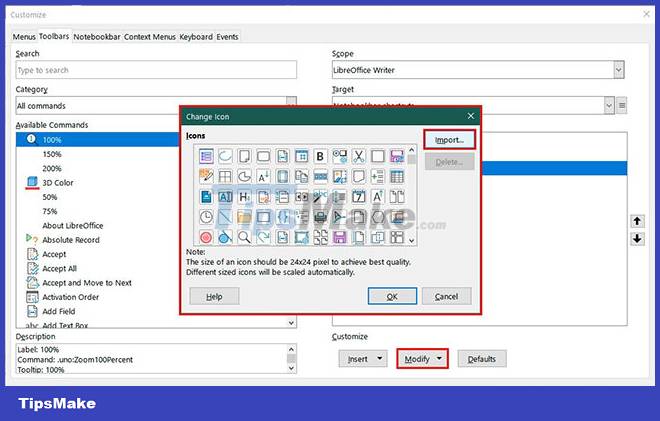
To change the icon, choose Modify > Change Icon. From there, you can choose the icons that come with LibreOffice or import a new one. New icons should be 24×24 pixels, with no excess at the edges.
You can also download a complete set of matching icons. Go to Tools > Options and choose LibreOffice > View from the menu on the left. LibreOffice comes with several options. You can also download more using LibreOffice extensions. You can then click Apply to save your changes.